Introduction
DNS stands for Domain Name System. In a nutshell, it’s used to point a website domain towards the IP address of the server where it’s hosted.
There are many different types of DNS records, but to use your website/s with vCanopy, you will need to be familiar with two: The A Record and CNAME Record.
The short video by Ryan Schacht below offers an excellent introductory overview:
NOTE
We've had reports of an SSL failing due to the DNS provider auto adding an AAAA record pointing to their own hosting servers. AAAA records are for IPv6 addresses and these are not necessary for vCanopy. You can delete them when you're ready to set your DNS records to point to your vCanopy servers.
Part 1: A and CNAME Records
A RECORDS
“A Record” stands for “address record” and it’s used to point a domain name to an IP address.
When someone types in your websites domain name into their browser, the A Record let’s the browser know where the website files and data are hosted.
CNAME RECORDS
CNAME stands for “canonical name” and it’s used to map one domain to another. This is used so that only one A record requires updating anytime you make a server change that would affect multiple records such as “www”.
For example, by setting the “www” as a CNAME, “www.exampledomain.com” will use the IP address of the root “exampledomain.com” automatically.
Part 2: DNS Records and vCanopy
vCanopy offers staging and update sites (aka canary websites) for each of your WordPress websites. Only the staging site requires its own A record/CNAME. Below is an example to illustrate what these look like: –
- Primary website: example.com
- Staging website: staging.example.com
If you don’t setup DNS records for the staging subdomain, your browser has no way to tell where they are hosted and will return a “This site can’t be reached” message.
Below is an example of how an A record and CNAME for your primary website and staging website will look:
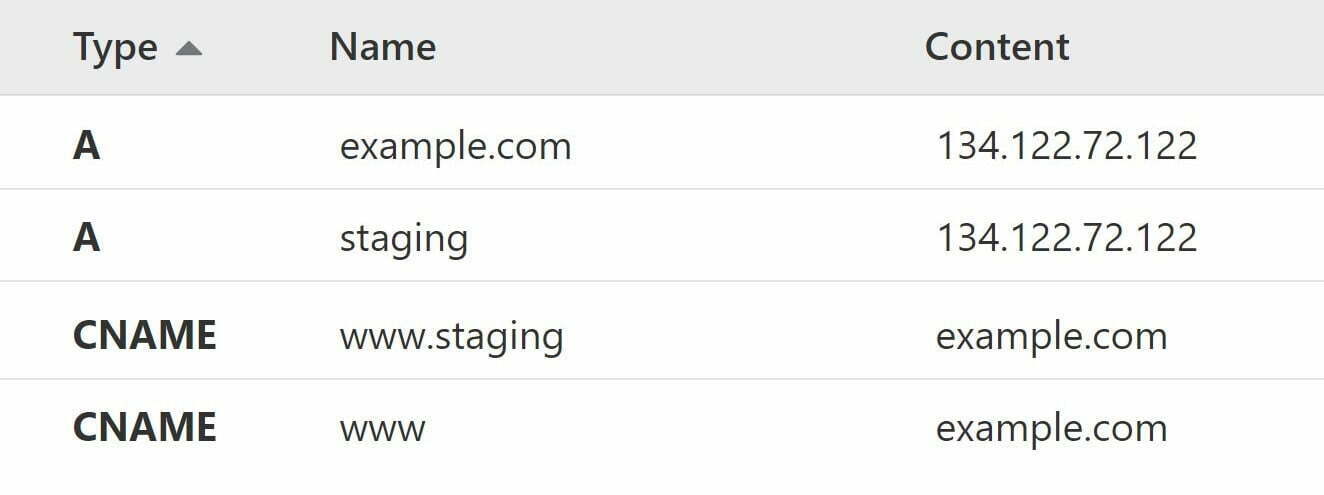
In your case “example.com” would of course be your own domain name.
Editing your DNS records
If you’re not sure how to find and edit your DNS records then usually a Google search for “how to edit DNS records” plus the name of your registrar will quickly help you locate their specific knowledgebase article.
E.g. “How to edit DNS records Godaddy”
If you’re unable to locate their specific instructions then we’d recommend reaching out to their support directly. They should be able to send you the information you need.
Part 3: DNS Made Easy and Cloudflare Integration
Most PaaS Cloud VPS providers include DNS management as part of their platform, the same is usually true for your domain registrar.
While these solutions may be adequate in most situations, there is a lot to be said for using a specialist DNS provider. As with every aspect of your technology stack it is generally considered best practice to separate concerns and use different specialist services for each component. This will provide greater resilience, is more secure, and when using service APIs is often more convenient.
vCanopy has built in integration with DNS Made Easy (DNSME), one of the leading managed DNS providers, and CloudFlare.
Learn how to setup DNS Made Easy here:
Using DNS Made Easy (DNSME) with vCanopy
Learn how to setup Cloudflare here:
Part 4: Changing DNS Records inside your vCanopy account
NOTE
This will only be available if you have integrated Cloudflare and/or DNS Made easy as laid out in Part 3.
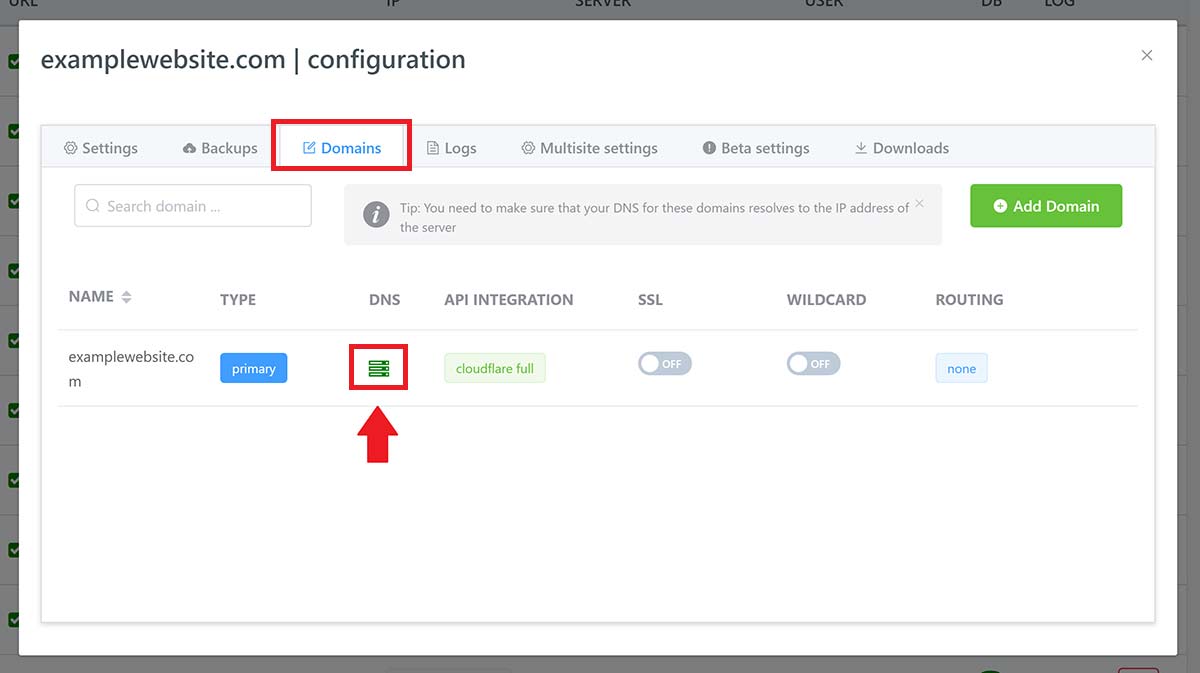
To change DNS records on a website that’s integrated with either Cloudflare or DNS Made Easy, click on the website you wish to edit to open the configuration modal and click through to the Domains tab.
Here click on the server icon as shown in the image below to bring up the DNS editor.
Here you can edit the following: –
- A Records
- CNAME Records
- TXT Records
- NS (Nameservers)

For vCanopy purposes, you’ll only need the A Records and CNAME Records.
If you’ve added a new domain and selected an API Integration before the build process, vCanopy will automatically set up your records for you inside your Cloudflare / DNS Made Easy account.
To edit this in the future, you can click into either A records or CNAME records, make your edits and save, and vCanopy will update these via API.
When clicked on, A Records will look like this: –
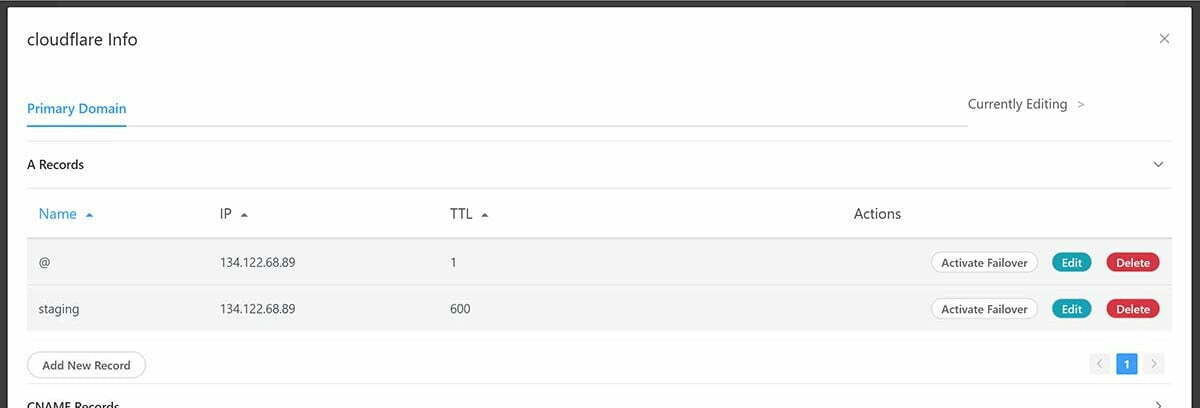
Note: “@” is for the root domain, e.g. examplewebsite.com.
CNAME Records will look like this: –
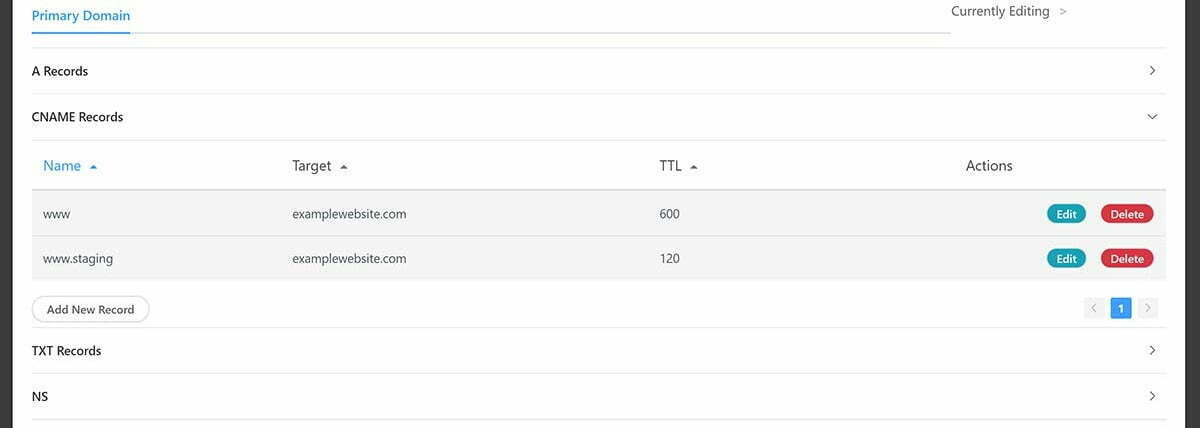
As staging websites are on the same server you can either point them to the root domain or you can point them to the matching subdomain – both will work.


