TABLE OF CONTENTS
Introduction
In the world of WordPress there are many different performance optimisation best practices, and innumerable plugin based caching solutions.
But Nginx comes with FastCGI caching built in, and no plugin based solution will ever match the performance of Nginx server based static asset and page caching.
With vCanopy’s highly optimised Nginx FastCGI caching, even if PHP fails your site will still be served from the cached resources until they expire. But increased speed is only half the story, the true power of Nginx FastCGI caching lies in its ability to serve your sites under incredible loads, the sorts of loads where the bottleneck becomes I/O restrictions and not server CPU/Memory resources.
FastCGI Caching is incredibly powerful.
Platform Documentation
Microcaching is a caching technique where content is cached for a very short period of time. It's an effective method for accelerating the delivery of dynamic, non‑personalized content by caching it for very short periods of time.
Source: The Benefits of Microcaching with NGINX
vCanopy FastCGI employs microcaching with a TTL of 1 second. The above article is a great resource for learning more about the topic and seeing it's effectiveness in ta real world case study.
FastCGI: Best Use Cases
FastCGI is perfect for websites with high concurrent traffic (where it has an edge over Redis Nginx Page caching), and it’s also ideal for websites where content regularly changes. For example, popular blogs and news websites that regularly publish new content and/or have active comments, or forums with publically accessible content.
In these cases, microcaching is perfect as it will update the cache in the background each time a visitor loads a page, ensuring that all future visitors are served with the latest content.
For most other use cases where your site traffic isn’t thousands of concurrent visitors hitting your website at the same time, and your content is fairly static, Redis Nginx Page Caching may be a better fit and is what we recommend for most websites.
1. Enable Nginx FastCGI Page Caching
You can enable FastCGI caching and change the cache TTL inside your websites customizer.
ENABLE FASTCGI CACHING
Click on your domain name on your Sites page panel to open the Site Customizer:

Click through to the Caching Tab and here you can activate FastCGI caching by clicking the toggle:
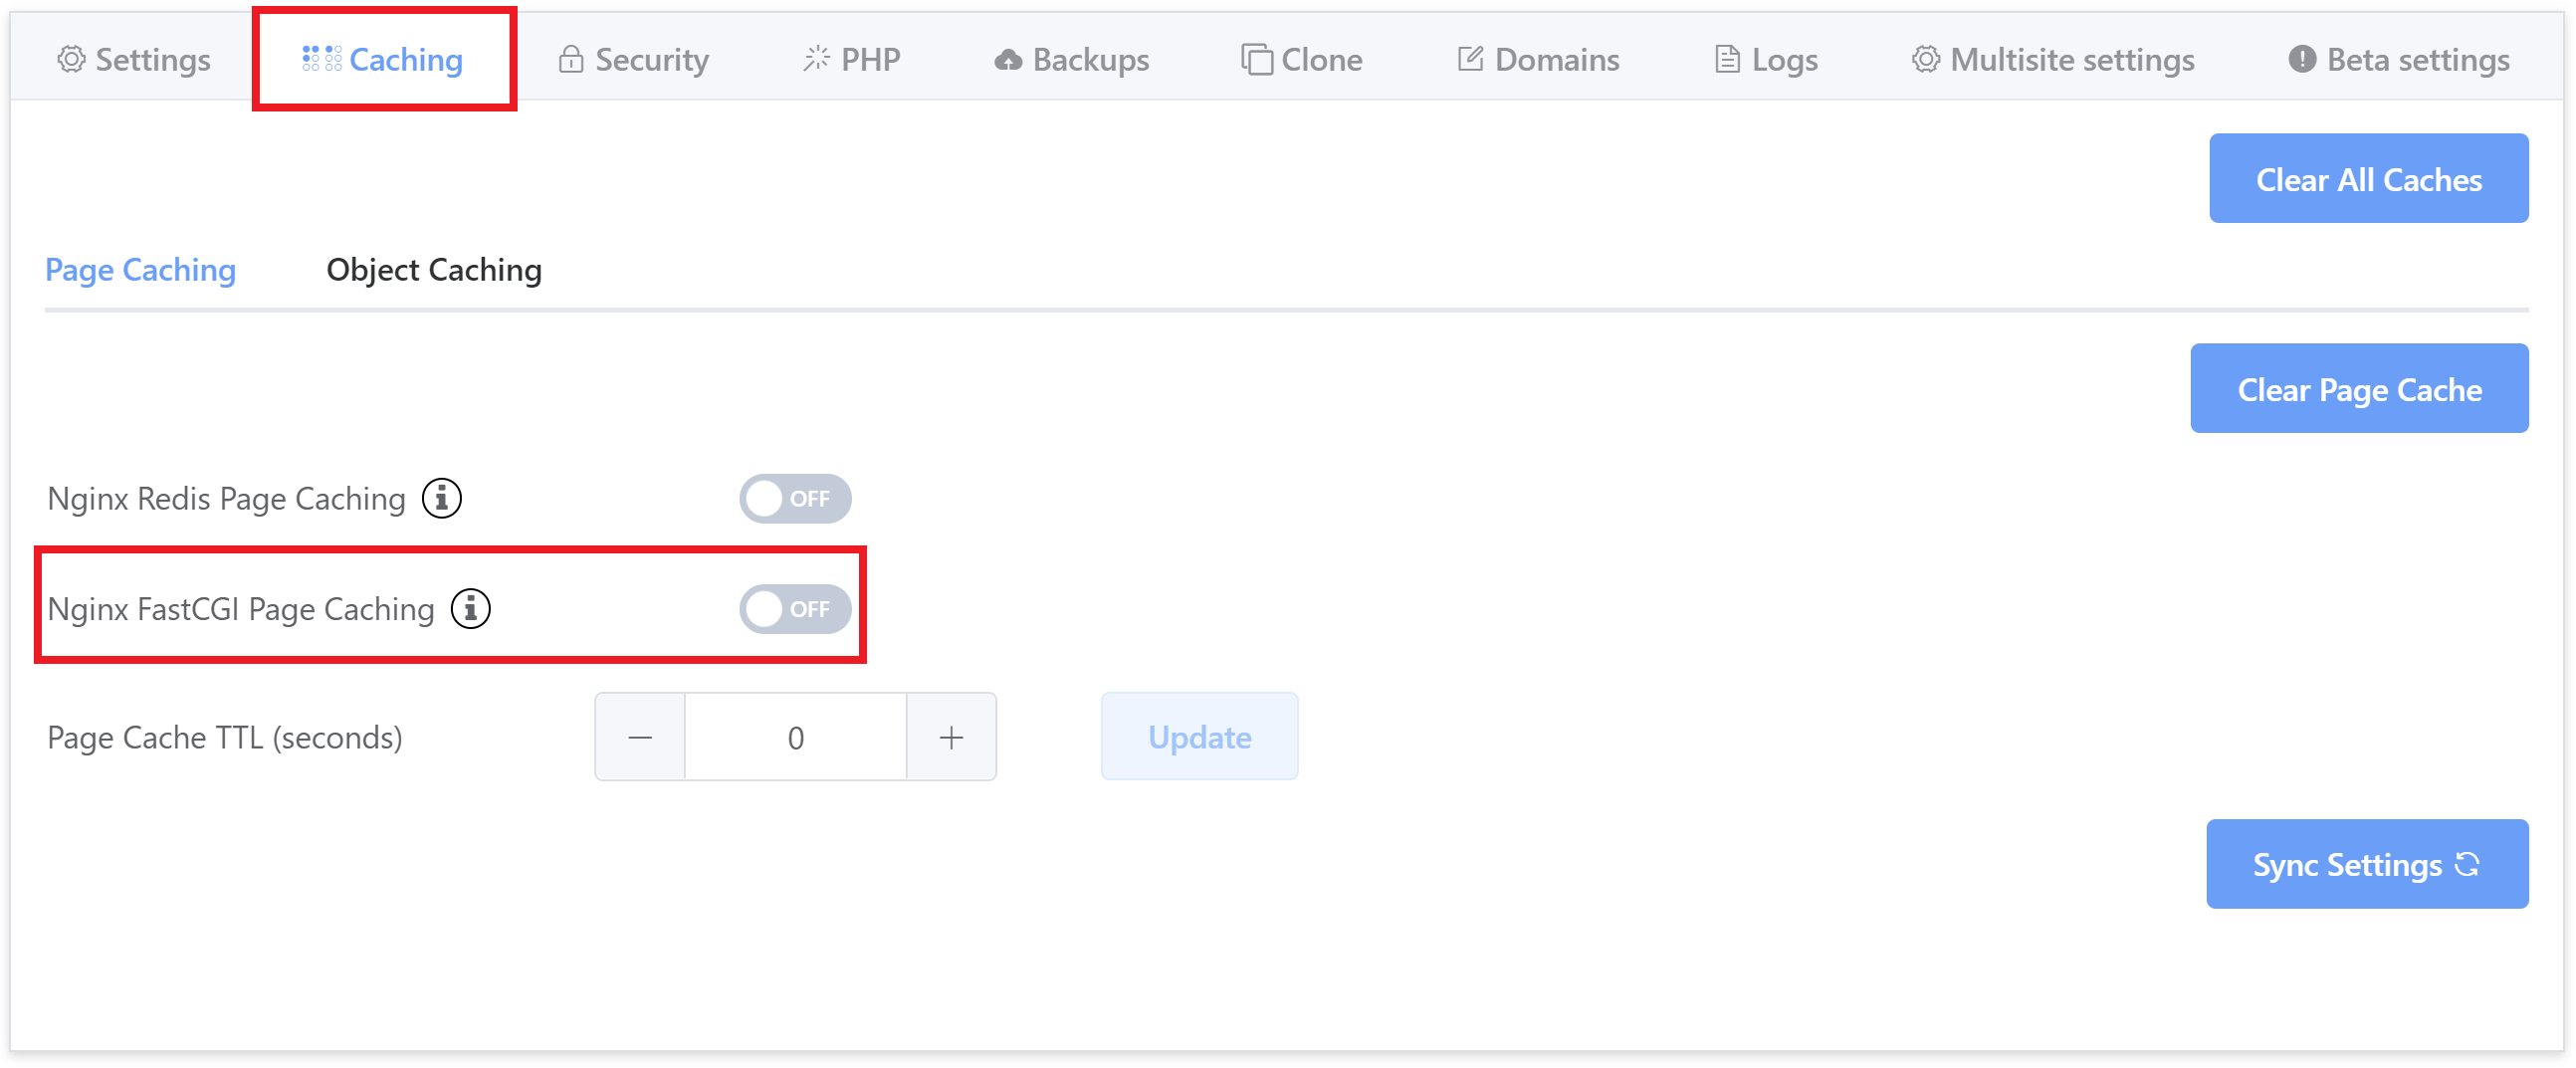
Your site will now have Nginx FastCGI Caching enabled with vCanopy custom configurations.
ADJUST CACHE TIME TO LIVE (TTL)
You can also change the caching TTL by changing the number [in seconds] and clicking Update:
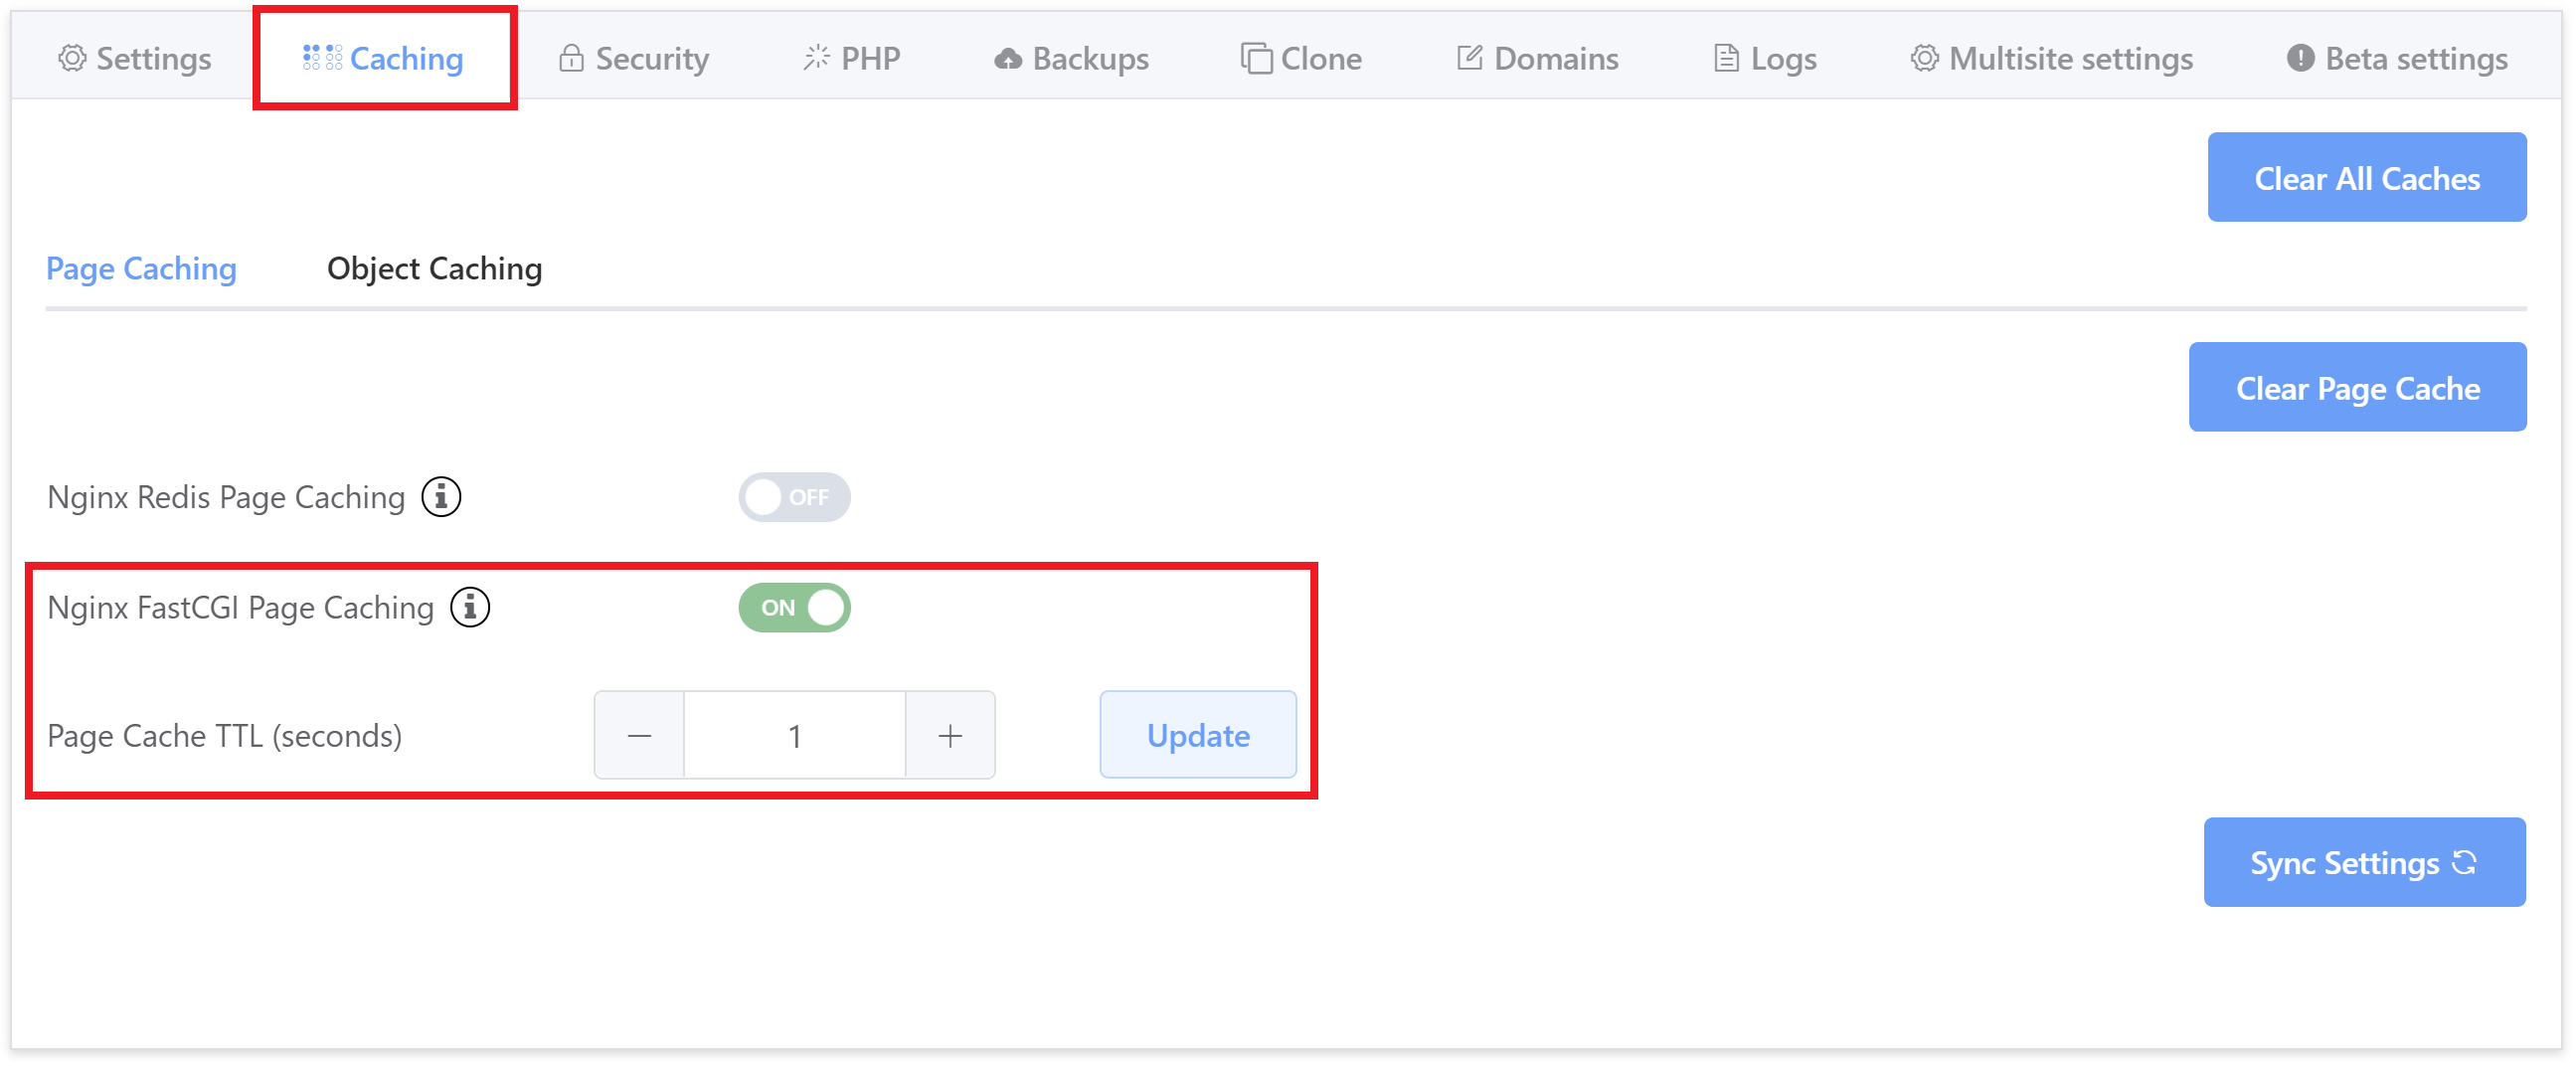
Time to live (TTL) is the time that your page is stored in a caching system before it’s deleted or refreshed. The default setting for FastCGI Page caching is 1 second (though if you’re switching from Redis Page Caching you will need to reset this time manually).
After this time, the cached page will be served as “STALE”, which is still from the cache, but will then update in the background if any changes have been made since then.
CONFIRM CACHING IS ACTIVE
If you visit your site and check the response headers using the site inspector you will see that caching has been enabled.
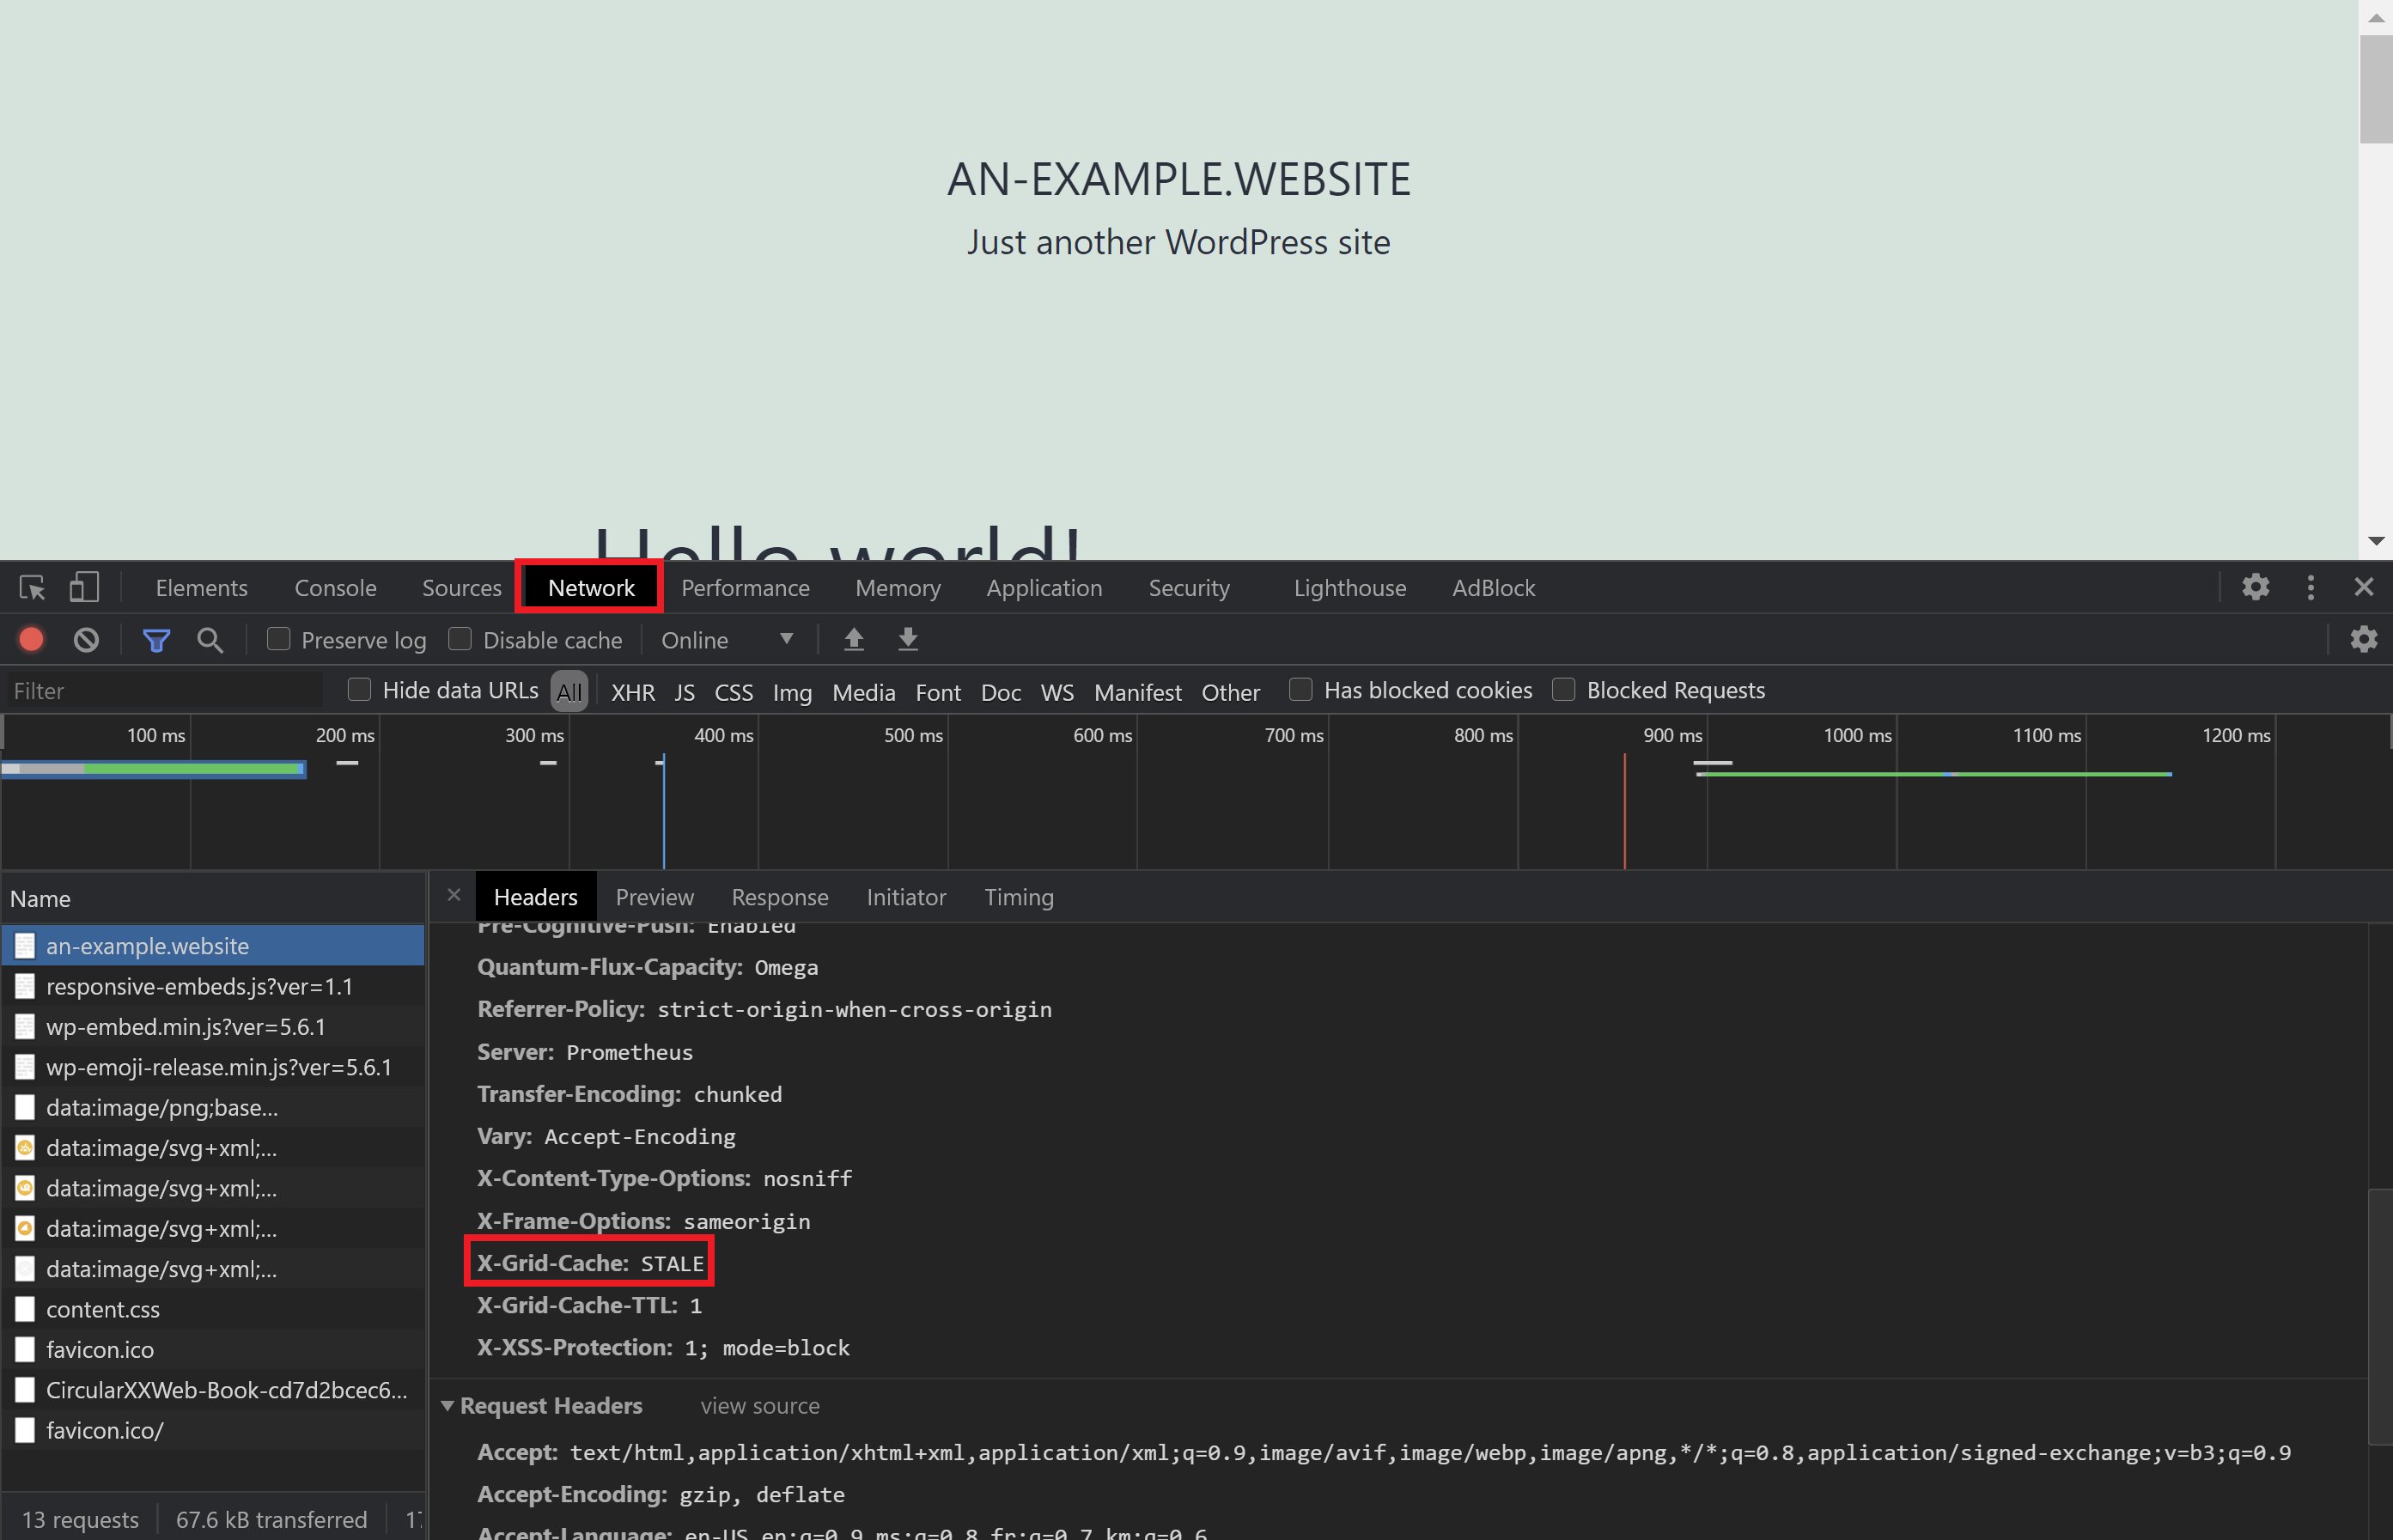
Note: “STALE” still means a cached page is being served, and it will also update the cache in the background if changes have been made to the page. Getting a “HIT” with FastCGI is going to be difficult due to the TTL of 1 second. More details below in Part 3.
2. Enable FastCGI Cache Purging
Nginx FastCGI cache purging is one of the premium features of the Nginx Plus platform but, as is usual with the open source community, a resourceful community member has stepped into the gap and provided an invaluable asset to enable cache purging on the FOSS version of Nginx.
Most platforms have their Nginx stack compiled with the FRiCKLE ngx_cache_purge module for this, however this version of the module will only allow complete purging of a sites Cache on single user stacks where the PHP user and the Nginx user are the same.
The vCanopy stack uses the Torden Fork of the ngx_cache_purge module alongside custom configurations and our custom WordPress plugin. This means the vCanopy multi user server management platform has fully functioning Full Nginx Cache Purging out of the box. We are the first and currently the only platform to offer this feature out of the box, but we have also open sourced it so expect it to become standard in the near future.
Fully functioning FastCGI Cache purging requires two plugins, Nginx Helper and vCanopy Nginx Cache Purger (catchy!), both of which will be auto-installed and activated on your site when you enable vCanopy FastCGI Caching.
You will find them available under the Settings of your WP Admin.
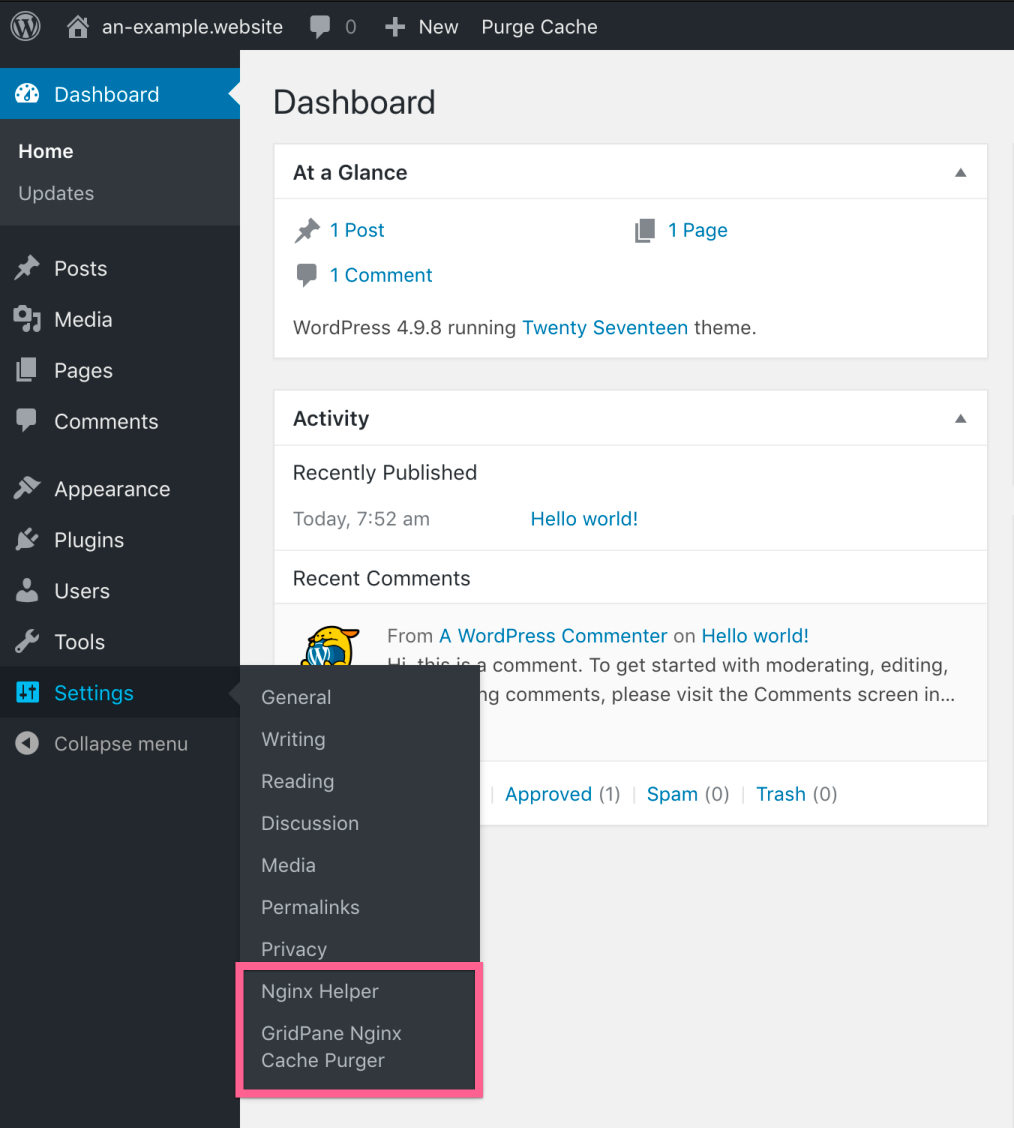
2a Configure Nginx Helper Plugin for Incremental Cache Purging
This plugin allows for the incremental purging of your sites cache when you update content, such as posts, pages, comments etc. The plugin has been installed, but you need to configure it to suit your specific purge requirements.
You will need to check Enable Purge, select nginx Fastcgi cache and the default Using a GET requess to PURGE/url option.
Under Purging Conditions you should select what content you would like to trigger the purging and updating of cache.
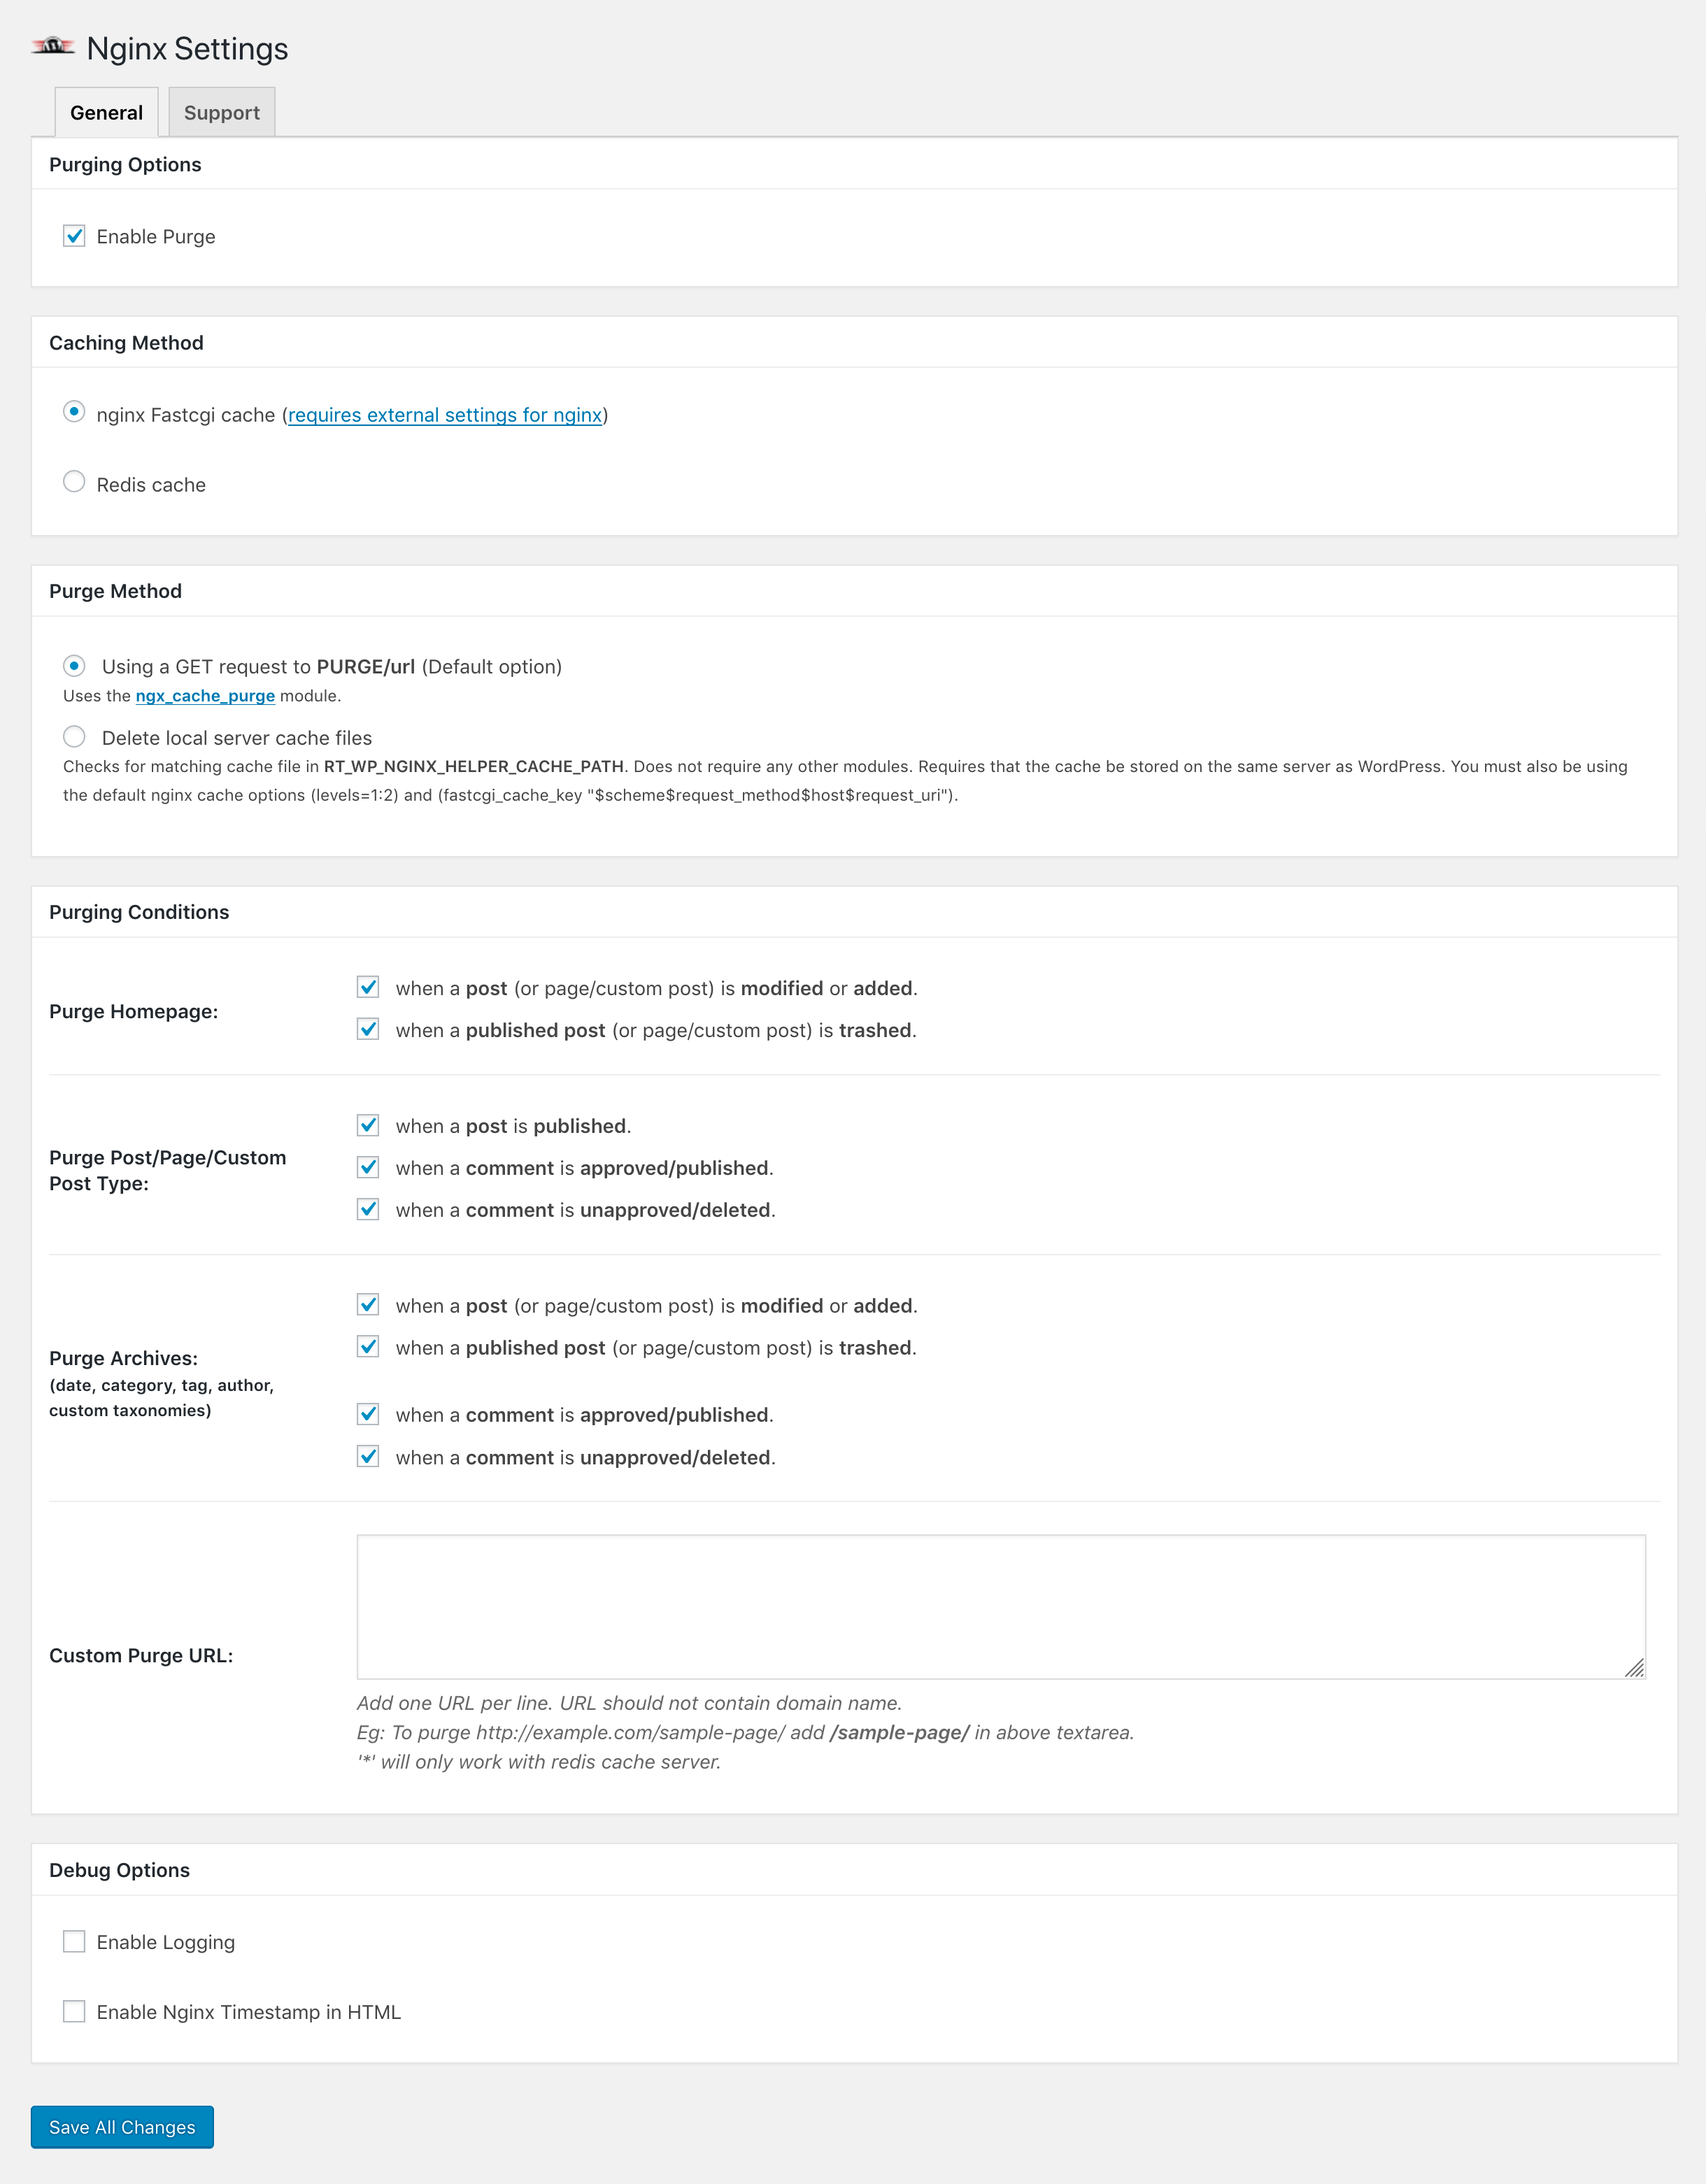
Click Save All Changes when you have configured the options to suit your needs and now the cache will automatically purge outdated content as you update your vCanopy site content.
IMPORTANT – NGINX HELPER PURGE ENTIRE CACHE DOES NOT WORK
The Nginx Helper plugin was built for single-user server stacks. The plugin functions for purging the entire cache do not work with a multi-user stack like vCanopy.
The Purge Entire Cache Button Does Not Work

The Admin Bar Purge Cache Does Not Work
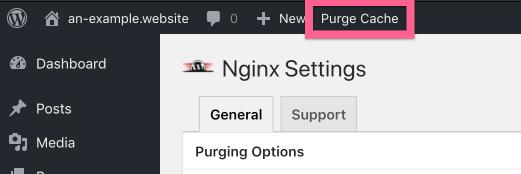
To purge the cache at will please see below.
IMPORTANT
If you switch from FastCGI to Redis Page caching or vice versa, make sure you also switch the caching method inside Nginx Helper plugin inside your website.
2b Use the vCanopy Nginx Cache Purger to Purge ALL site cache
Cache purging when content updates are great, but it will not be triggered when the site updates in other ways. For example, if you have been updating your site’s theme* and have new site assets, this will not trigger a cache purge.
*We do not recommend cowboy coding – we have a fantastically powerful one-click staging solution for your development workflow.
This is when you need the ability to Purge All the cache.
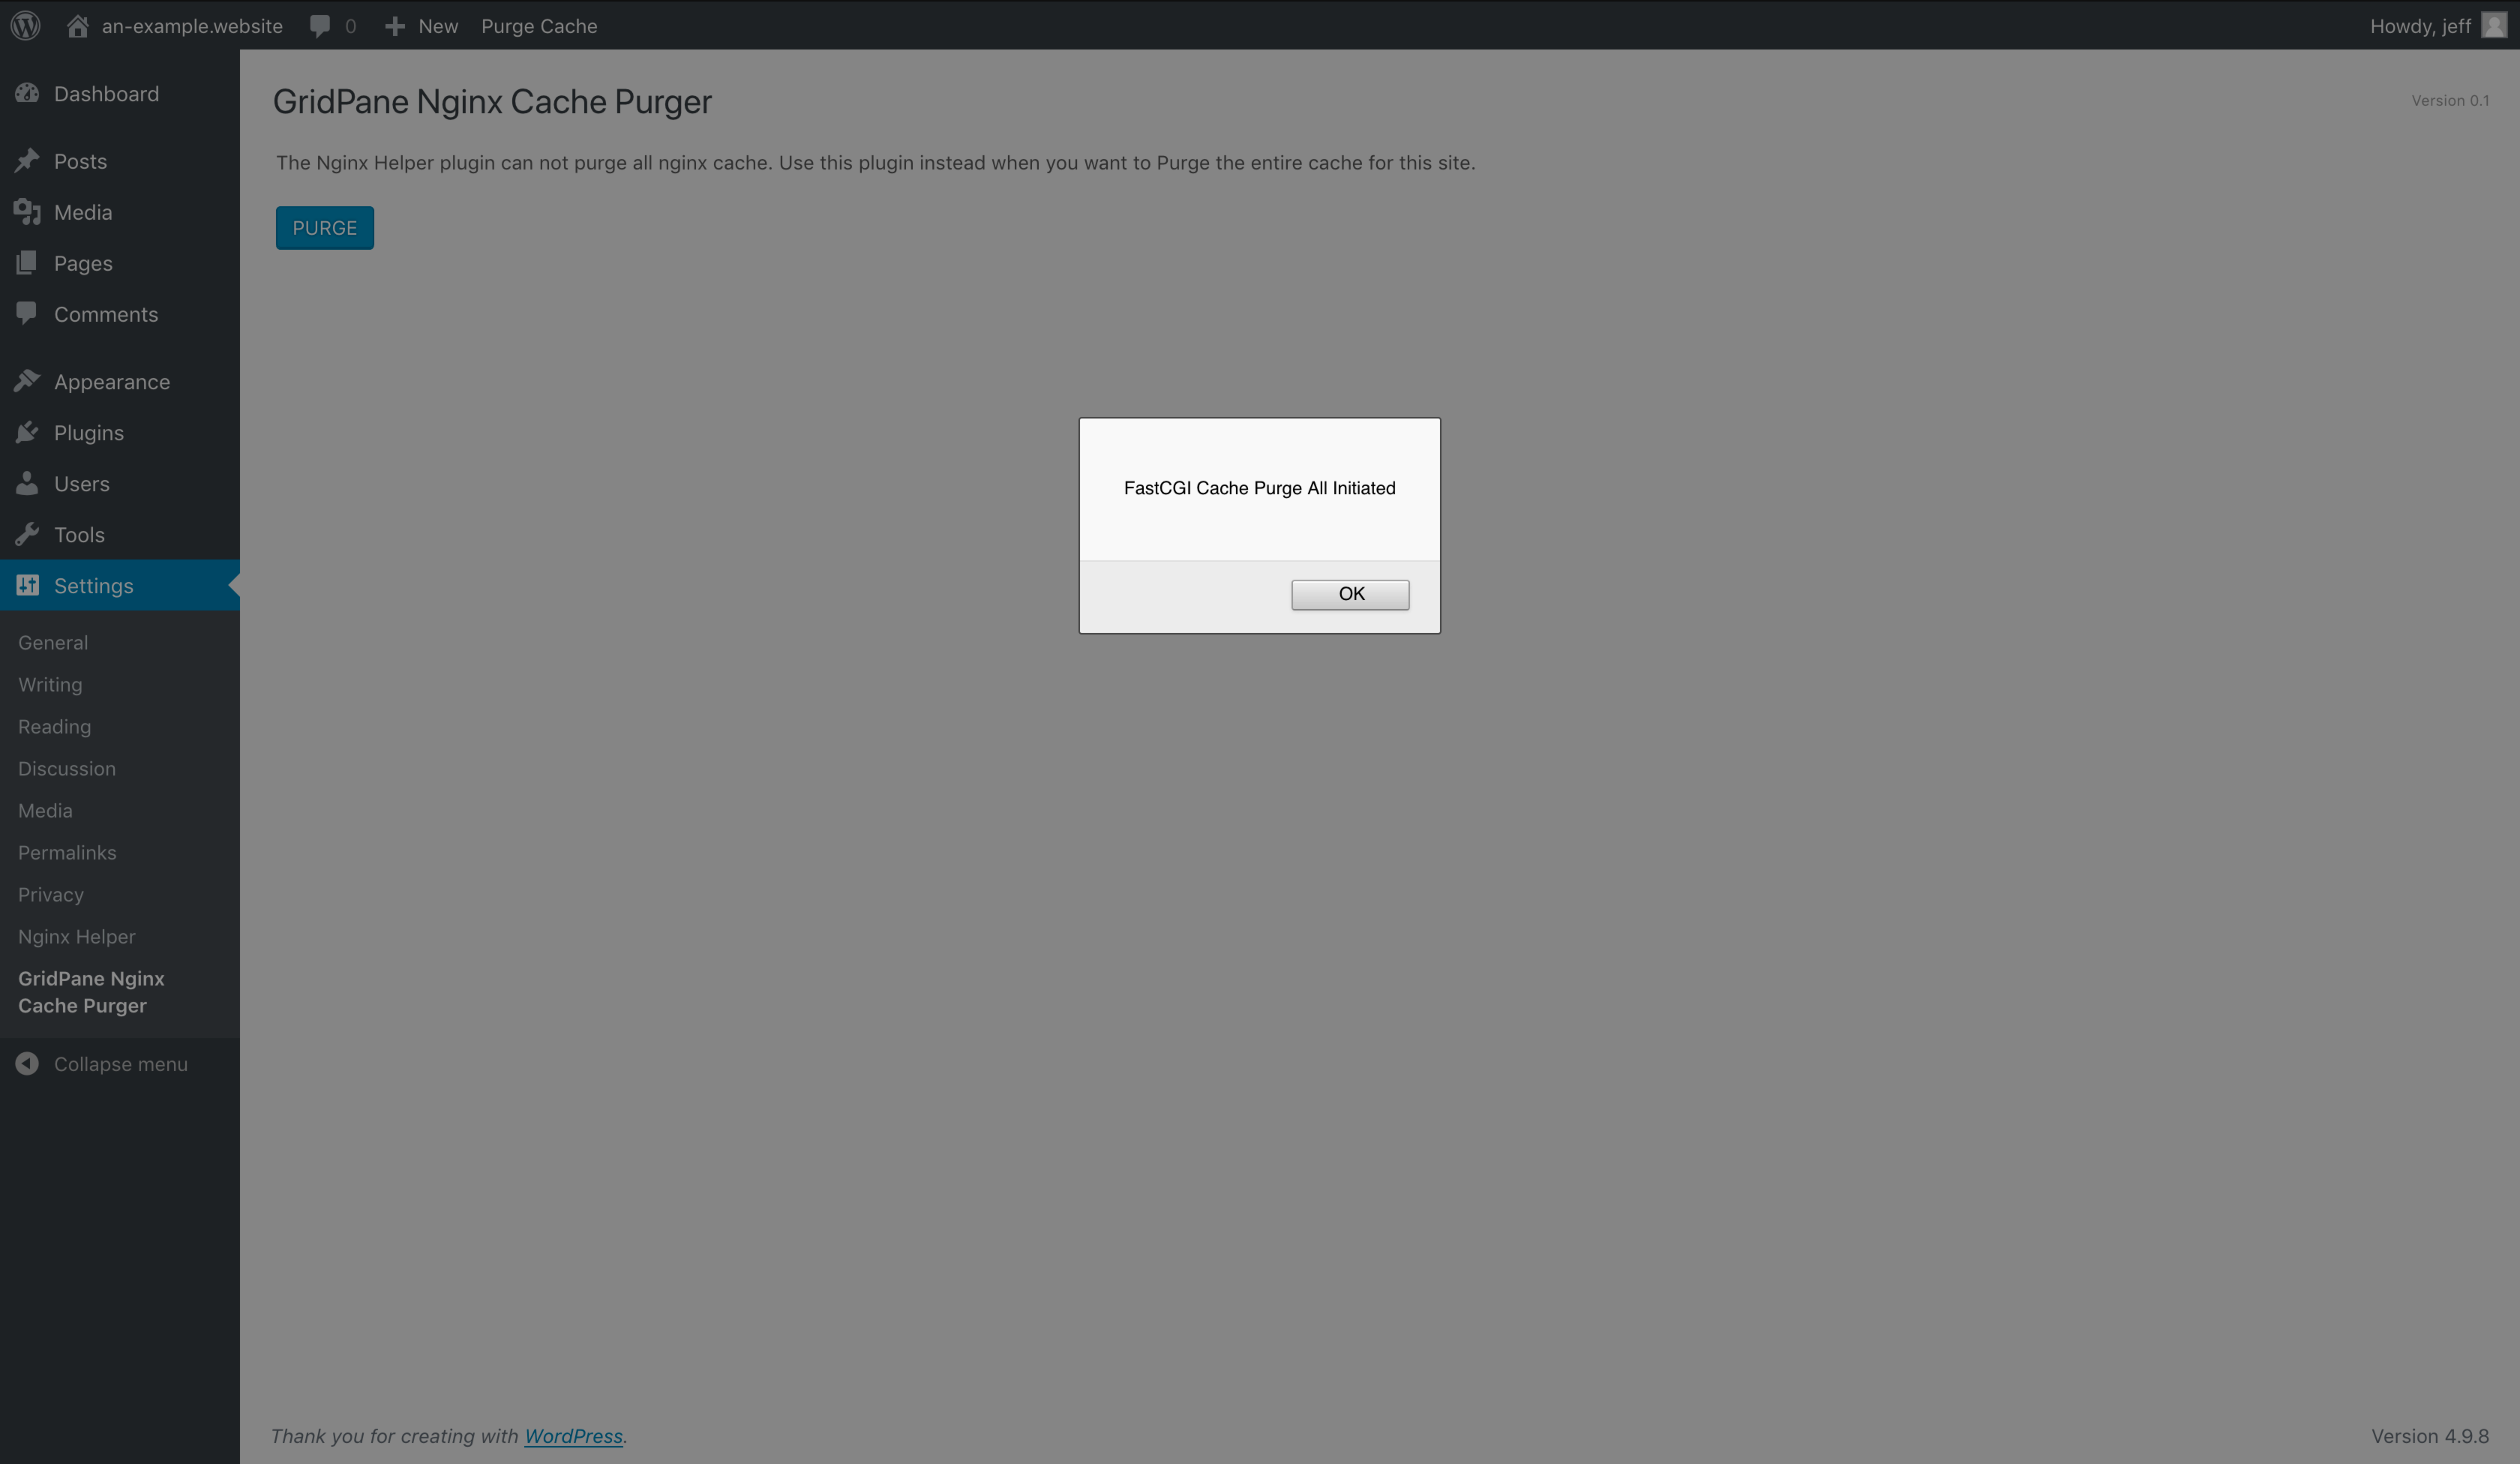
The plugin is very simple and does exactly what you think. When you want to purge all cache for your site, click the big blue Purge button.
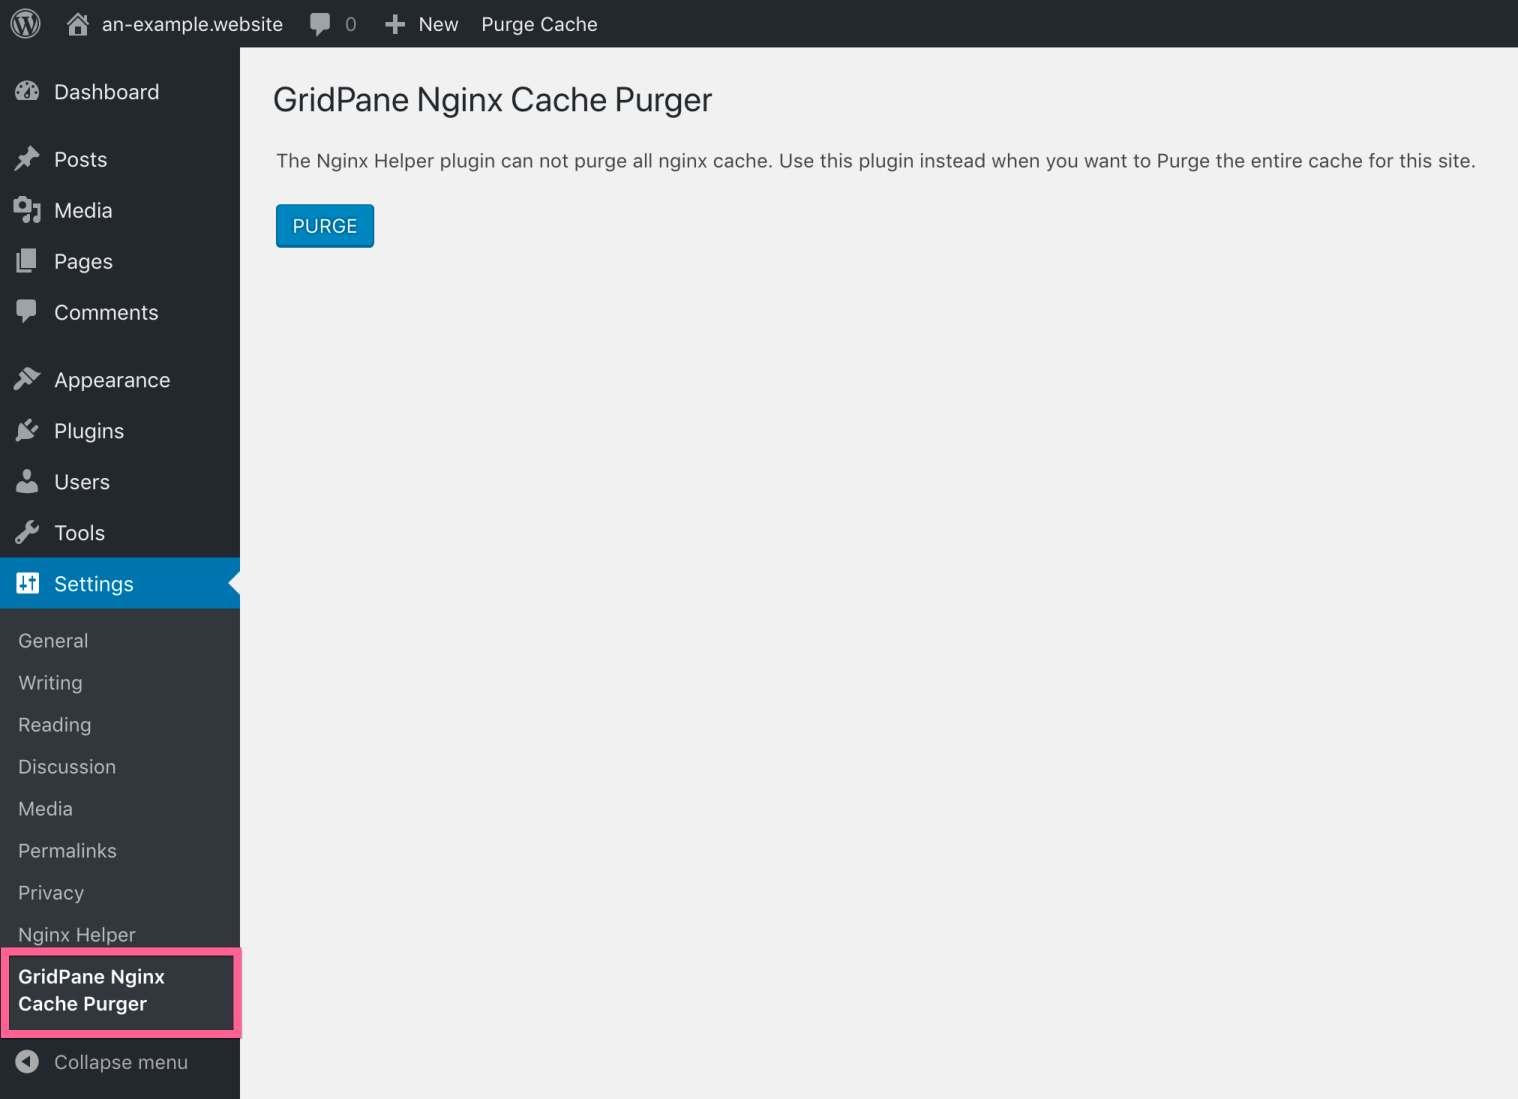
The cache purging will initiate and you will be greeted by a popup modal to let you know the plugin has done its job.
WHAT IF I DELETE THE NGINX HELPER AND vCanopy NGINX CACHE PURGER PLUGINS?
If you delete the Nginx Helper plugin, then the server will have difficulty clearing the cache on content updates, instead, you will need to use the vCanopy Tools to clear the cache.
You can always download and re-install the Nginx Helper plugin from the WordPress Org Repository at any time, this can be done directly from the plugins interface in wp-admin.
vCanopy only automatically installs the vCanopy Nginx Cache Purger plugin as an MU Plugin whenever you enable FastCGI caching. You can reinstall this plugin at any time by toggling caching off/on or if you like you can download it from the Github repo.
3. How to check if your page has been cached
First, open up your website in an incognito window. Next, right-click and choose “Inspect“, select the “Network” tab, and then reload the page. The result will look similar to the image below.
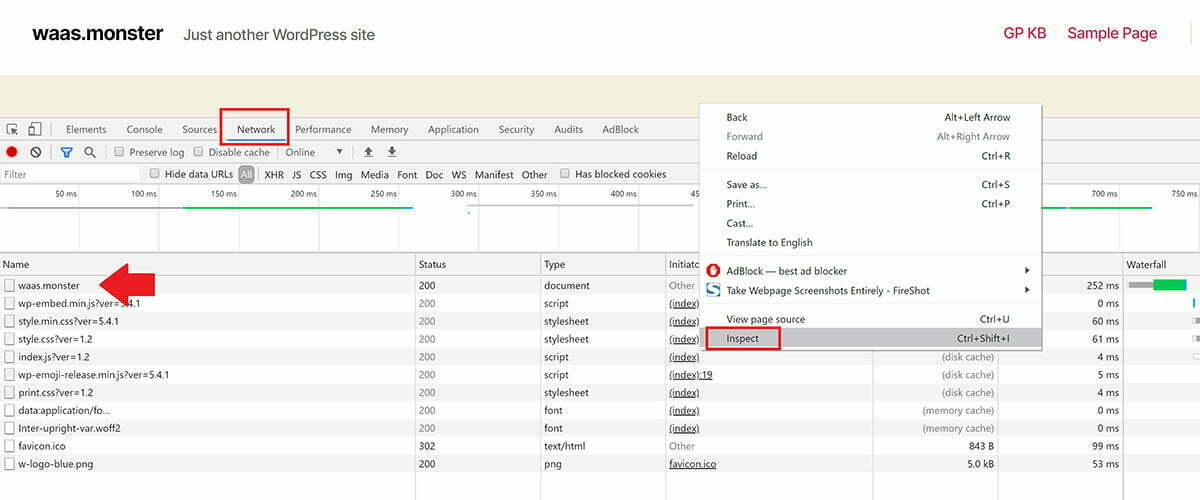
Click on your URL on the left-hand side to open up the box on the right, then down until you see the “Response Headers” section. If our caching is active you’ll see the
X-Grid-Cache
Next to X-Grid-Cache you’ll see a value of either:
HIT | MISS | BYPASS | STALE
HIT means the website is cached.
MISS means this page hadn’t been cached yet as it’s the first time it’s been visited since either the cache has been activated or cleared -on reload it should say HIT.
BYPASS means this page has been excluded and will never be cached.
STALE means your browser’s cache has expired. This will be common with FastCGI as the cache refreshes every second by default. This still means that caching is taking place on your server.
Here is what FastCGI Page caching looks like when turned on (on activating I got a value of MISS, but now the page has loaded, on reload I have a value of HIT as shown below):
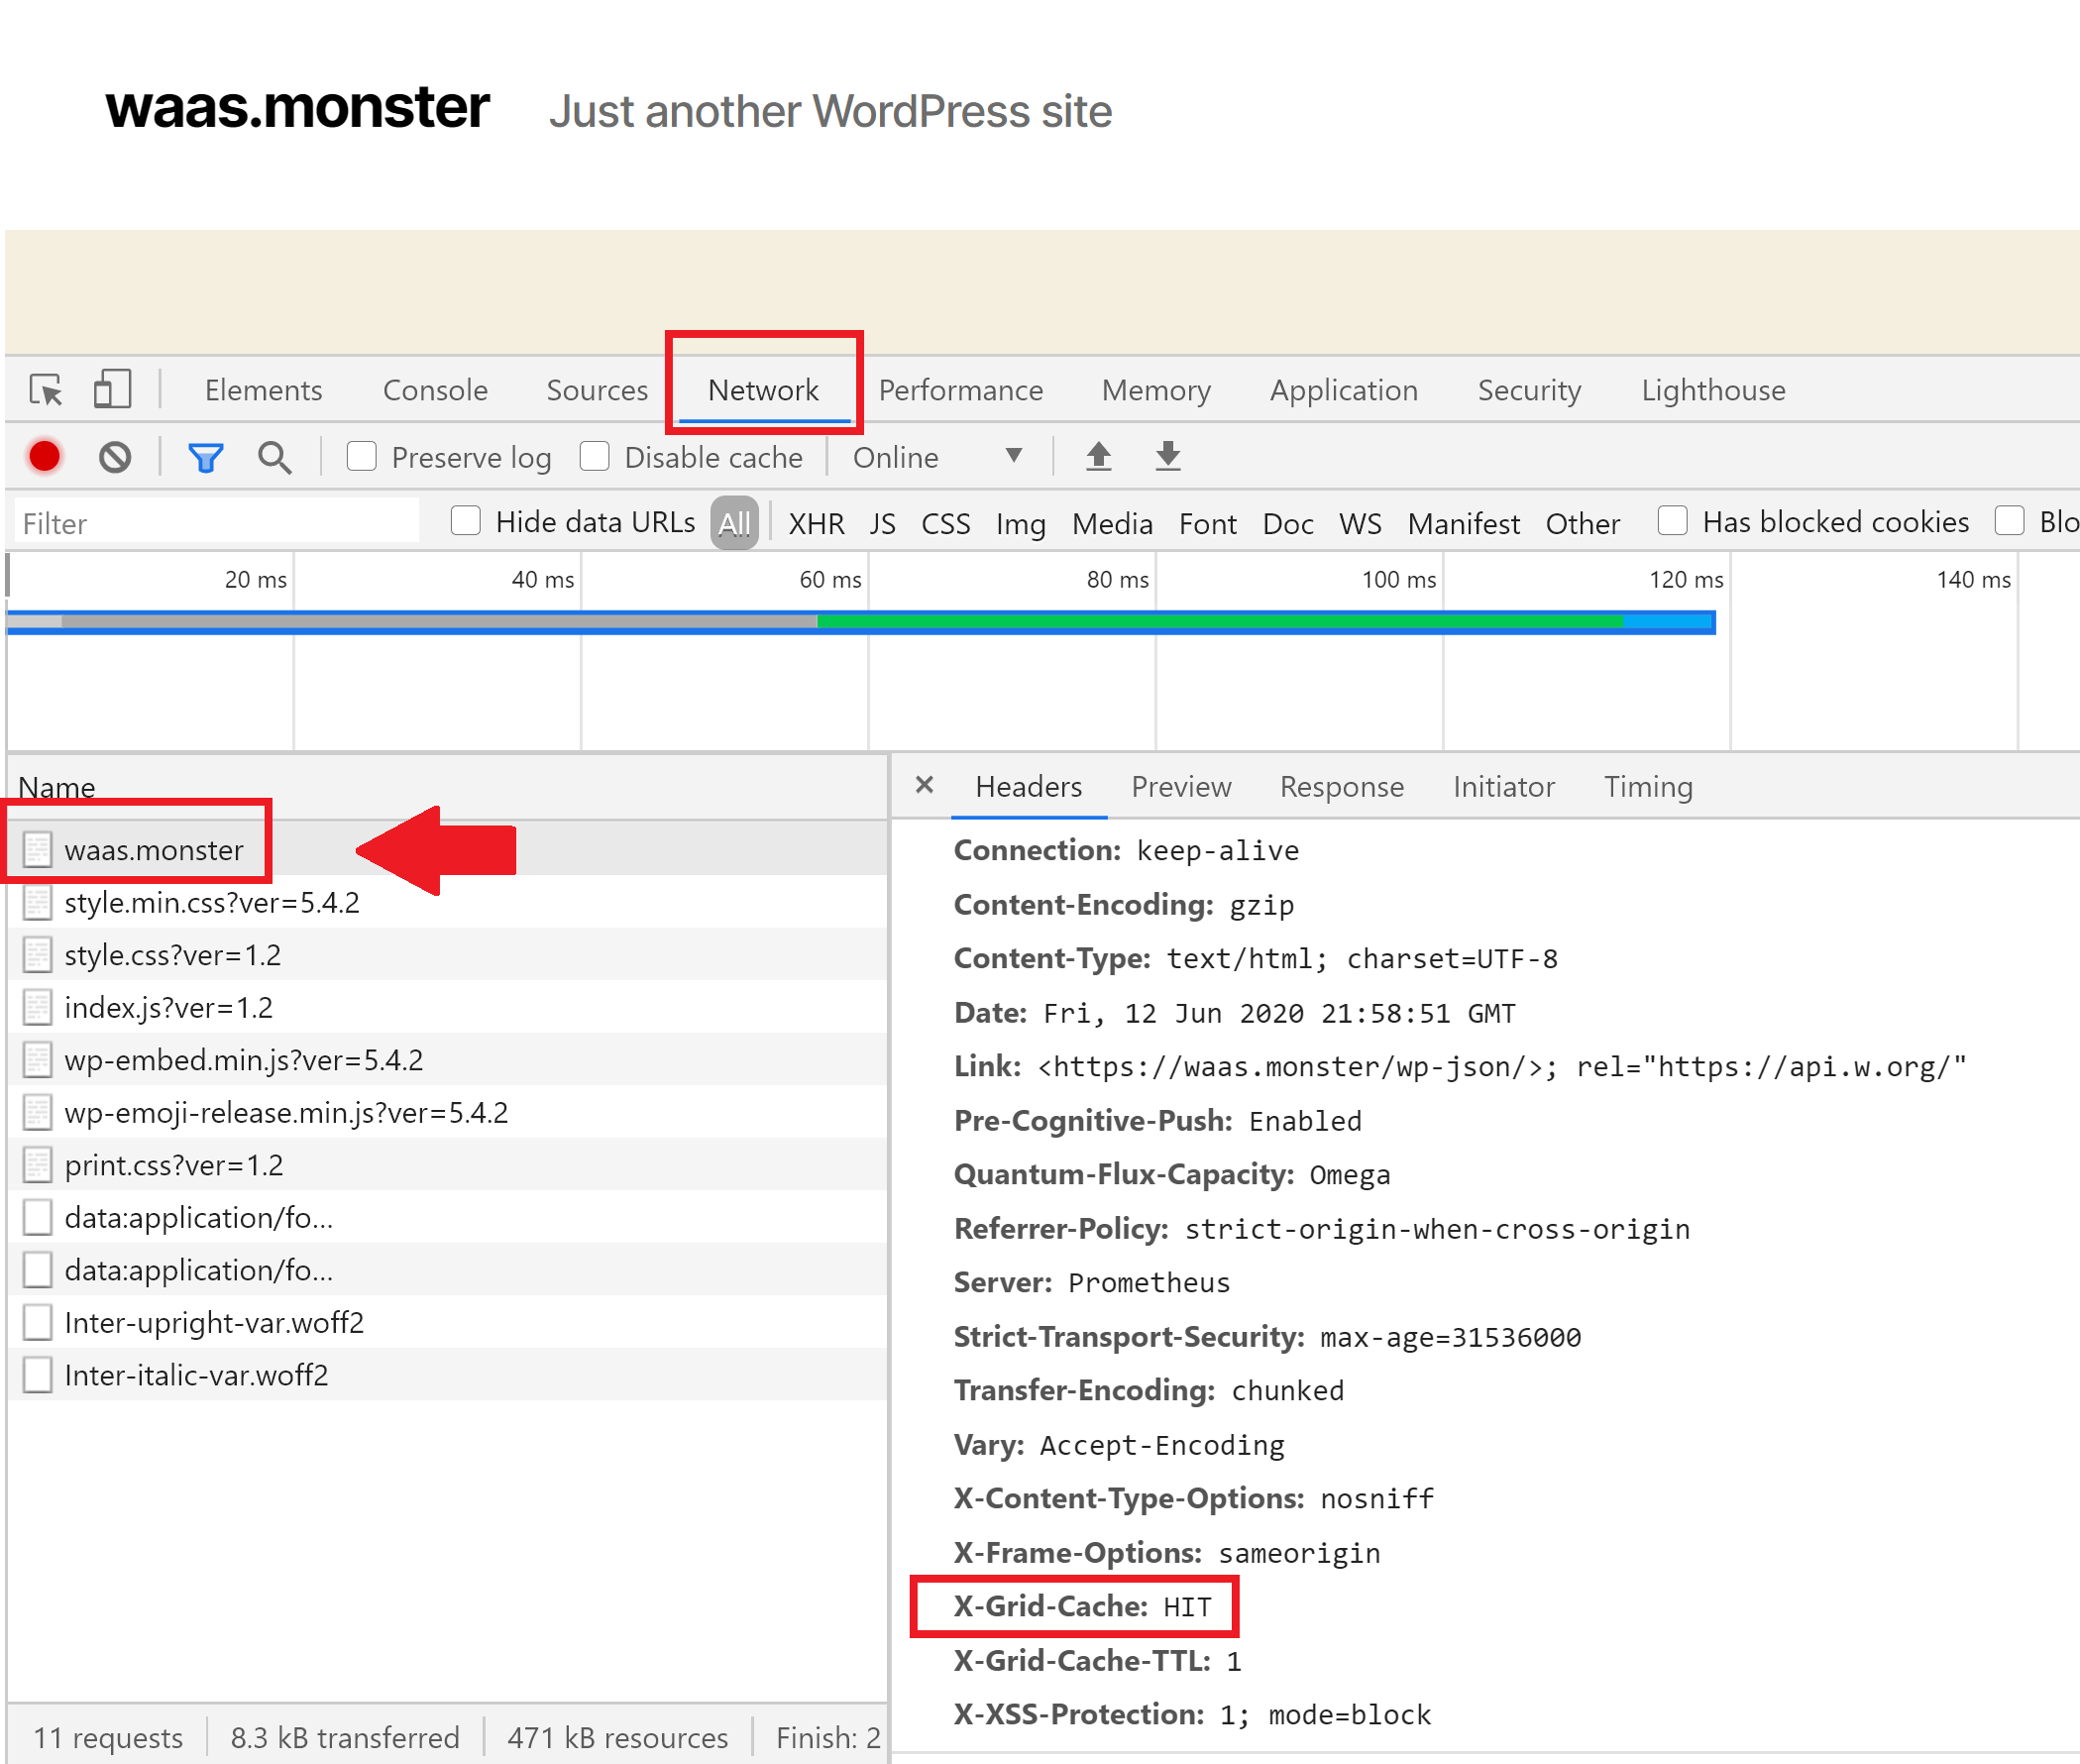
In the above image, you can also see X-Grid-Cache-TTL: 1.
TTL stands for time to live, and this tells your browser how long it should cache this page for. The number next to it is the time in seconds. By default, FastCGI is set to refresh every second, so in this case, we can see the number 1.
CACHING WON’T TAKE PLACE WHILE YOU ARE LOGGED IN
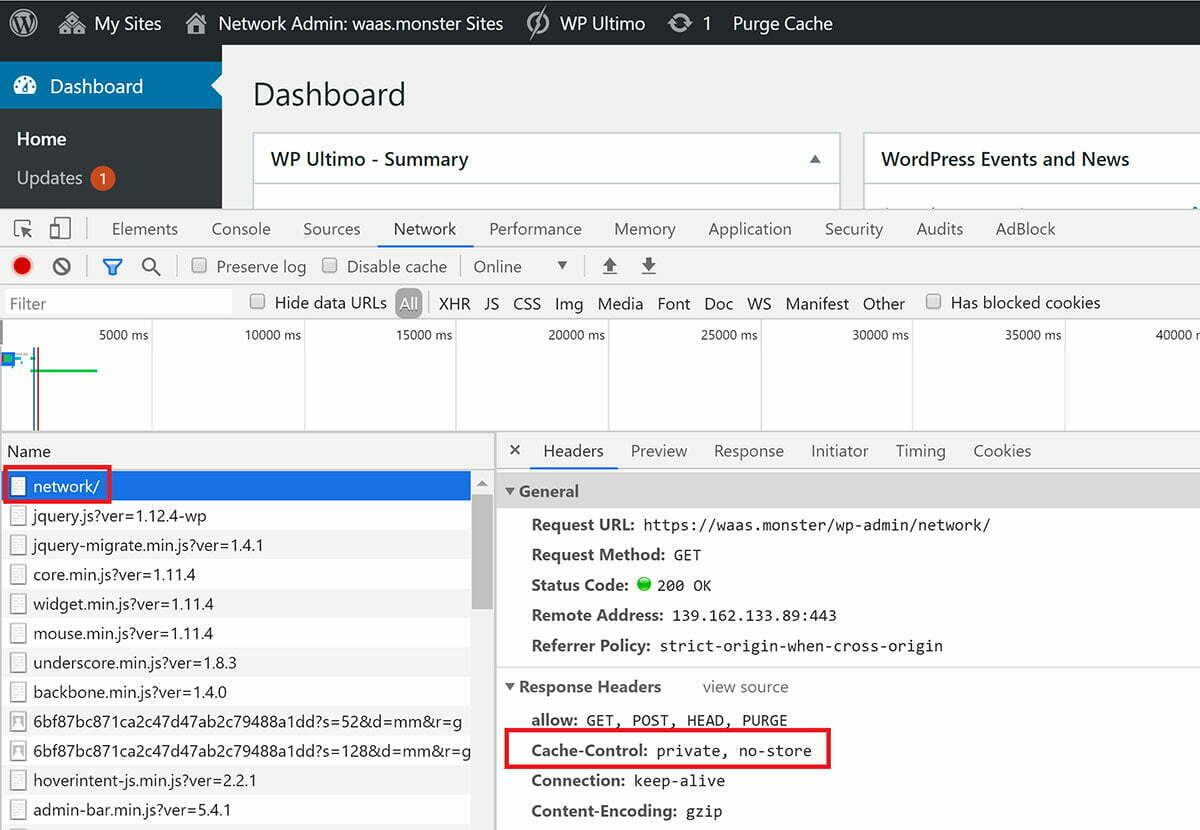
When logged into your website you will see that the cache is bypassed, and in your dashboard, you will see:
cache-control: private, no-store
This forces browsers and CDNs never to cache.
Nginx Cache Exclusions
By default we exclude certain common pages that should never be cached. You can learn more about what we exclude and how to make further exclusions in the following articles:


