IMPORTANT
Always be sure to check that your site is functioning correctly after implementing any kind of additional security, including the Cloudflare rules detailed in this article.
Introduction
Cloudflare offers an excellent (and easy) way to lock down and secure various endpoints on your WordPress websites, as well as offering a simple one-click DDOS protection measure should you ever come under a serious attack. In this blog post, we’ll take a look at a variety of different rules you could employ. Cloudflare’s free plan comes with the ability to add 5 rules, so you can choose the ones that will best complement your existing server and application-level security setup. These rules fall under 4 categories: Locking down endpoints, preventing spam, blocking bad bots, and country/continent-based blocking.
TABLE OF CONTENTS
- Creating a Cloudflare Firewall Rule
- Part 1. Country or Continent Blocking
- Part 2. Locking Down WordPress – Mass lockdown – Restrict access to /wp-admin/ and /wp-login.php
- Part 3. Prevent Spam – Block contact form spam – Block comment spam – 2 in 1: Block both form and comment spam
- Part 4. Block bad bots
You can also learn more about using Cloudflare’s firewall rules and what’s available per plan in their official documentation here: Cloudflare Firewall Rules Docs.
INFORMATION
The Cloudflare proxy must be active on your website for the firewall rules you set to take place. Please ensure that you set orange clouds for your A and CNAME records.
Creating a Firewall Rule
Creating Cloudflare firewall rules is quick and easy. Inside your Cloudflare account choose your website and then click through to the Security > WAF page. Here click the Create a Firewall Rule button.
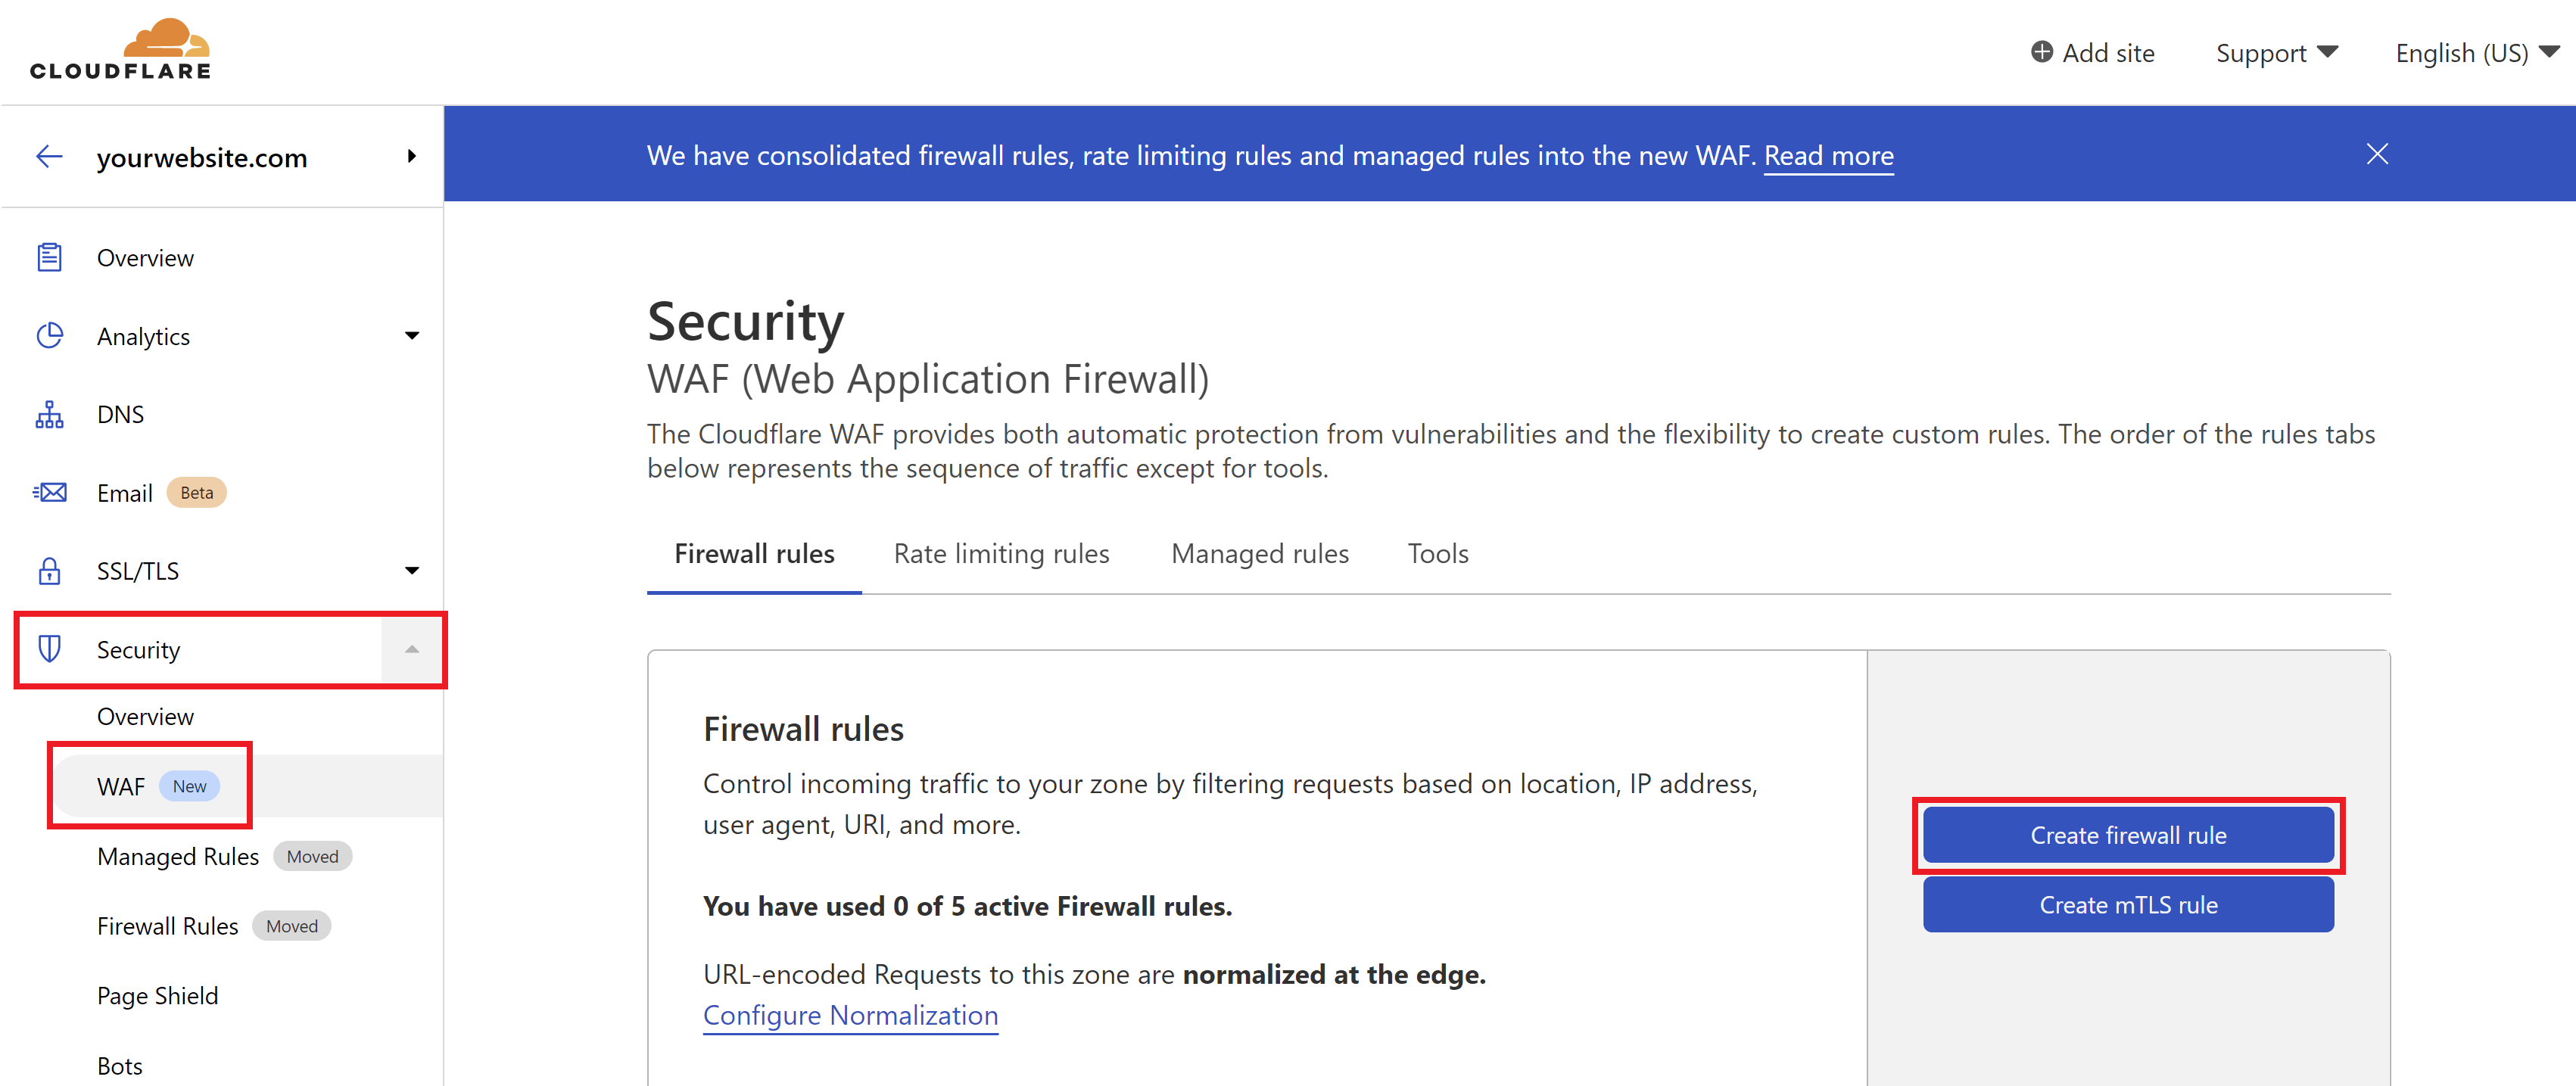
At the time of writing, Cloudflare have recently moved some of their security settings around as you can see in the above screenshot.
RULE CONSOLIDATION
One of the great things about Cloudflare’s rules is just how much you can do with one rule. Many of the sections below can be consolidated into one singular rule, leaving you with free additional rules for the future if you need them.
Part 1. Country or Continent Blocking
We’ll start off with country/continent blocking as it can be used creatively in the following sections as well.
If your website isn’t serving a global audience, then country/continent blocking can be a handy tool to block a ton of malicious traffic without needing to worry about blocking legitimate visitors who are your website’s target audience. Not expecting any visitors from outside of your own country? You can block them (though do note that our/your hosting support team may also be blocked if/when you need assistance).
STEP 1. CREATE A CLOUDFLARE FIREWALL RULE
Navigate to the Security > WAF page, and click the Create Firewall Rule button.
STEP 2. CONFIGURE YOUR FIREWALL RULE EXPRESSION
First, give your rule an easy to identify name.
If you want to only allow specific countries, set the following:
- Field: Country or Continent
- Operator: “Is in”
- Value: Choose your countries/continents
If you’re only allowing traffic from one country you can instead choose “equals” as the operator.
If you instead want to block specific countries, set the following:
- Field: Country or Continent
- Operator: “Is not in”
- Value: Choose your countries/continents
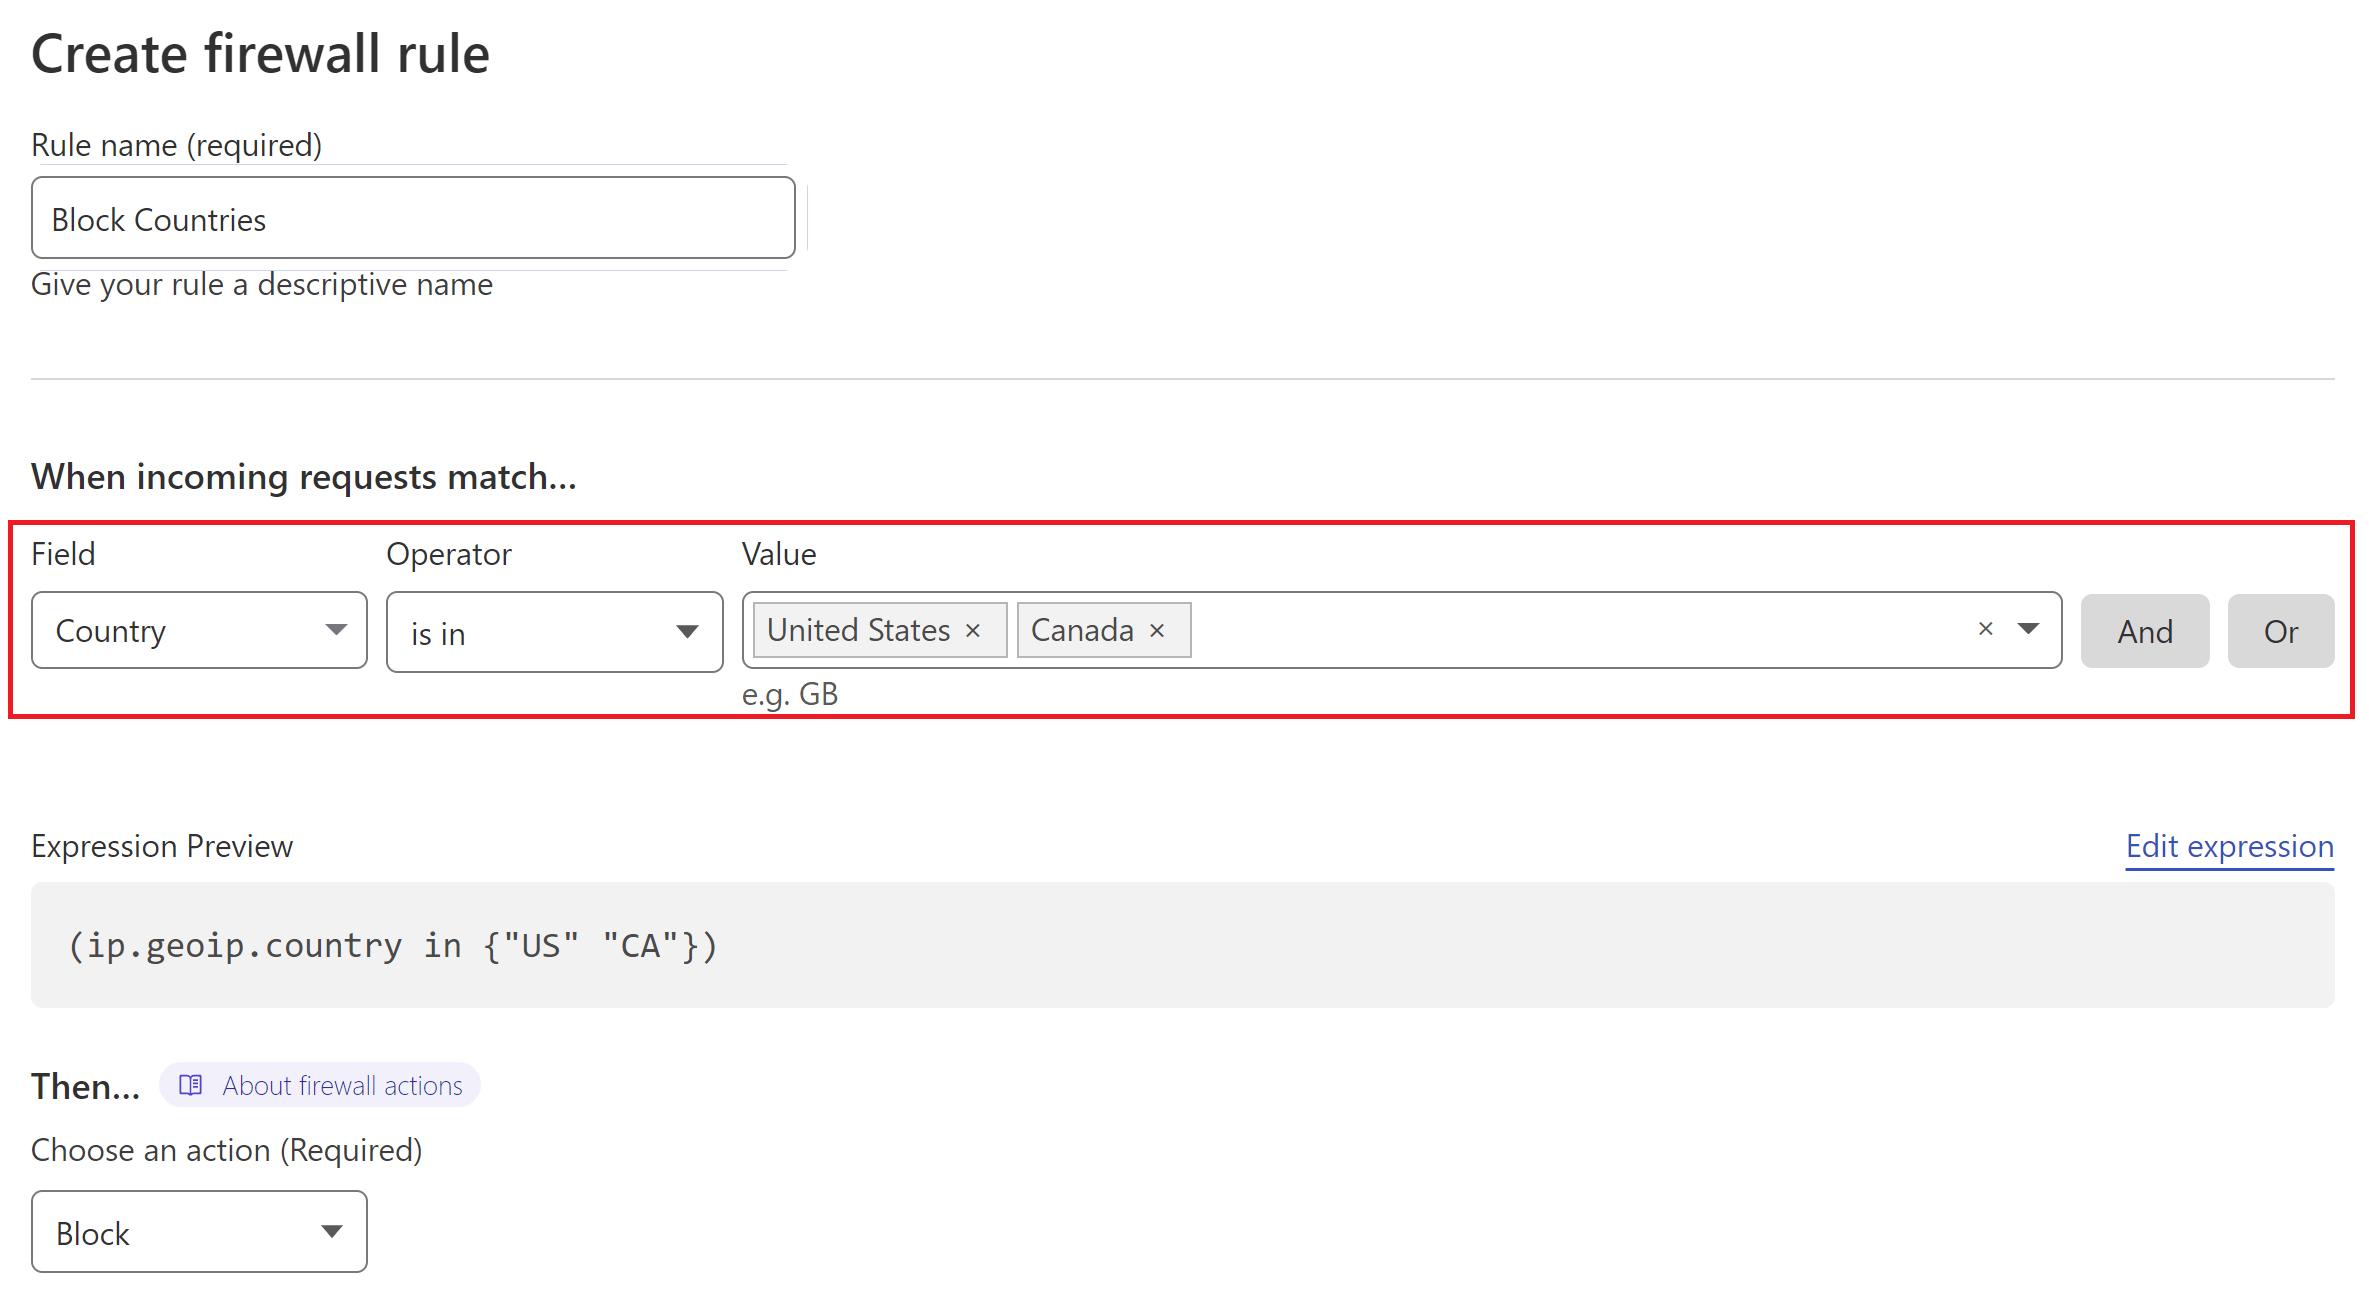
Here’s an example of allowing all countries except the US and Canada:
STEP 3. SET THE ACTION AND DEPLOY YOUR RULE
Cloudflare can block all requests that break the rule outright. When ready, click the Deploy button to set your new firewall rule live.
Part 2. Locking Down WordPress
There are numerous different ways to approach locking down your site. Below I’ve split them into two categories:- The first details locking down various endpoints.
- The second details restricting access to your login page and the /wp-admin area.
2.1 Mass Lockdown
With this rule we’ll lock downxmlrpc.php, access to /wp-content/, and access to /wp-includes/. INFORMATION
The following block on /wp-content/ will prevent files such as PDF's from being directly accessible. If you link to any files here anywhere other than your WordPress website (such as in an email). You can create an exception to these by creating an additional rule, for example:
AND "URI path" "does not include" ".pdf"
STEP 1. CREATE A CLOUDFLARE FIREWALL RULE
Navigate to the Security > WAF page, and click the Create Firewall Rule button.
STEP 2. CONFIGURE YOUR FIREWALL RULE EXPRESSION
First, give your rule an easy to identify name.
Here we’ll create 3 separate rules for each of the area’s outlined above. First, we’ll simply block direct access to xmlrpc.php with:
- Field: URI Path
- Operator: “contains“
- Value: /xmlrpc.php
Use the OR option on the right-hand side to create two additional rules as follows:
- Field: URI Path
- Operator: “contains“
- Value: (1) /wp-content/ and (2) /wp-includes/
AND
- Field: Referer
- Operator: “does not contain“
- Value: your website URL
It looks as follows:
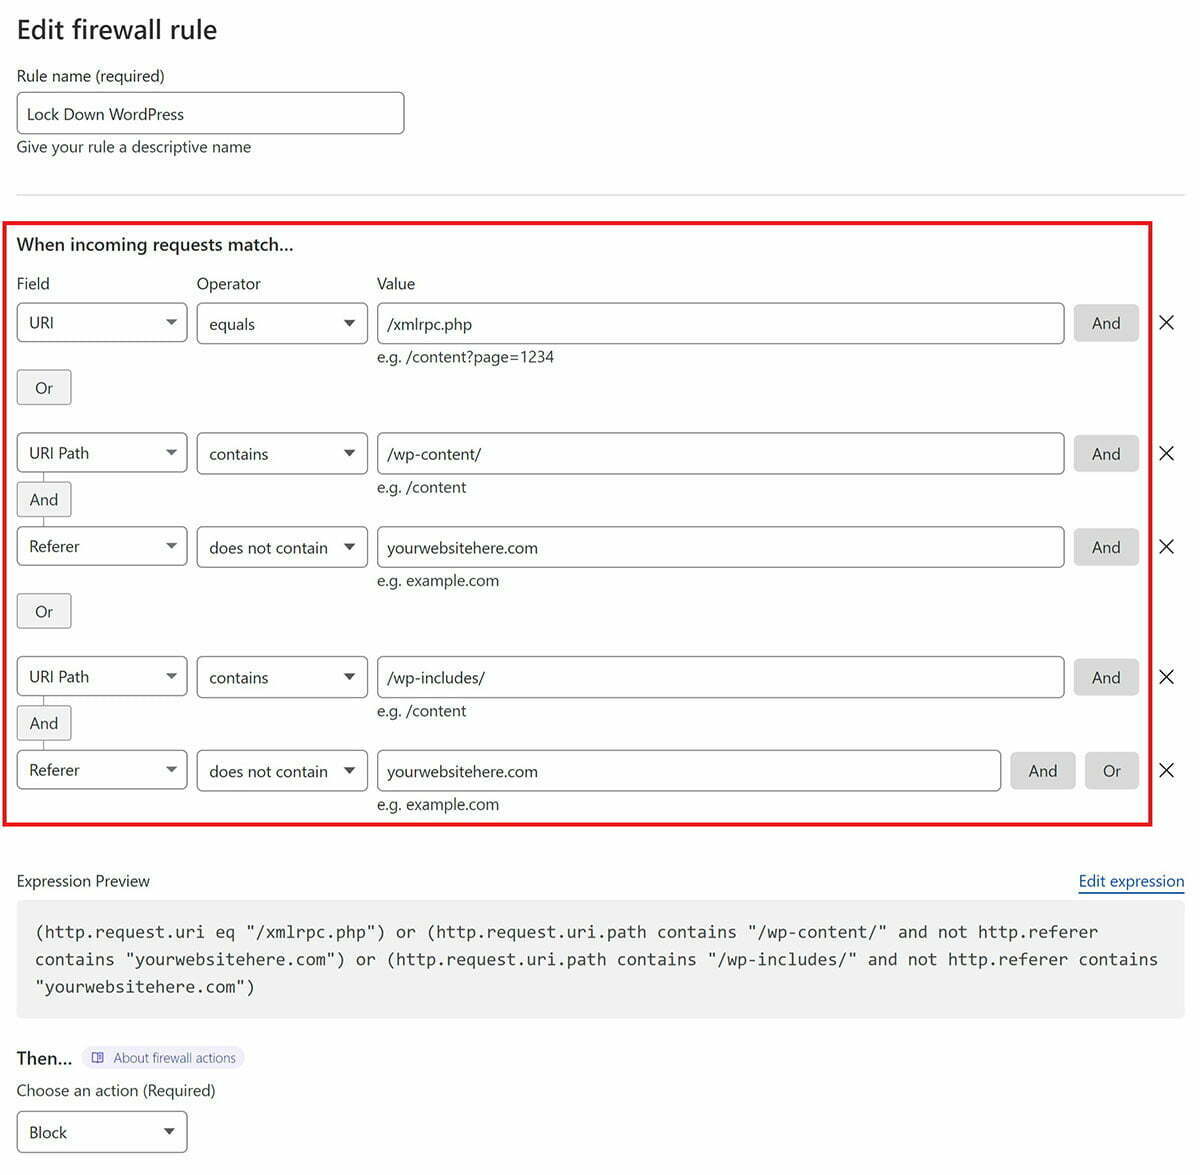
If you’d like to use the same, or use this as a starting point, you can copy the following expression:
(http.request.uri eq "/xmlrpc.php") or (http.request.uri.path contains "/wp-content/" and not http.referer contains "yourwebsitehere.com") or (http.request.uri.path contains "/wp-includes/" and not http.referer contains "yourwebsitehere.com")
Inside your Firewall rule, click “Edit Expression” and paste the above.
From here you can continue editing the firewall rule to your liking.
STEP 3. SET THE ACTION AND DEPLOY YOUR RULE
Cloudflare can block all requests that break the rule outright. When ready, click the Deploy button to set your new firewall rule live.
2.2 Restrict to /wp-admin/ and /wp-login.php
The following details locking down two area’s vital to accessing your website. Use with caution when working on client websites.
STEP 1. CREATE A CLOUDFLARE FIREWALL RULE
Navigate to the Security > WAF page, and click the Create Firewall Rule button.
STEP 2. CONFIGURE YOUR FIREWALL RULE EXPRESSION
First, give your rule an easy to identify name.
Here’s an example rule:
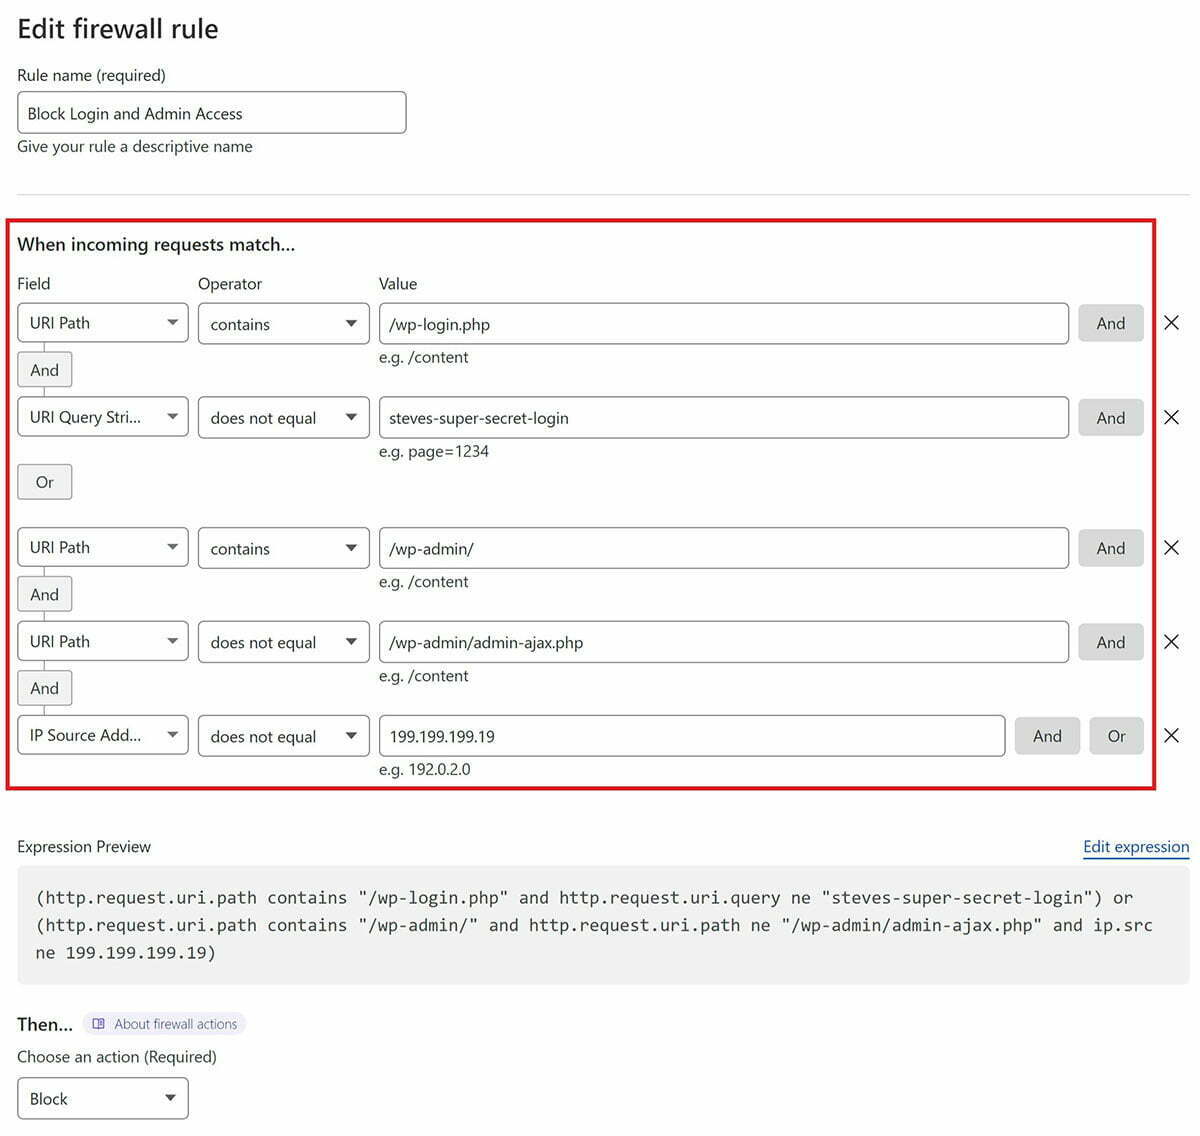
In this example, I’ve used two different ways to block access to these areas just for demonstration purposes. I’ve locked down the /wp-login.php page to only be available when accessed via a specific query string.
The /wp-admin/ area has been locked down to a single IP address only unless it’s specifically the /wp-admin/admin-ajax.php file. This could instead be blocked entirely, and then you could use the WAF “Tools” tab to whitelist your IP address and those of your clients to bypass all firewall rules instead.
To keep things simple for client sites, you could lock these down to their specific country. It’s not perfect, but it can still block a ton of potentially malicious traffic.
If you’d like to use the same rule pictured above as a starting point, you can copy the following expression:
(http.request.uri.path contains "/wp-login.php" and http.request.uri.query ne "steves-super-secret-login") or (http.request.uri.path contains "/wp-admin/" and http.request.uri.path ne "/wp-admin/admin-ajax.php" and ip.src ne 199.199.199.19)
Inside your Firewall rule, click “Edit Expression” and paste the above.
From here you can continue editing the firewall rule to your liking.
STEP 3. SET THE ACTION AND DEPLOY YOUR RULE
Cloudflare can block all requests that break the rule outright.
When ready, click the Deploy button.
Part 3. Prevent Spam
Spam is a contact nuisance for nearly every website, whether it be through contact forms, comments, or both. We have a 2 part series digging into different strategies that are completely free to implement that you may also be interested in:
- How to Reduce Eric Jones Spam (and all the other Contact Form Spam)
- How to Stop WordPress Comment Spam Permanently (for FREE)
These contain the rules below as well as some non-Cloudflare alternatives. You can also learn more about the specifics of how spam is posted and how to address the root cause.
3.1 Prevent Contact Form Spam
The following is limited in its application as it’s specific to pages and not to contact forms themselves. However, if you have a regular website where contact forms aren’t on every page, then this is an extremely effective measure.
STEP 1. CREATE A CLOUDFLARE FIREWALL RULE
Navigate to the Security > WAF page, and click the Create Firewall Rule button.
2. CONFIGURE YOUR FIREWALL RULE EXPRESSIONS
First, give your rule an easy to identify name.
Here is what my rule looks like: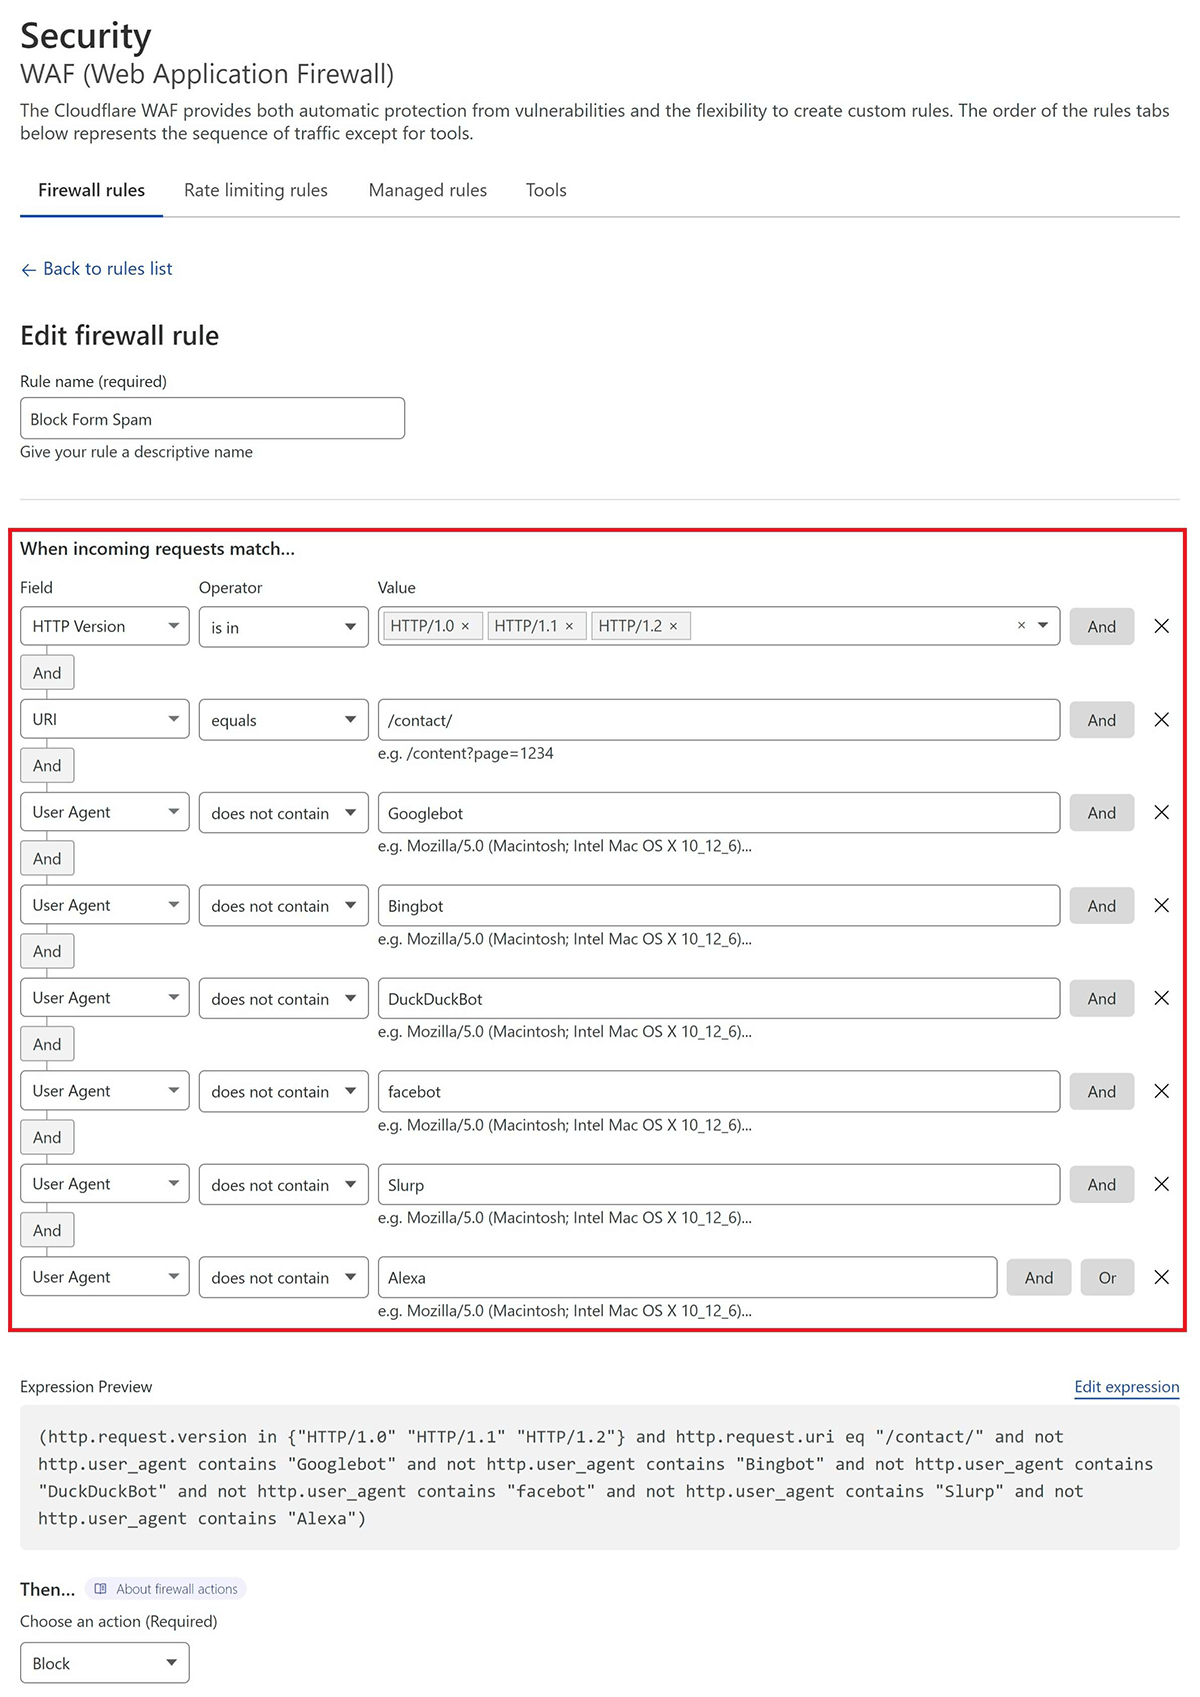
This states that if:
- the URI is /contact/
- and the request is made over HTTP/1.0/1.1/1.2
- and it is NOT either Googlebot, Bingbot, DuckDuckBot, Facebot, Cloudflare, Slurp, or Alexa
- then perform ACTION (see below)
If you’d like to use the same, or use this as a starting point, you can copy the following expression:
(http.request.version in {"HTTP/1.0" "HTTP/1.1" "HTTP/1.2"} and http.request.uri eq "/contact/" and not http.user_agent contains "Googlebot" and not http.user_agent contains "Bingbot" and not http.user_agent contains "DuckDuckBot" and not http.user_agent contains "facebot" and not http.user_agent contains "Slurp" and not http.user_agent contains "Alexa")Next, inside your Firewall rule, click “Edit Expression” and paste the above.
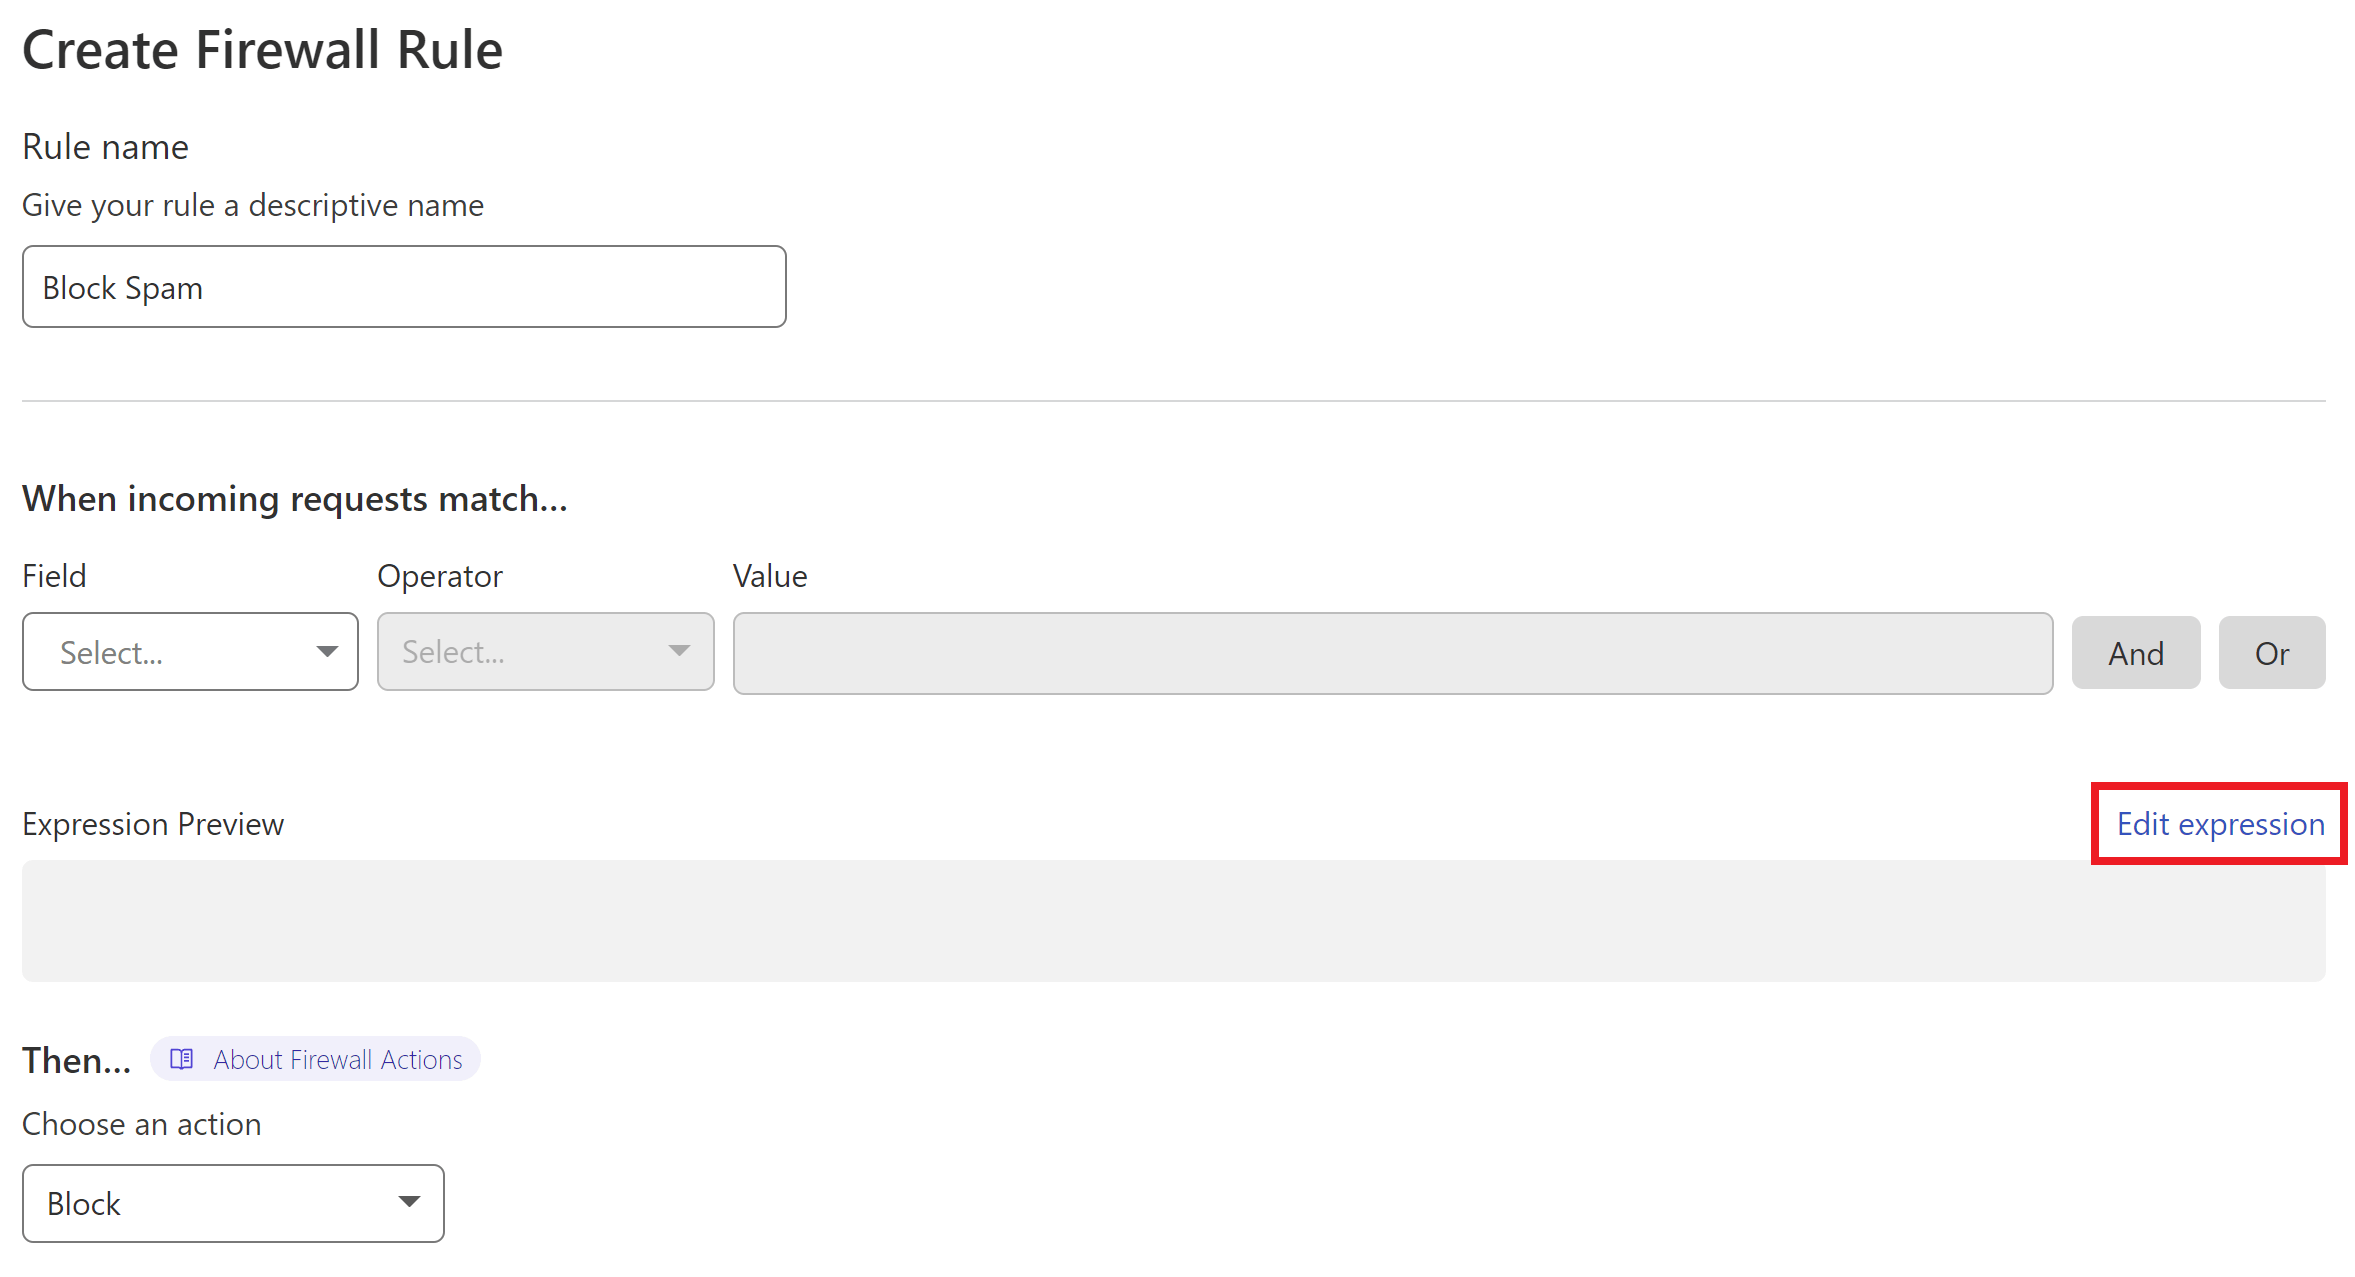
From here you can continue editing the firewall rule to your liking.
3. SET THE ACTION
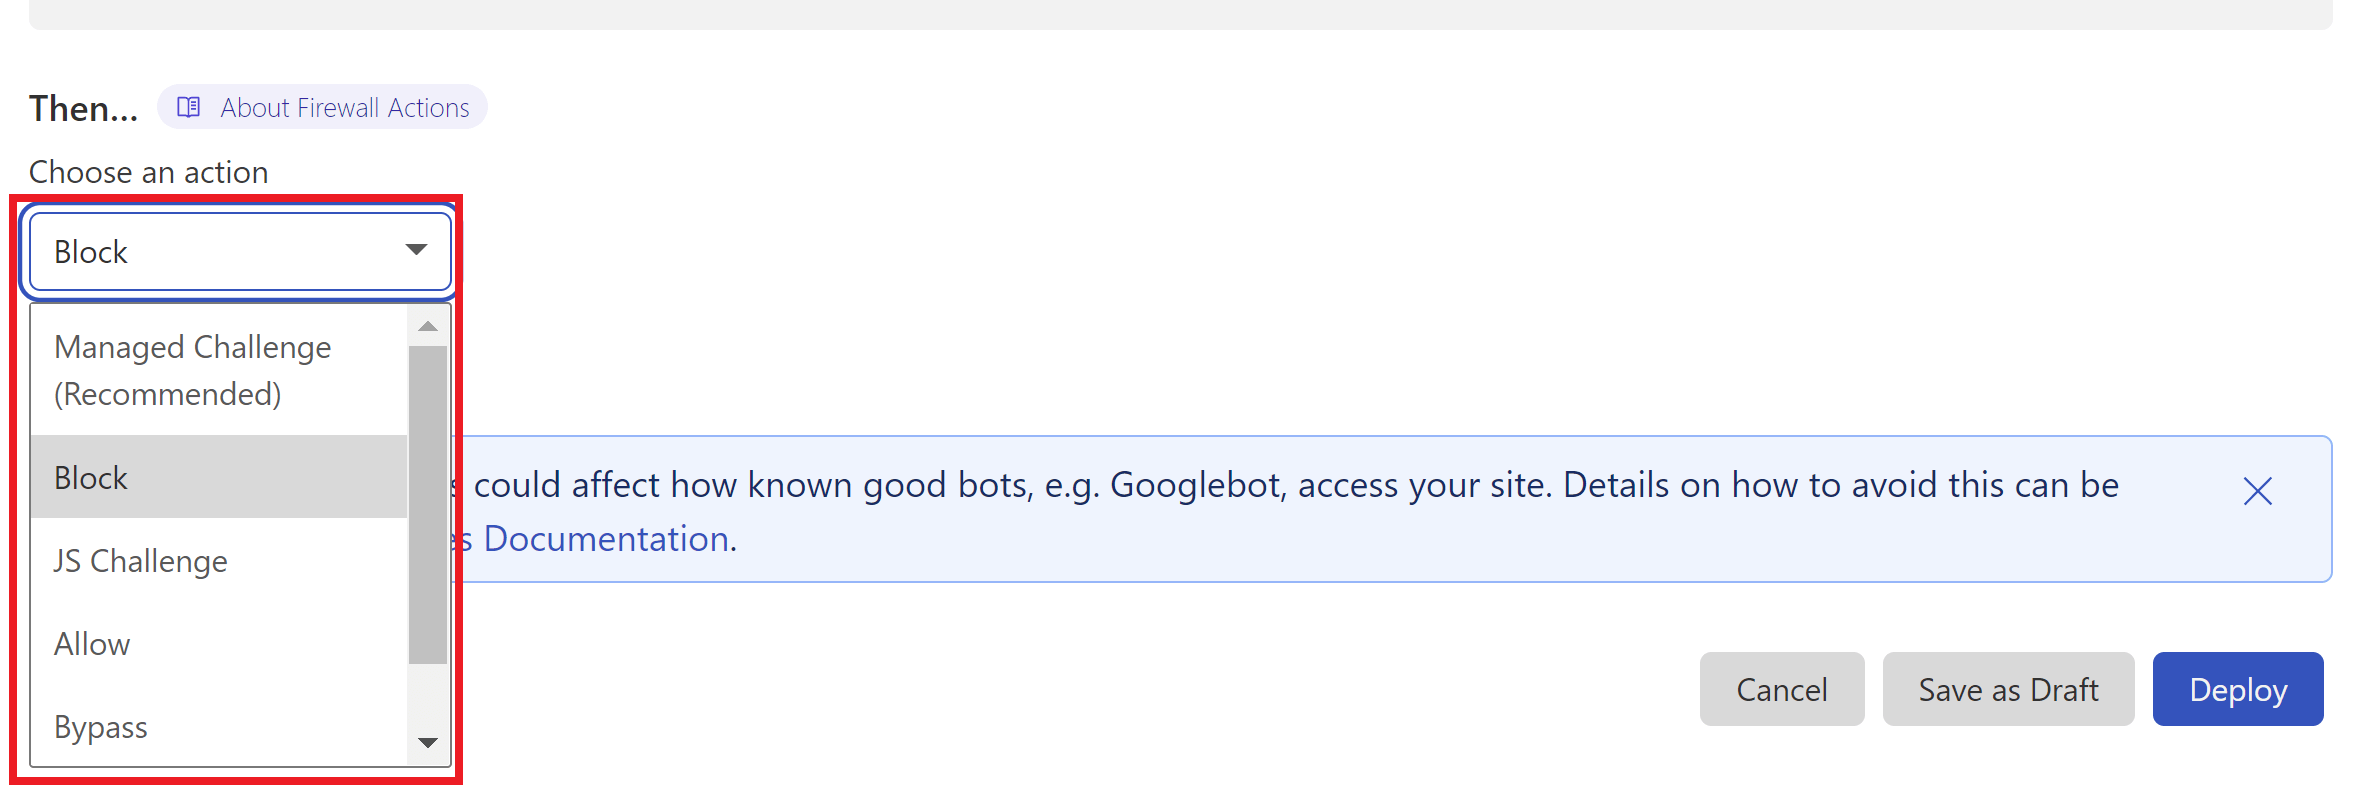
I chose to outright block this traffic, but one of the great things about Cloudflare is that you can use their managed challenge or JS challenge to screen this traffic instead. Choose the option that you feel best suits your needs.
4. DEPLOY YOUR RULE
When ready, click the Deploy button to set your new firewall rule live.
3.2 Prevent Comment Spam
Here we’re going to restrict wp-comments-post.php to weed out bot traffic.
Denying bot traffic access to the wp-comments-post.php file can be done at the DNS level with a Cloudflare JS challenge.
Unlike contact form spam, which can be a little more complex to deal with, blocking this traffic for comments is a simple matter. Automated spam submissions can’t process JS and thus fail Cloudflare’s JS challenge, which then blocks this traffic at the DNS layer before the request can even reach your server.
STEP 1. CREATE A CLOUDFLARE FIREWALL RULE
Navigate to the Security > WAF page, and click the Create Firewall Rule button.
STEP 2. CONFIGURE YOUR FIREWALL RULE EXPRESSIONS
First, give your rule a name that’s easy to identify.
Here is what the rule looks like:
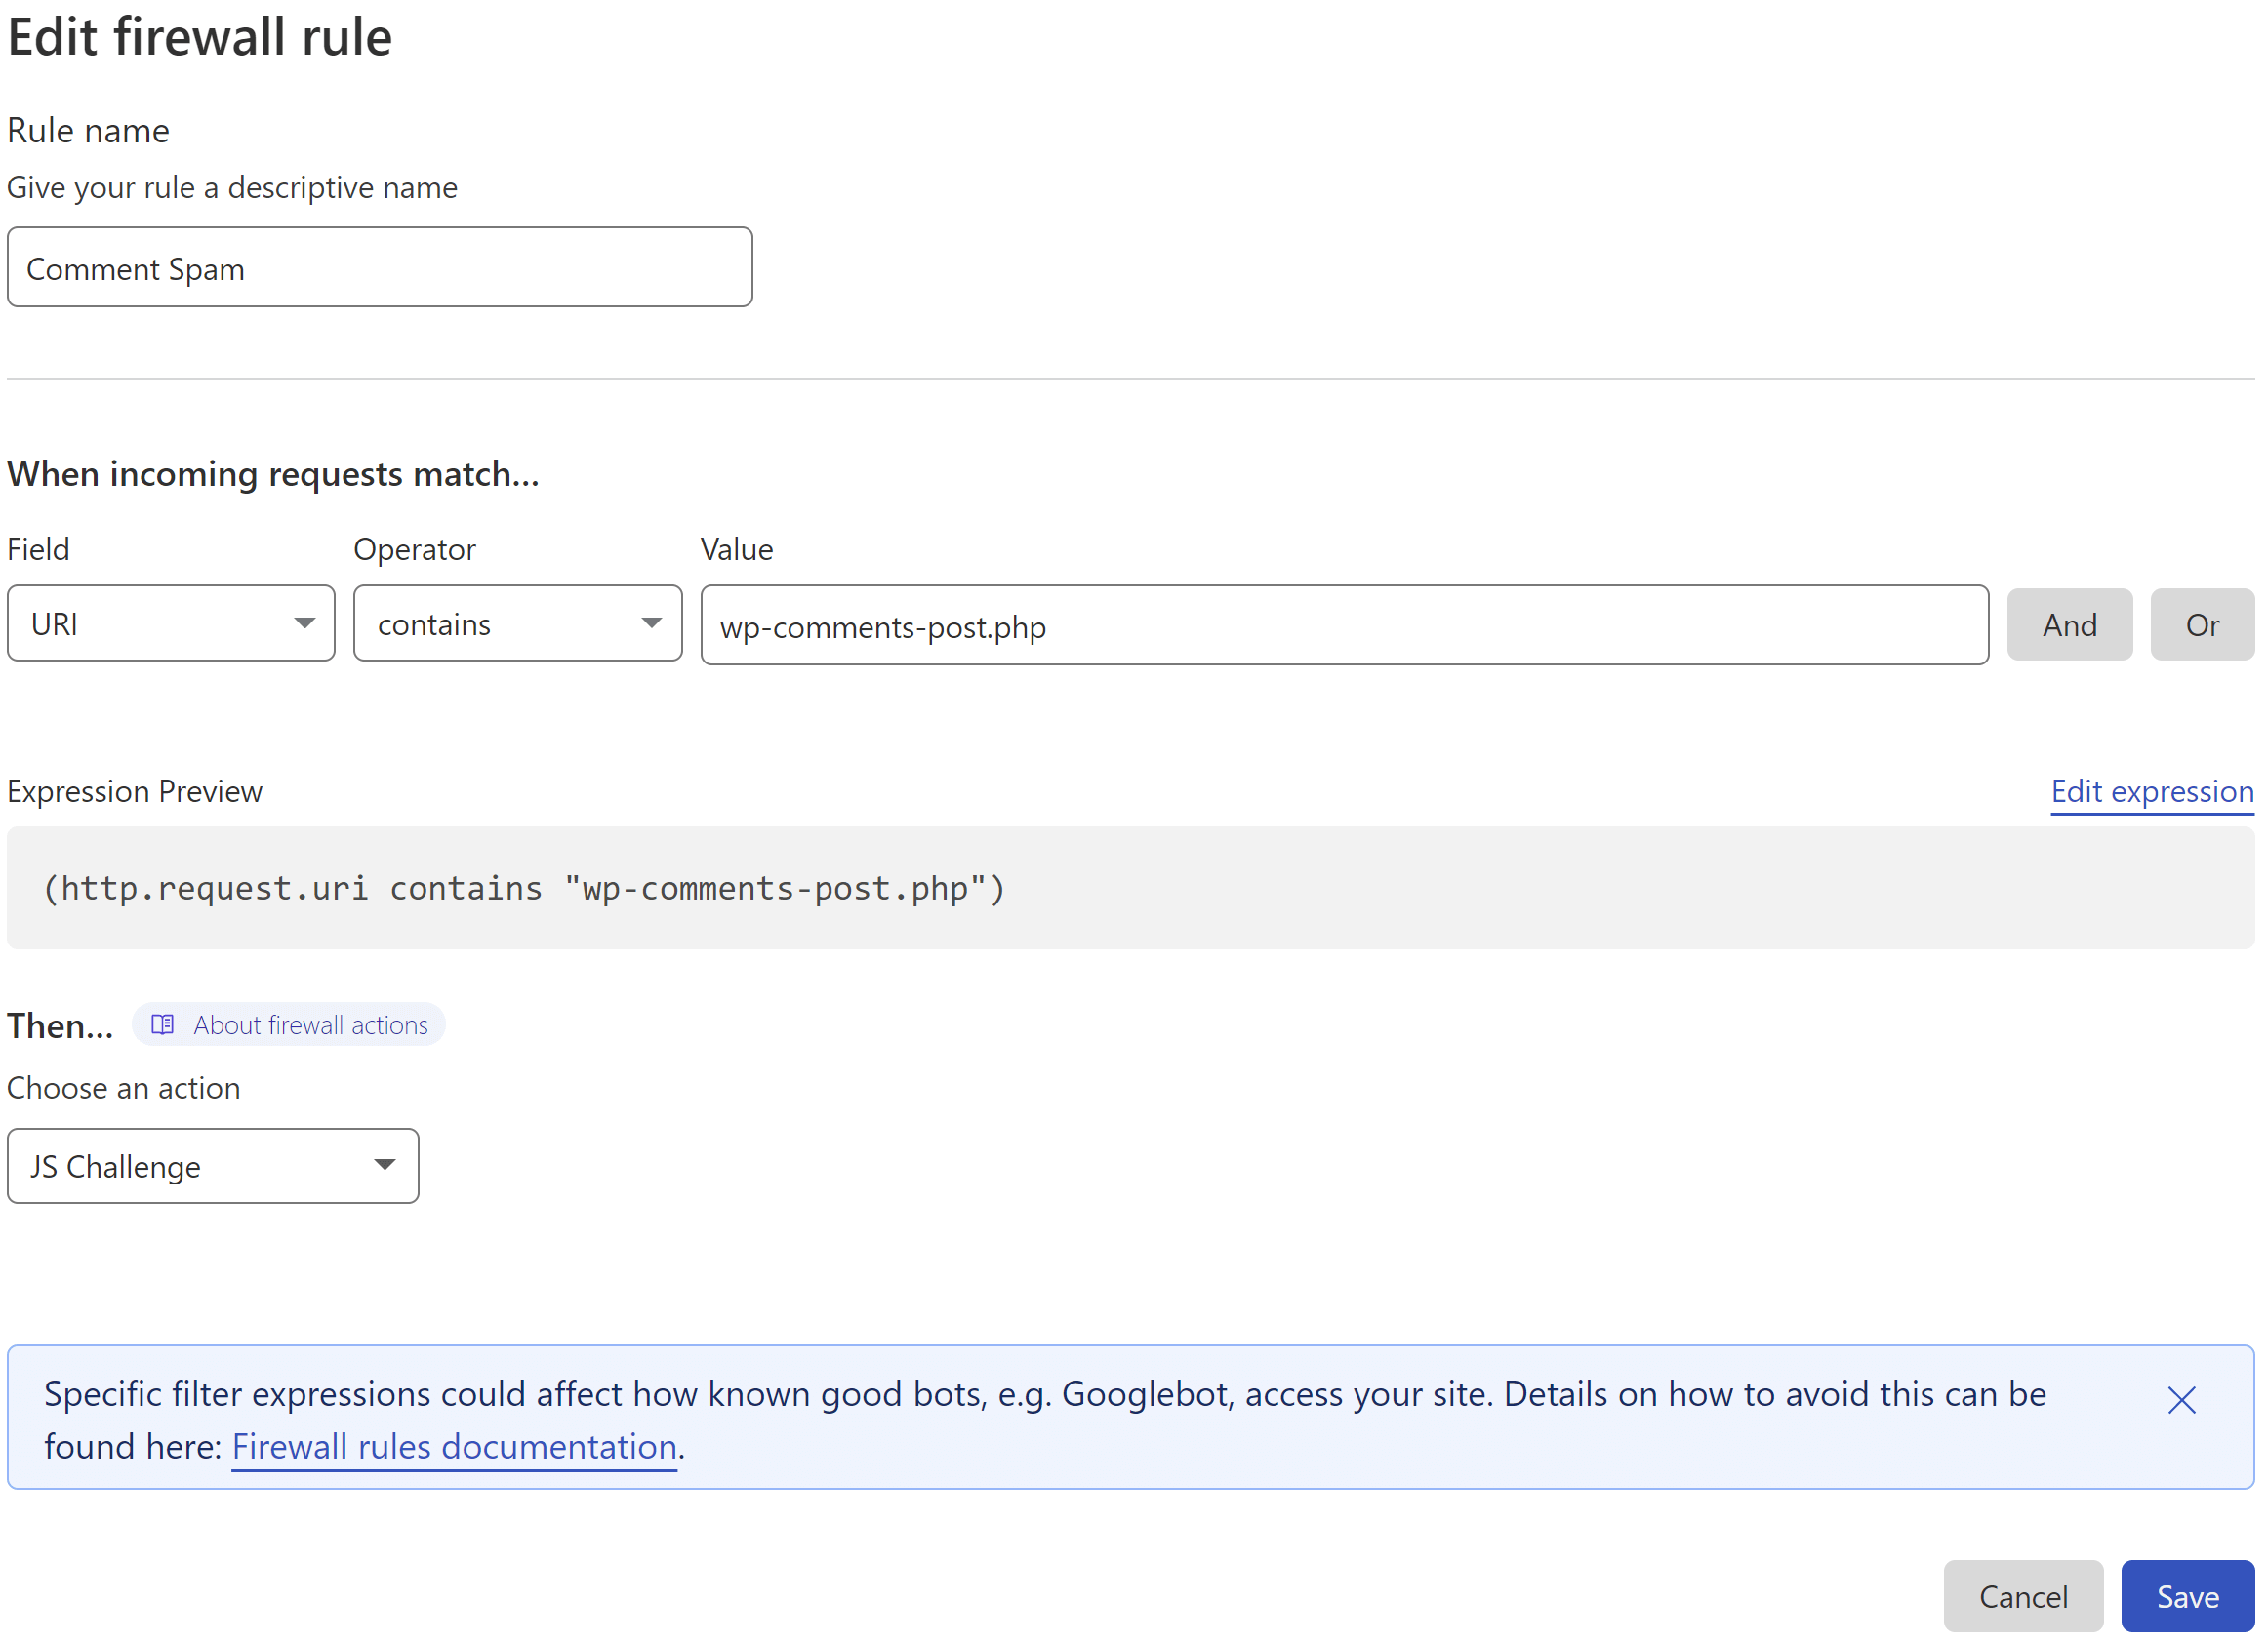
This states that if:
- the URI contains /wp-comments-post.php
- then perform ACTION (see below)
STEP 3. SET THE ACTION
Cloudflare offers two methods that could be utilized here. One is their “Managed Challenge” and the other is their JS challenge. As the JS challenge only takes place after a visitor has browsed the page and submitted their comment, the very brief Cloudflare challenge page that pops up doesn’t interfere with the user’s actions beforehand.
STEP 4. DEPLOY YOUR RULE
When ready, click the Deploy button to set your new firewall rule live.
3.3. 2 in 1: Block both form and comment spam
The following can be used as an alternative to the above two rules. It blocks submissions that aren’t made directly from your website, and thus blocks the automatic posting by spam bots.
STEP 1. CREATE A CLOUDFLARE FIREWALL RULE
Navigate to the Security > WAF page, and click the Create Firewall Rule button.
STEP 2. CONFIGURE YOUR FIREWALL RULE EXPRESSION
First, give your rule an easy to identify name.
Here’s what the rule looks like:
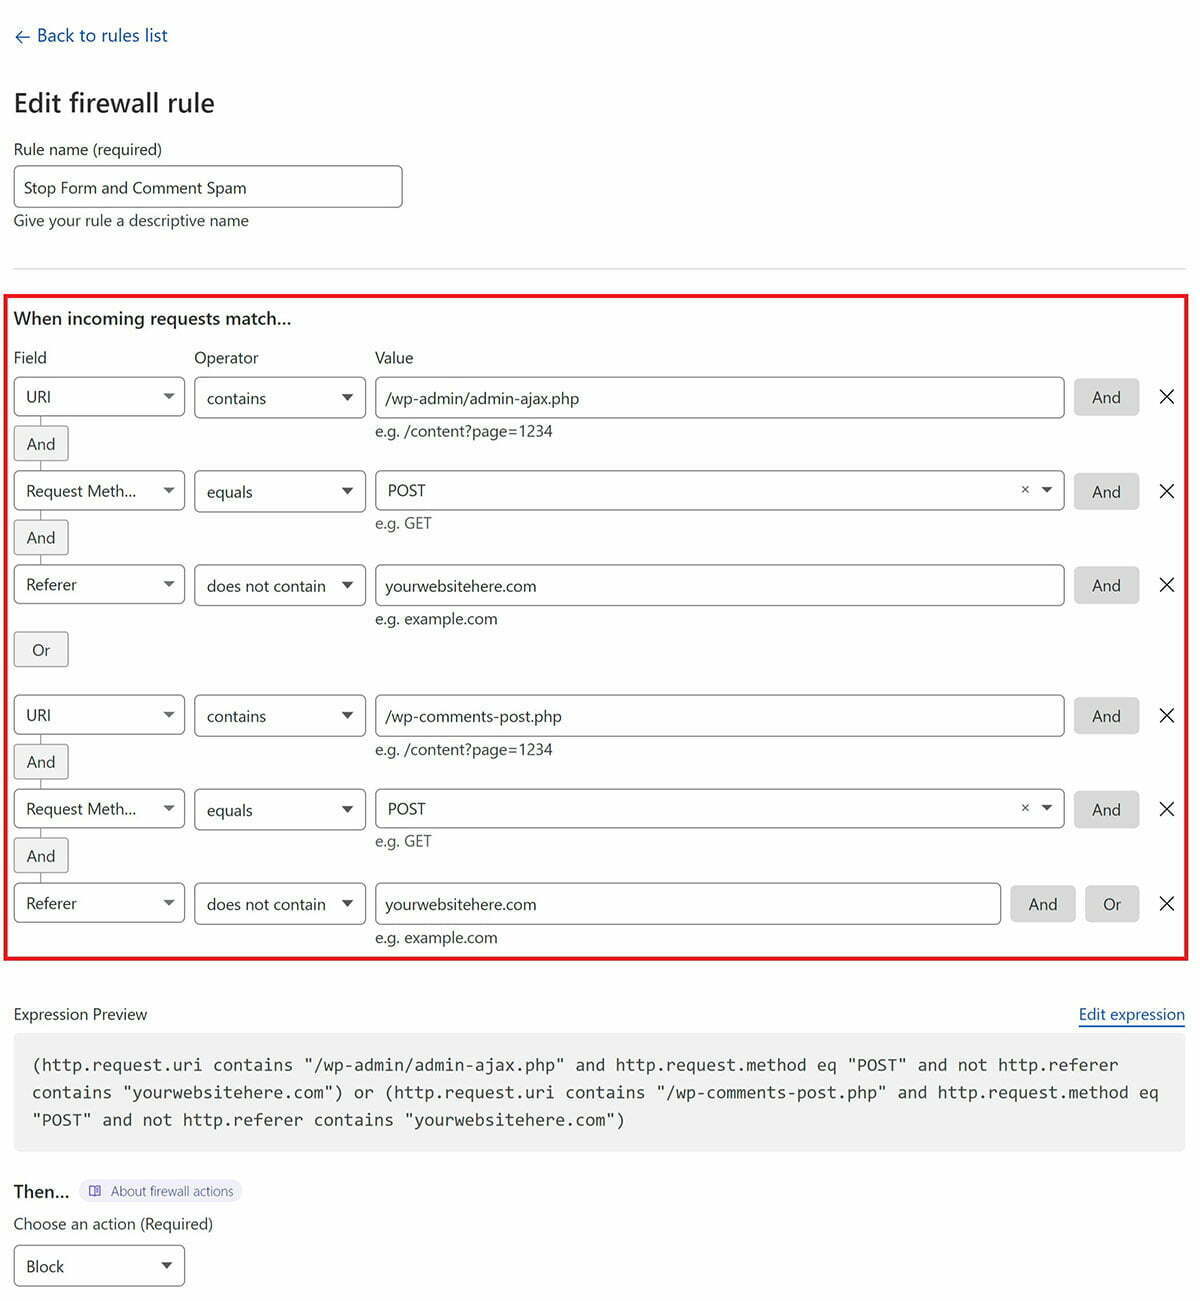
This states that if:
- The URI contains either /wp-admin/admin-ajax.php or /wp-comments-post.php
- and the request method is POST
- and the referrer does not contain your website URL
- then perform ACTION (block in this case)
If you’d like to use the same, you can copy the following expression (be sure to replace the URL with your own website):
(http.request.uri contains "/wp-admin/admin-ajax.php" and http.request.method eq "POST" and not http.referer contains "yourwebsitehere.com") or (http.request.uri contains "/wp-comments-post.php" and http.request.method eq "POST" and not http.referer contains "yourwebsitehere.com")
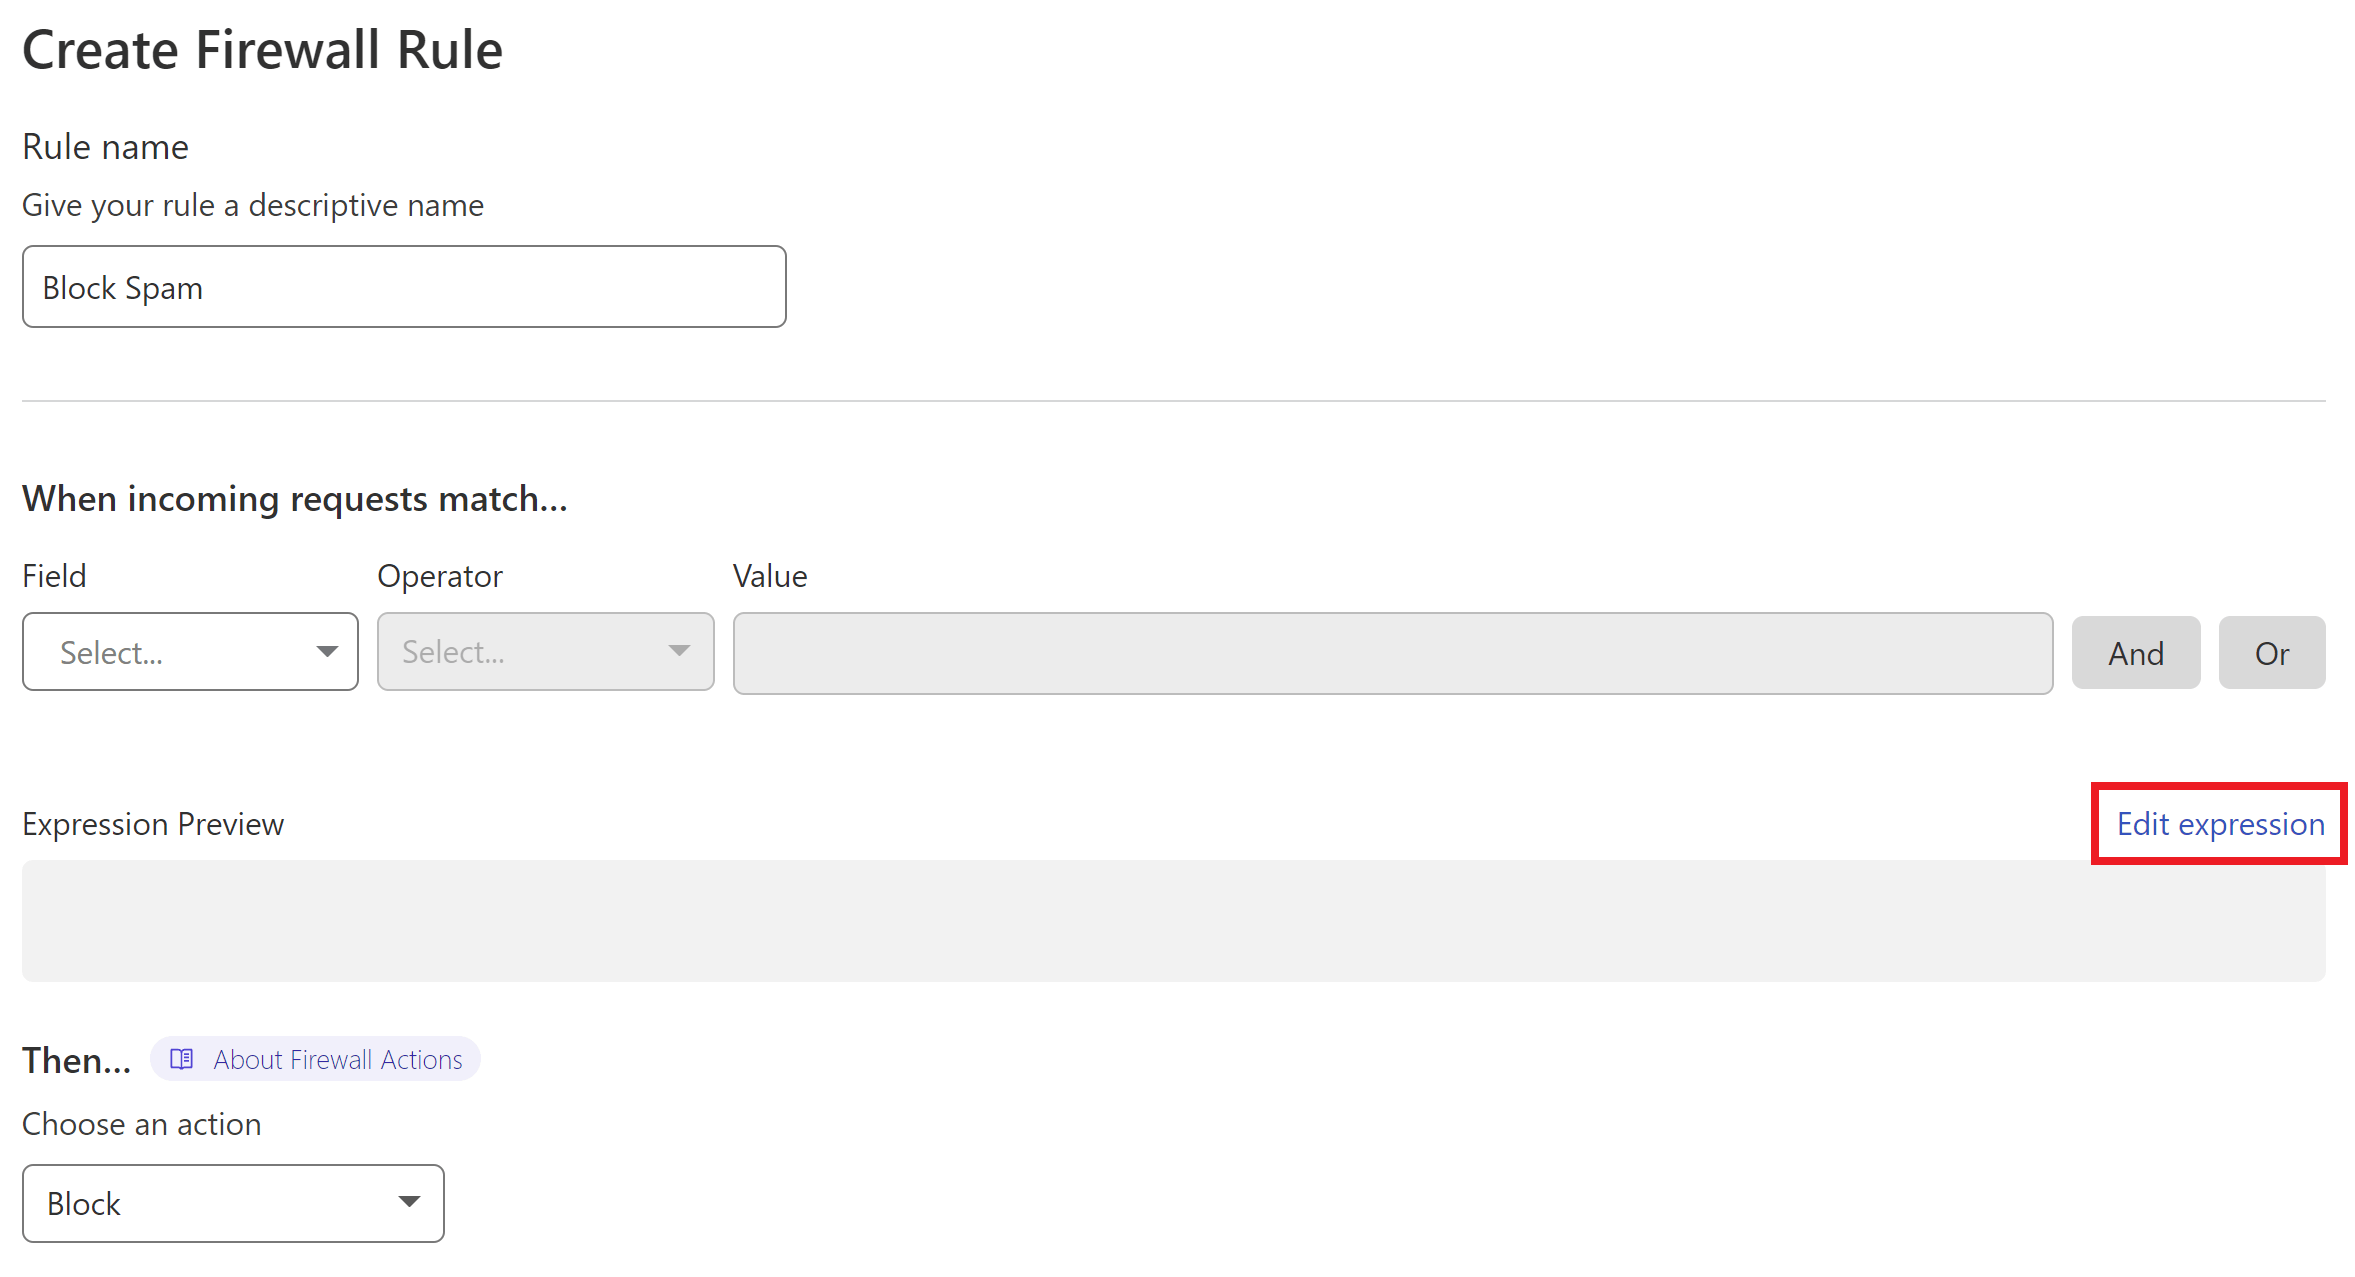
Next, inside your Firewall rule, click “Edit Expression” and paste the above.
STEP 3. SET THE ACTION AND DEPLOY YOUR RULE
Cloudflare can block all requests that break the rule outright.
When ready, click the Deploy button.
4. Block Bad Bots
Cloudflare allows you to block bots based on their user agent. Like country blocking, it’s quick and easy to setup.
7G Users: The 7G WAF contains a long list of bad bots that it blocks at the server level. If you’re already using 7G then you may want to give this one a miss and save your Cloudflare rules. You can also create your own 7G rule to block additional bots if ever needed.
STEP 1. CREATE A CLOUDFLARE FIREWALL RULE
Navigate to the Security > WAF page, and click the Create Firewall Rule button.
STEP 2. CONFIGURE YOUR FIREWALL RULE EXPRESSION
First, give your rule an easy to identify name.
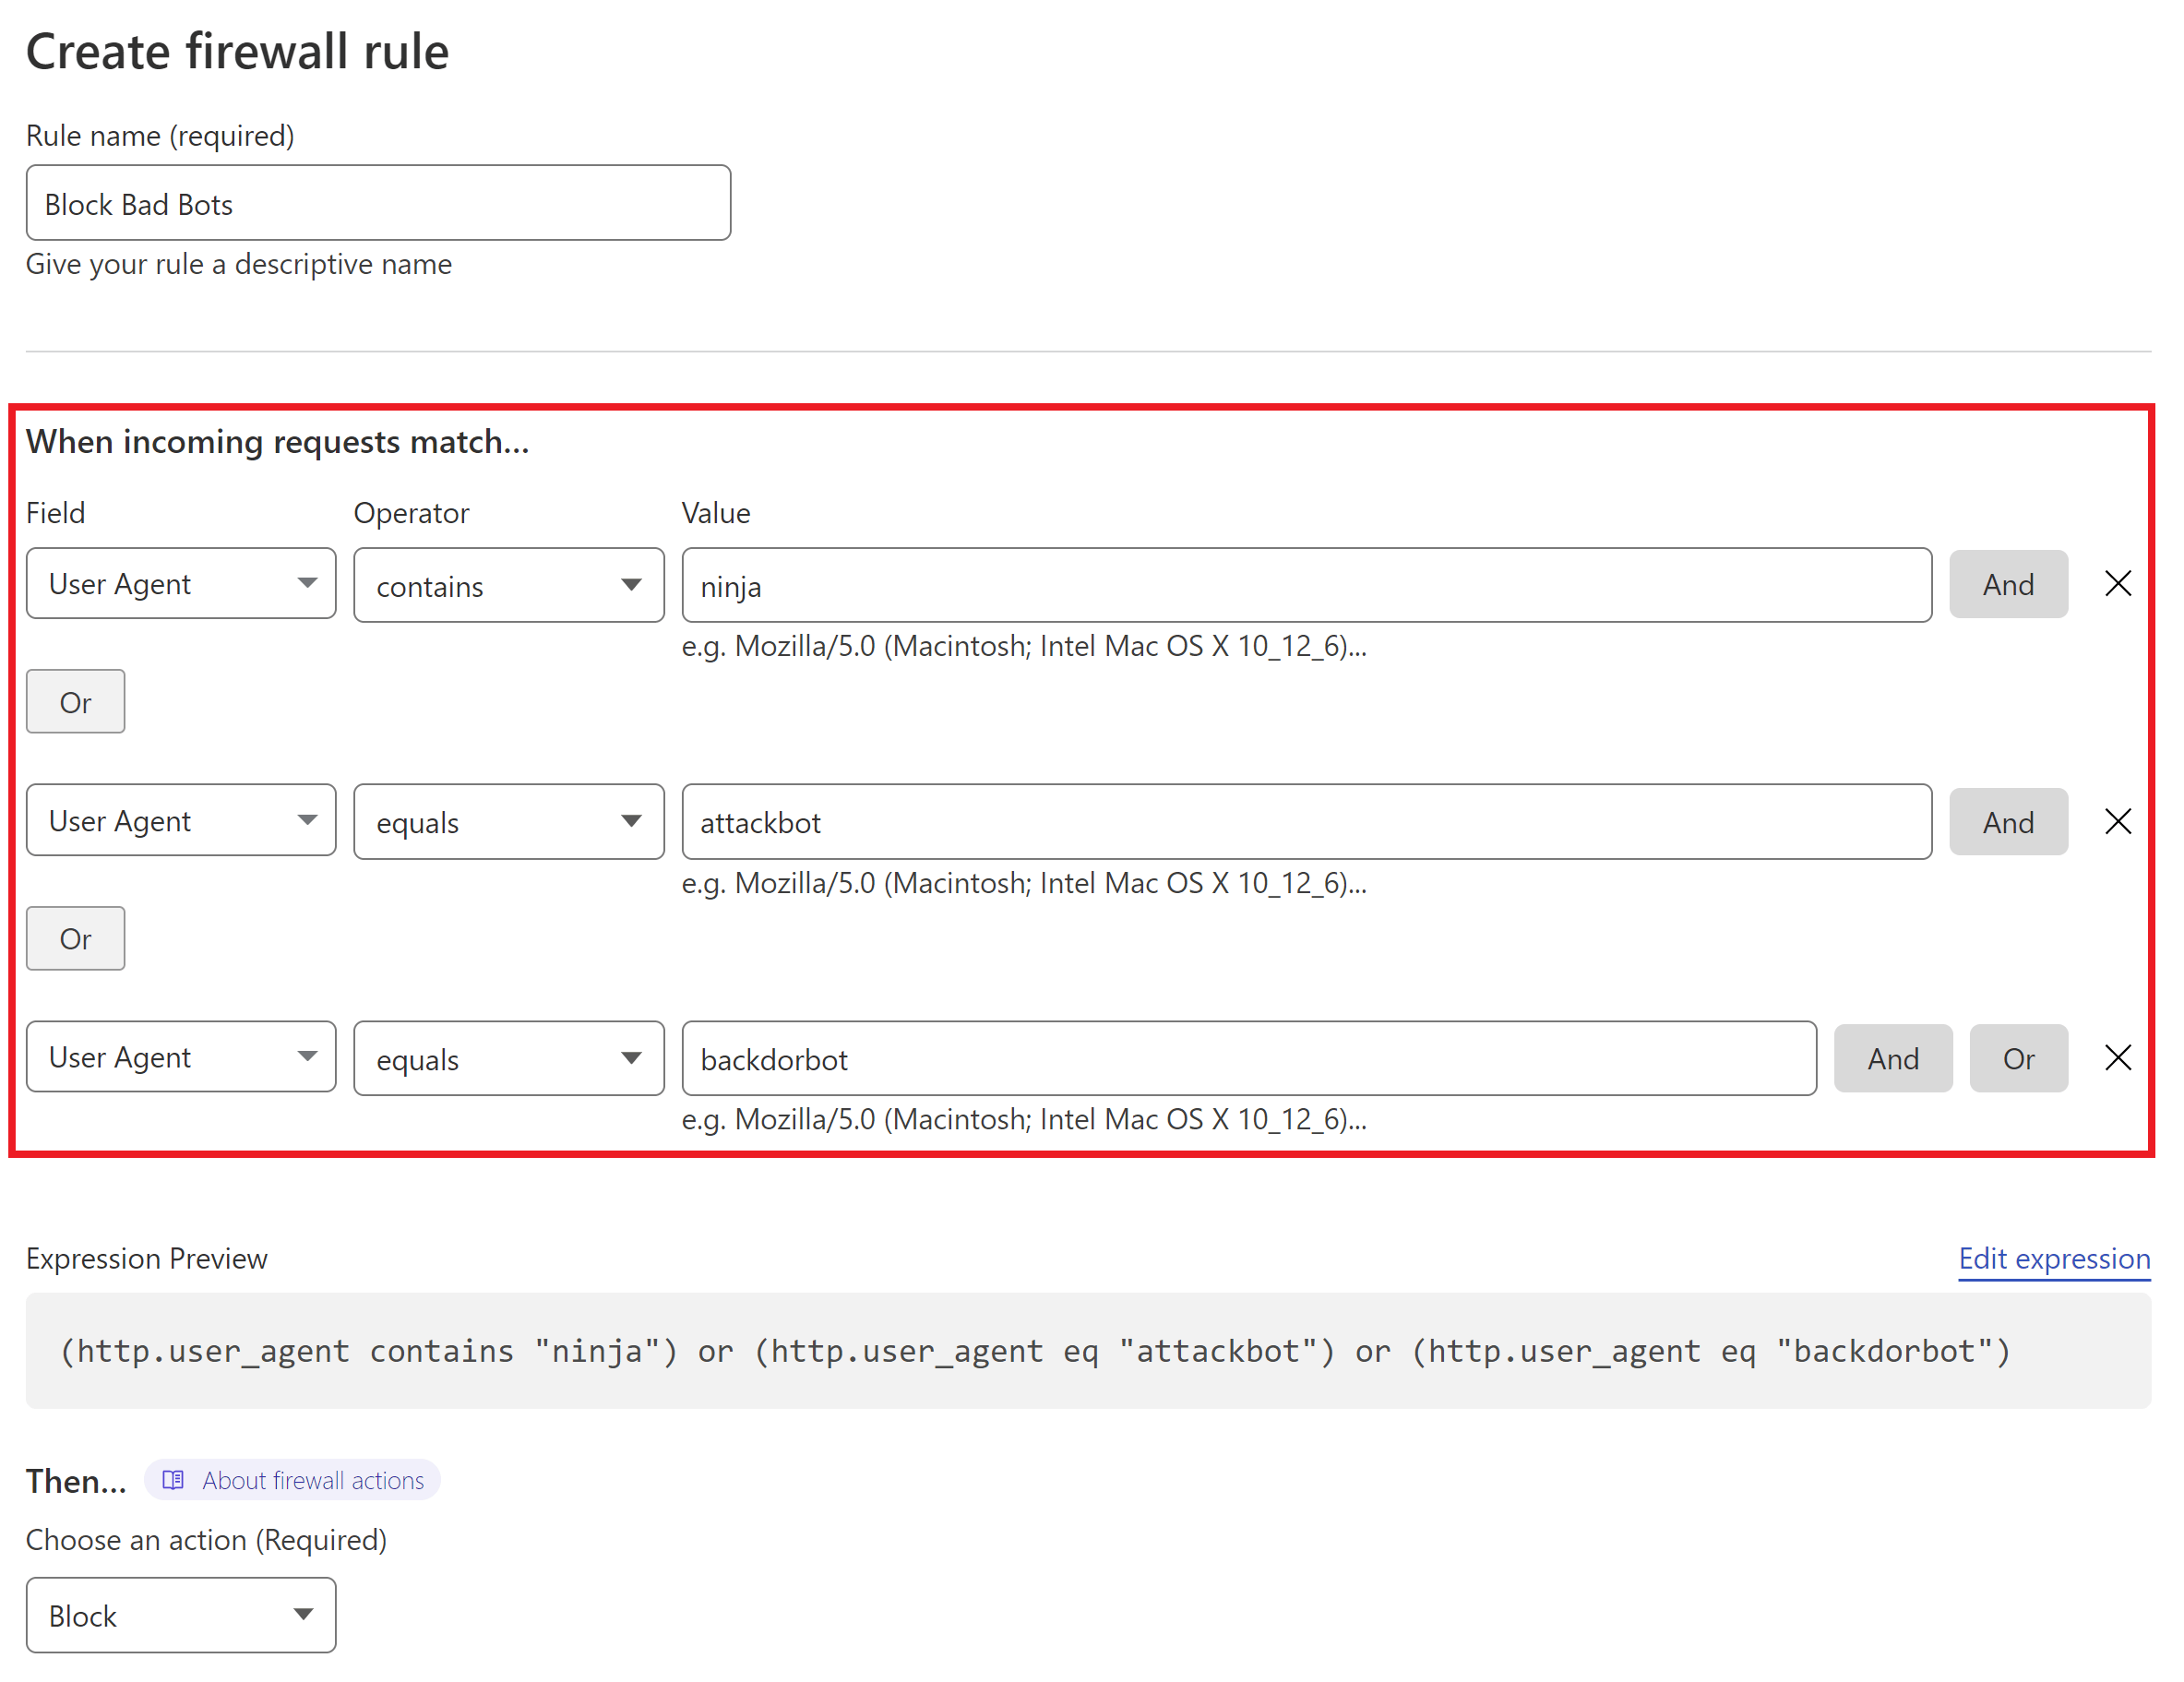
Next, set the following:
- Field: User Agent
- Operator: “Equals” or “Contains“
- Value: Add the name of the bad user agent
Add additional bots with the “OR” option on the right hand side.
Here’s an example of blocking multiple bots (and while these are bad bots, it’s only an example of how the rule can be used, not a comprehensive recommendation):
STEP 3. SET THE ACTION AND DEPLOY YOUR RULE
Cloudflare can block all requests that break the rule outright.
When ready, click the Deploy button.


