Introduction
vCanopy comes with a handy security measure that can easily be activated for any sites where you don’t use WordPress comments. Chances are, this is the majority of your websites and you can easily block posting comments from being possible, automatically eliminating any potential spam.
However, for those sites that do use comments, the constant barrage of spam can be a continual nuisance. Sure, it’s easy to make sure that never get’s published on the frontend (this article assumes you know how to disable trackbacks, set moderation rules, etc inside the WordPress Dashboard > Settings > Discussion), but it’s still there and needs to be dealt with. Fortunately, there are a few easy ways to solve your comment spam problem once and for all – and they’re all 100% FREE. In this article, we’ll take a look at these options and how to implement them on your websites.
Table of Contents
- Background Info
- Method 1: Restrict wp-comments-post.php unless a query string is appended
- Method 2: Restrict wp-comments-post.php with a Cloudflare JS Challenge
- Method 3: Restrict wp-comments-post.php if referrer doesn’t equal your website’s URL using Cloudflare (bonus: you can also use this to prevent contact form spam)
- Method 4: reCaptcha
- 2 Additional Alternative Methods for Blocking Comment Spam
- Additional Protection with WPFail2Ban and/or the Comment Blacklist
You may also be interested in this article on dramatically reducing contact form spam:
How to Reduce Eric Jones Spam (and all the other Contact Form Spam)
Background Info
To create an effective strategy for dealing with comment spam, it’s important to know the basics of how the WordPress comment system works, and how spammers use bots to mass post spam comments on autopilot.
How WordPress Processes Comments
WordPress processes comments using the wp-comments-post.php file, and comments are submitted to this file using the POST method. WordPress then parses this POST data and hands it off to the wp_handle_comment_submission function.
How Bots Post Spam
Bots post spam in a completely automated way. This goes for all types of spam submissions – comments, contact forms, fake Woo orders, etc.
This doesn’t require a visit to a specific blog post, it can all be sent directly to the site using automated CURL/WGET commands. All this requires is a post ID, name, email address, and the spam to be sent.
Why Bots Post Spam
Almost all WordPress comment spam has one direct goal: Post a link to somewhere. That’s it.
Why Most Solutions Fail
Most solutions such as firewalls, honey pots, blacklists, data analysis, email validation, removing the URL field, etc, don’t prevent the root cause, i.e. they don’t deny ALL bot traffic access to the wp-comments-post.php file.
If a bot can’t access this file, it can’t post spam. This is what most solutions fail to address, and why they fail.
Method 1: Restrict wp-comments-post.php unless a query string is appended
This method was created by Gulshan Kumar, and can be implemented in 2 different ways. The first is using his free, lightweight Forget Spam Comment WordPress plugin which is a simple set-and-forget solution.
The other is a 2 part process that requires adding a little PHP and JS to your site and then using either a Cloudflare rule, Nginx config, or OLS config to deny access to the wp-comments-post.php file unless the set query string is appended.
I highly recommend you check out his blog post and YouTube video here:
Now Forget about Spam Comment in WordPress by Gulshan Kumar
How it Works
First, direct access to the wp-comments-post.php is denied unless it’s accessed via a query string.
Next, when a real visitor views a post/page that has comments enabled, a tiny JS script adds a query string to /wp-comments-post.php when the user first scrolls. Now with the query string appended, real users can post comments.
Almost all comment spam comes from automated bot traffic that is specifically looking for the wp-comments-post.php file. This method completely denies access to this file unless it’s accessed with a specific query string appended, which no bot can do.
Getting Started
Option 1: If you’re using Gulshan’s free plugin, none of the steps below are necessary. Simply install and activate it, and then clear your website’s cache and you’re all set.
Option 2: If implementing code directly and then blocking on Nginx or OpenLiteSpeed you will need to connect to your server.
Please see Gulshan’s
blog post linked above for the PHP/JS code for WordPress. You have a few options (including one that’s specific to the GeneratePress theme), and you can add the PHP/JS directly to your theme functions.php, or add the JS directly to the appropriate page template/s.
If using this method, you can implement a block in one of the following 3 ways:
See the following guides on connecting to your server to get started with the Nginx and OpenLiteSpeed sections below:
Step 1. Generate your SSH Key
Step 2. Add your SSH Key to vCanopy (also see Add default SSH Keys)
Step 3. Connect to your server by SSH as Root user (we like and use Termius)
Restrict wp-comments-post.php with Cloudflare
Cloudflare firewall rules are an easy way to block any requests that break the rule we create at the DNS layer, before it ever gets the chance to even reach your server.
Important
The Cloudflare proxy must be active on your website for the firewall rules you set to take place. Please ensure that you set orange clouds for your A and CNAME records.
Step 1. Create a Cloudflare Firewall Rule
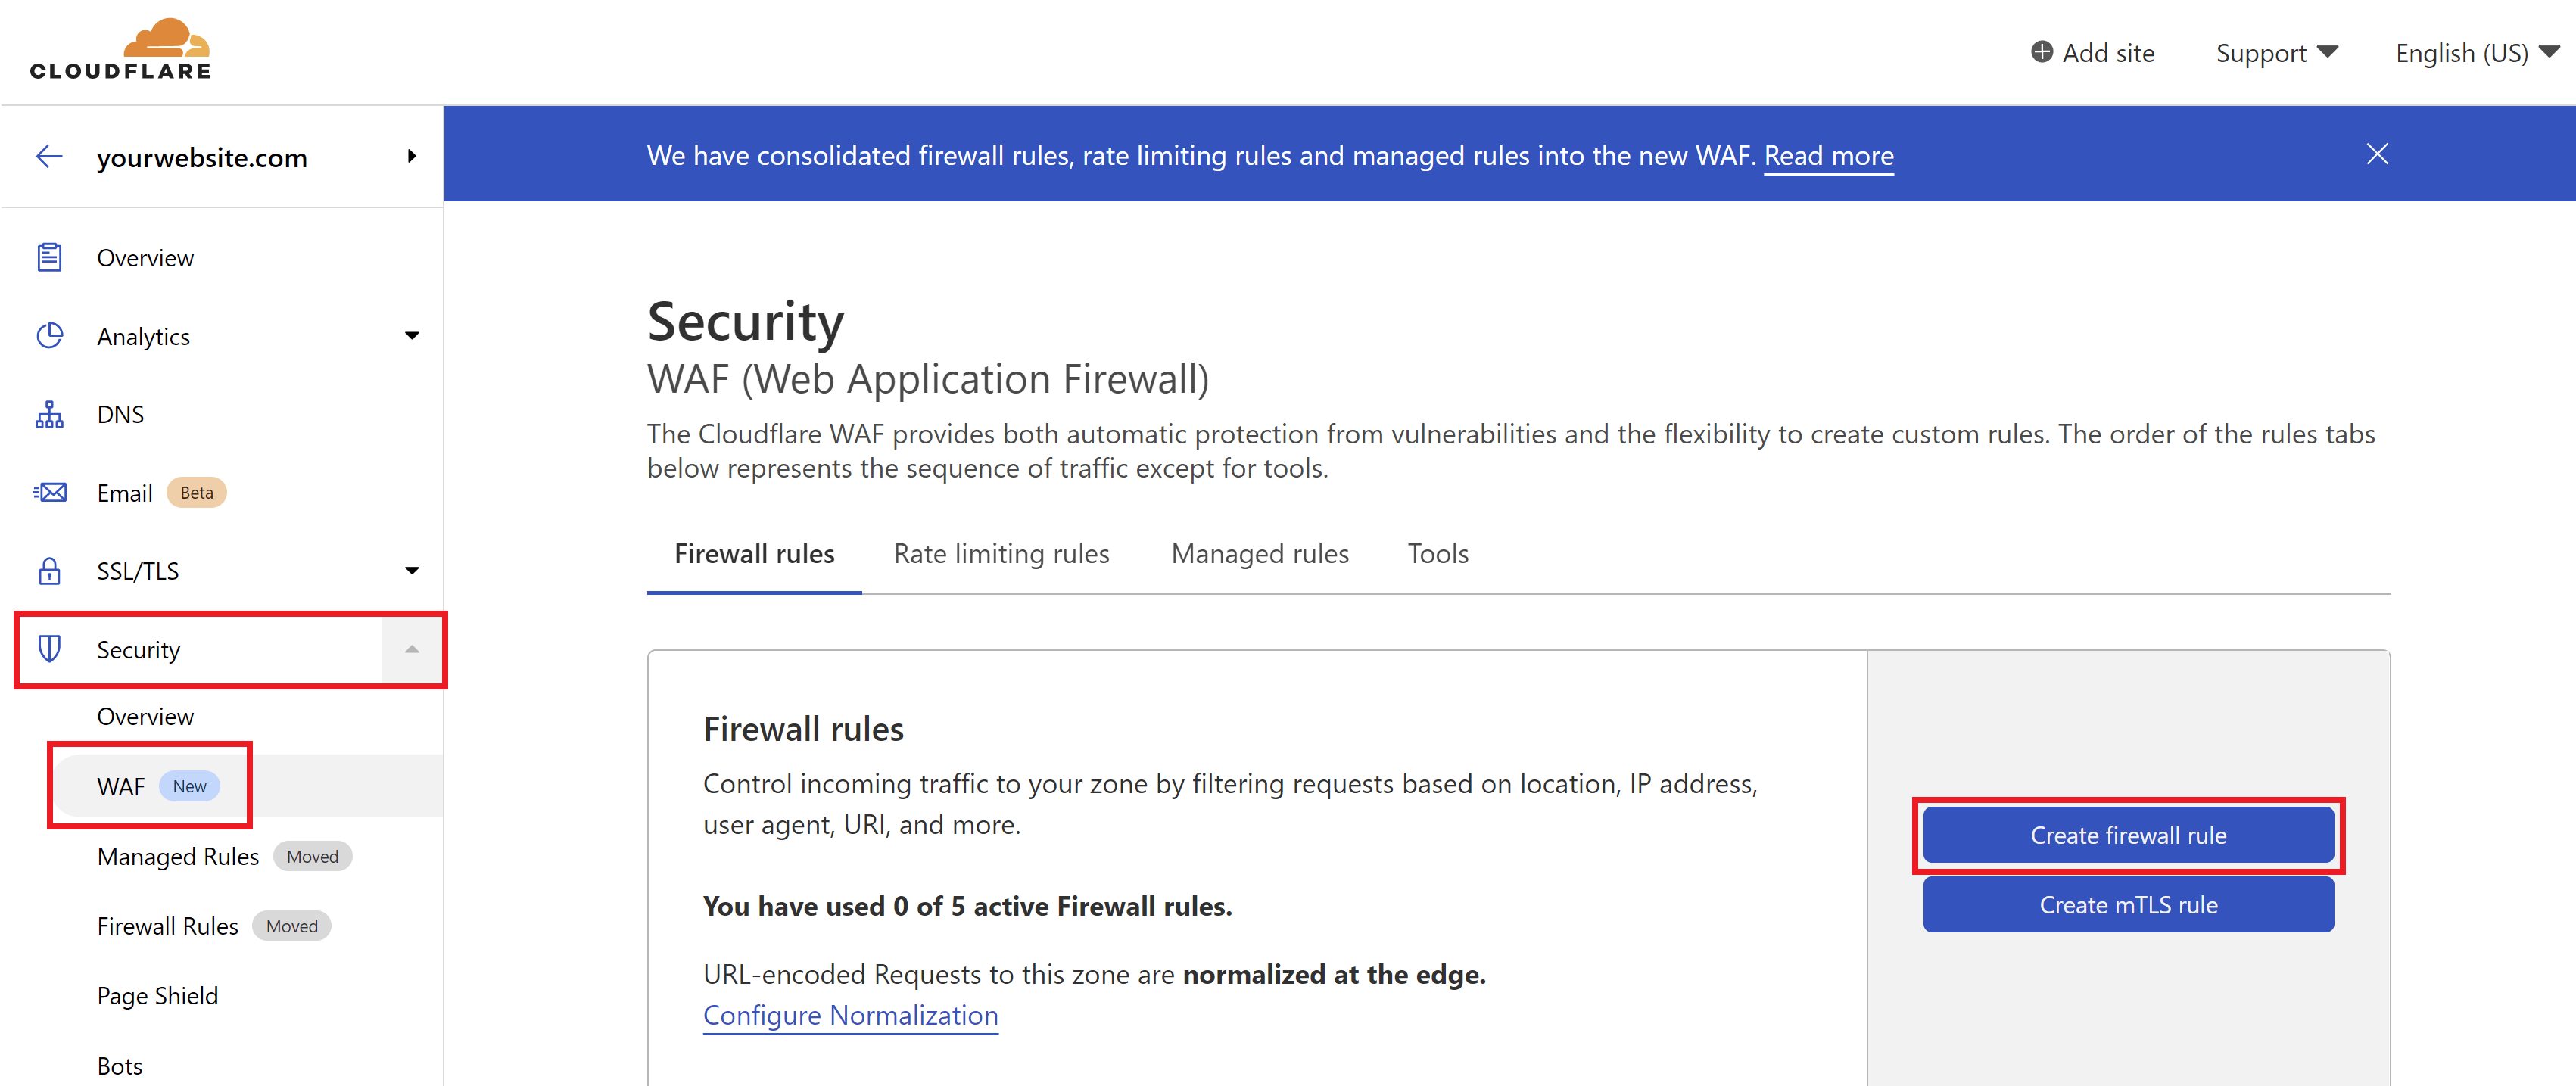
Inside your Cloudflare account choose your website and then click through to the Security > WAF page. Here click the Create a Firewall Rule button.
2. Configure Your Firewall Rule Expressions
First, give your rule a name that’s easy to identify.
Here is what the rule looks like (note that you can change “45jpfAY9RcNeFP” to something different):
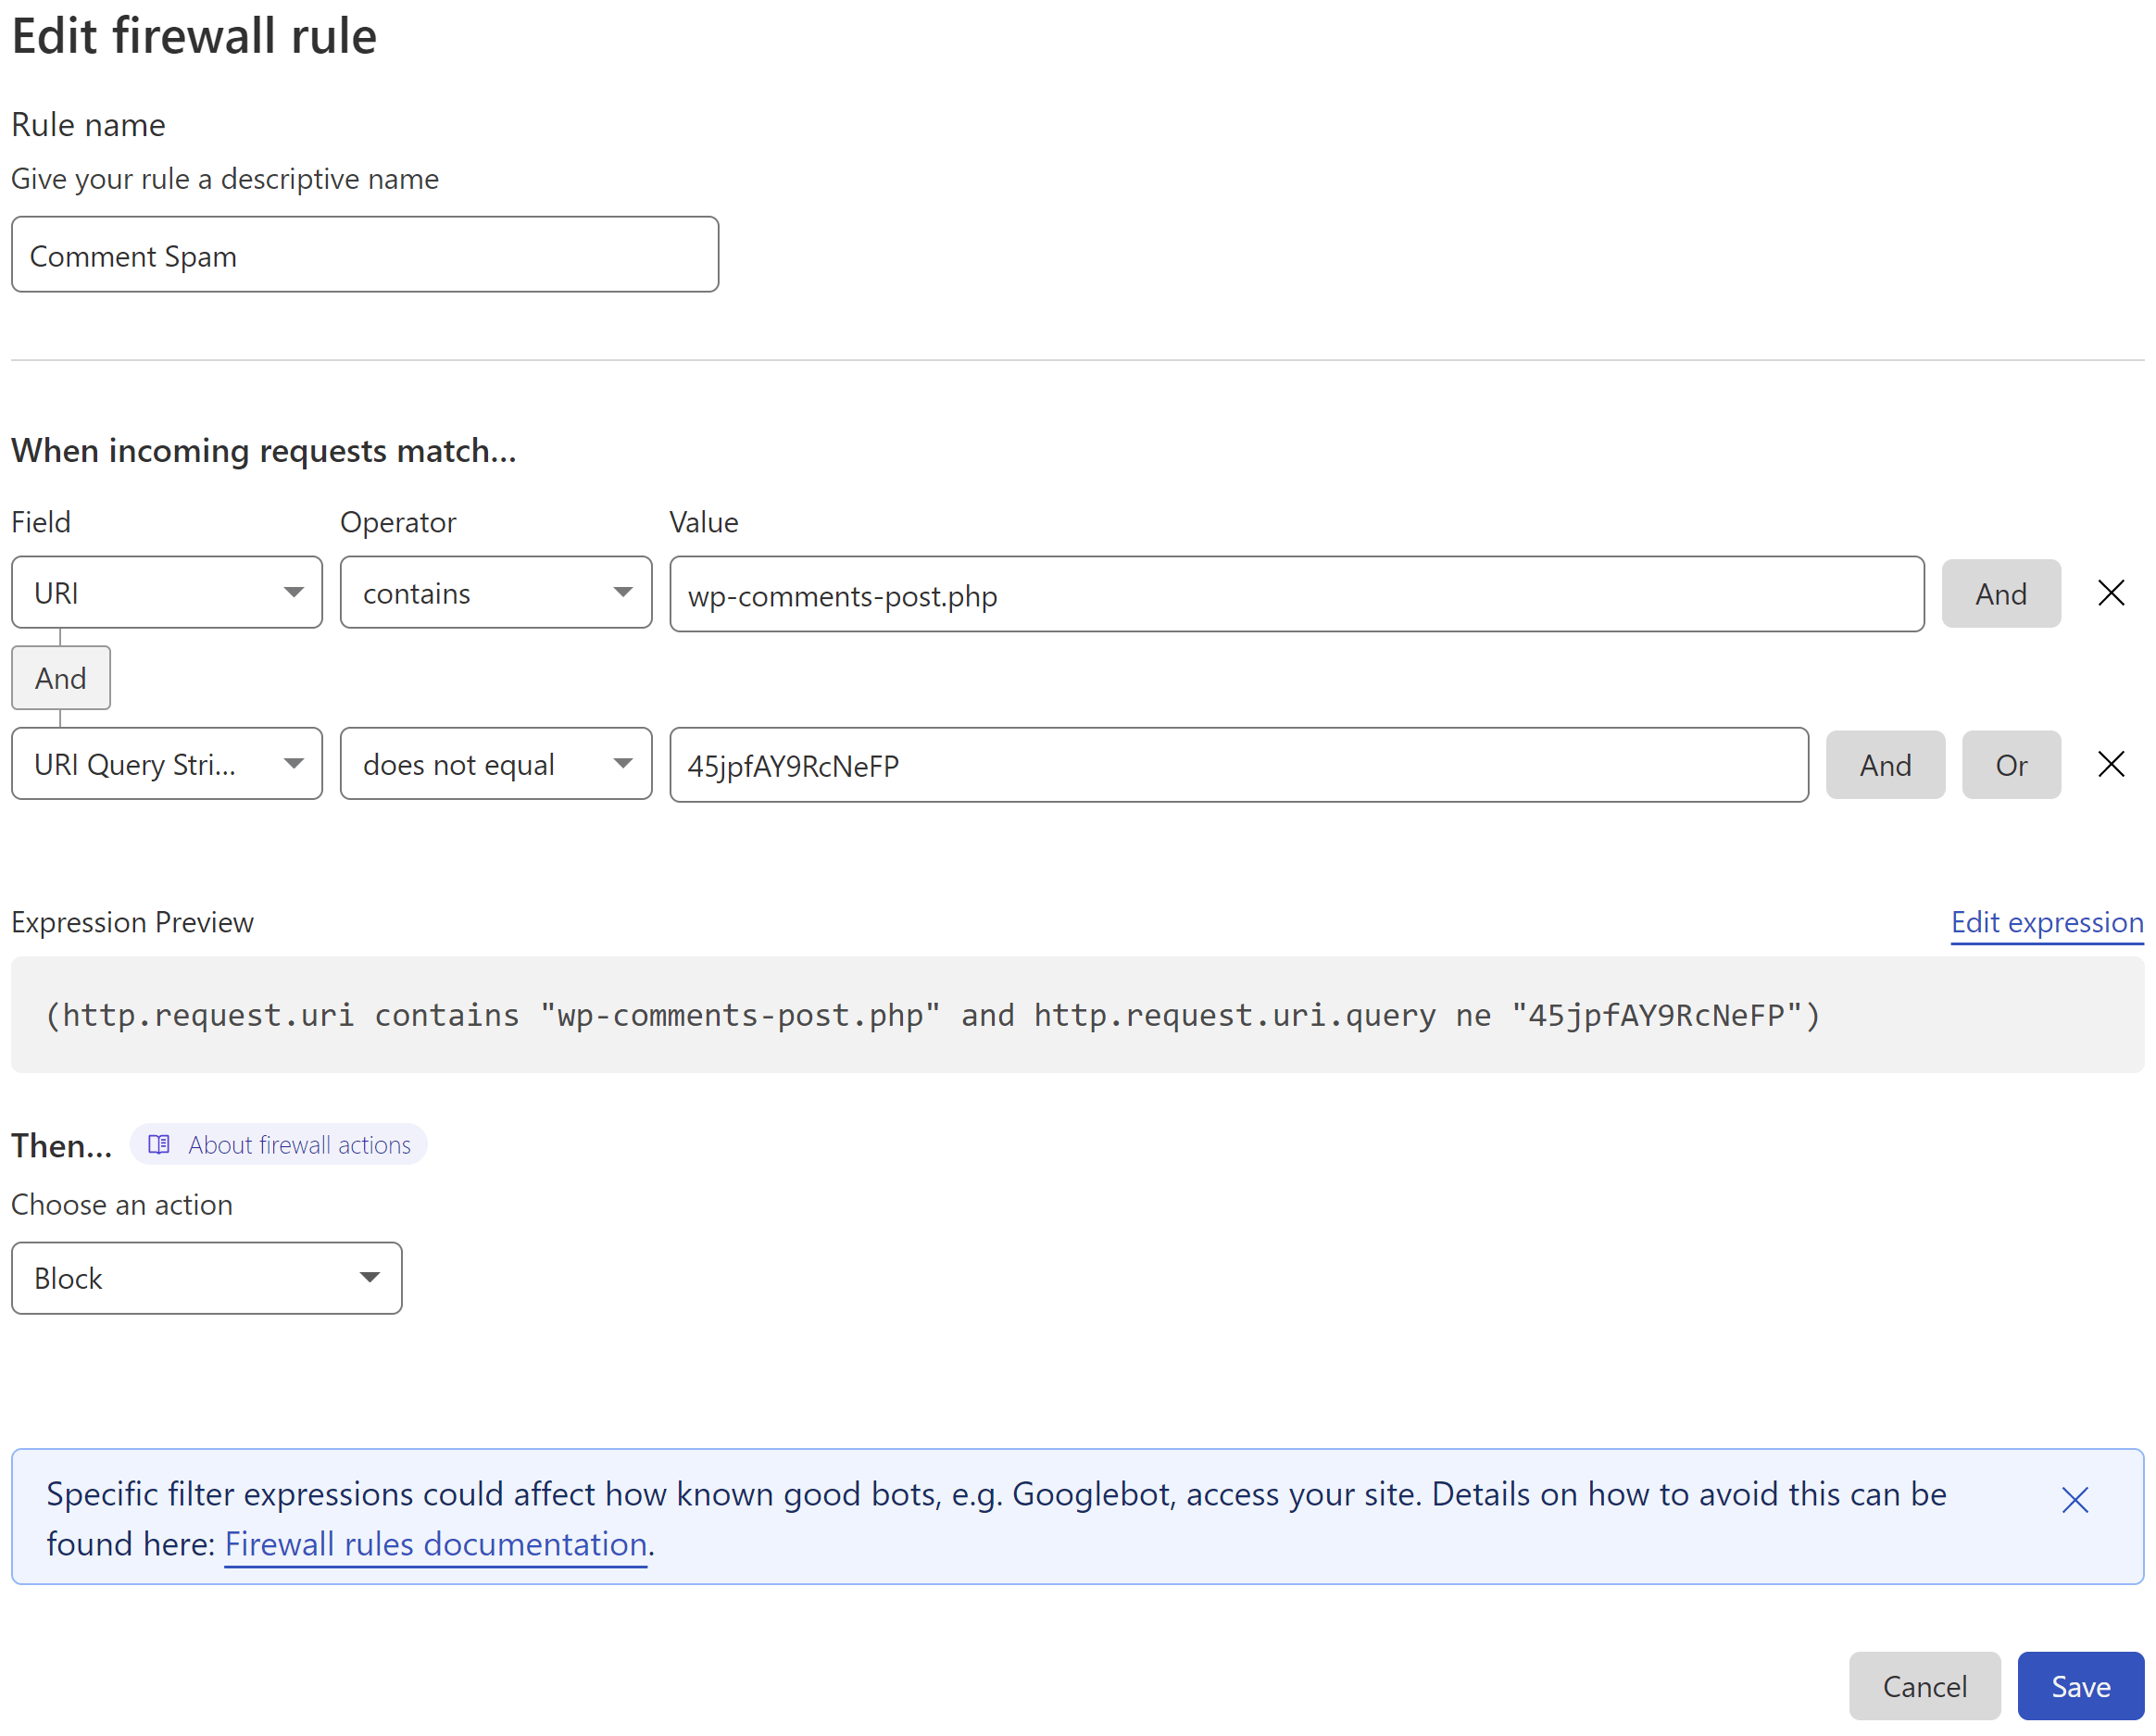
This states that if:
- the URI contains /wp-comments-post.php
- but the query string isn’t appended
- then perform ACTION (in this case Block)
3. Set the Action
Cloudflare can block all requests that break the rule outright.
4. Deploy Your Rule
When ready, click the Deploy button to set your new firewall rule live.
Also, ensure that you have orange clouds active on your A and CNAME records so that traffic to your site is passing through Cloudflare’s system.
Cloudflare will now block a ton of comment spam for you, and you can also include this in the block contact form rule in this article if you’ve already created it.
Restrict wp-comments-post.php on Nginx
On Nginx we can make use of the *-main-context.conf include.
1. Create a Custom Nginx Config
On Nginx you can create a server-wide config that will apply to all sites or a site-specific config.
To create a server-wide config, run the following command:
/etc/nginx/extra.d/blockspam-main-context.conf
To create a site-specific config, run this command (replace site.url with your site’s domain name):
nano /var/www/site.url/nginx/blockspam-main-context.conf
2. Add your Block Spam Configuration
Paste the following, and edit as necessary to target the correct URI for your website:
# You may change 45jpfAY9RcNeFP to something else
location = /wp-comments-post\.php {
if ($query_string !~ "45jpfAY9RcNeFP") {
return 404;
}
}
Save the file with CTRL+O followed by Enter, and then CTRL+X to exit nano.
This states that if:
- the URI matches /wp-comments-post.php
- but does not include this specific query string
- then return a 404 response.
3. Check and Reload Nginx
Check the Nginx configuration file with:
nginx -t
If no errors are returned, reload Nginx with:
gp ngx reload
Nginx will now comment form spam, and you can also use this alongside the block contact form rule in this article if you’ve already created it.
Restrict wp-comments-post.php on OpenLiteSpeed
When adding your rewrites, we recommend that you use the rewrites.conf instead of your .htaccess file.
Step 1. Edit your rewrites.conf
To edit the config file, use the following command (switching out site.url with your site URL):
nano /var/www/site.url/ols/rewrites.conf
Step 2. Add the rewrite rule
Add your rewrite as follows:
# If Query string doesn't matches return 404
RewriteCond %{REQUEST_URI} .wp-comments-post\.php
# You may change 45jpfAY9RcNeFP to something else
RewriteCond %{QUERY_STRING} !^45jpfAY9RcNeFP
RewriteRule (.*) - [R=404,L]
Next, save the file with CTRL+O and then Enter, and exit nano with CTRL+X.
Step 3. Rebuild your vhconf
As the rewrites.conf file has been modified, a specific OpenLiteSpeed command has to be executed in order for the changes to take effect (replace “site.url” with your domain name):
gpols site site.url

Method 2: Restrict wp-comments-post.php with a Cloudflare JS Challenge
Denying bot traffic access to the wp-comments-post.php file can be done at the DNS level with a Cloudflare JS challenge.
Unlike contact form spam, which can be a little more complex to deal with, blocking this traffic for comments is a simple matter. Automated spam submissions can’t process JS and thus fail Cloudflare’s JS challenge, which then blocks this traffic at the DNS layer before the request can even reach your server.
This is the easiest option to implement and Cloudflare’s free firewall rules offer a quick and simple way to accomplish this.
Important
The Cloudflare proxy must be active on your website for the firewall rules you set to take place. Please ensure that you set orange clouds for your A and CNAME records.
Step 1. Create a Cloudflare Firewall Rule
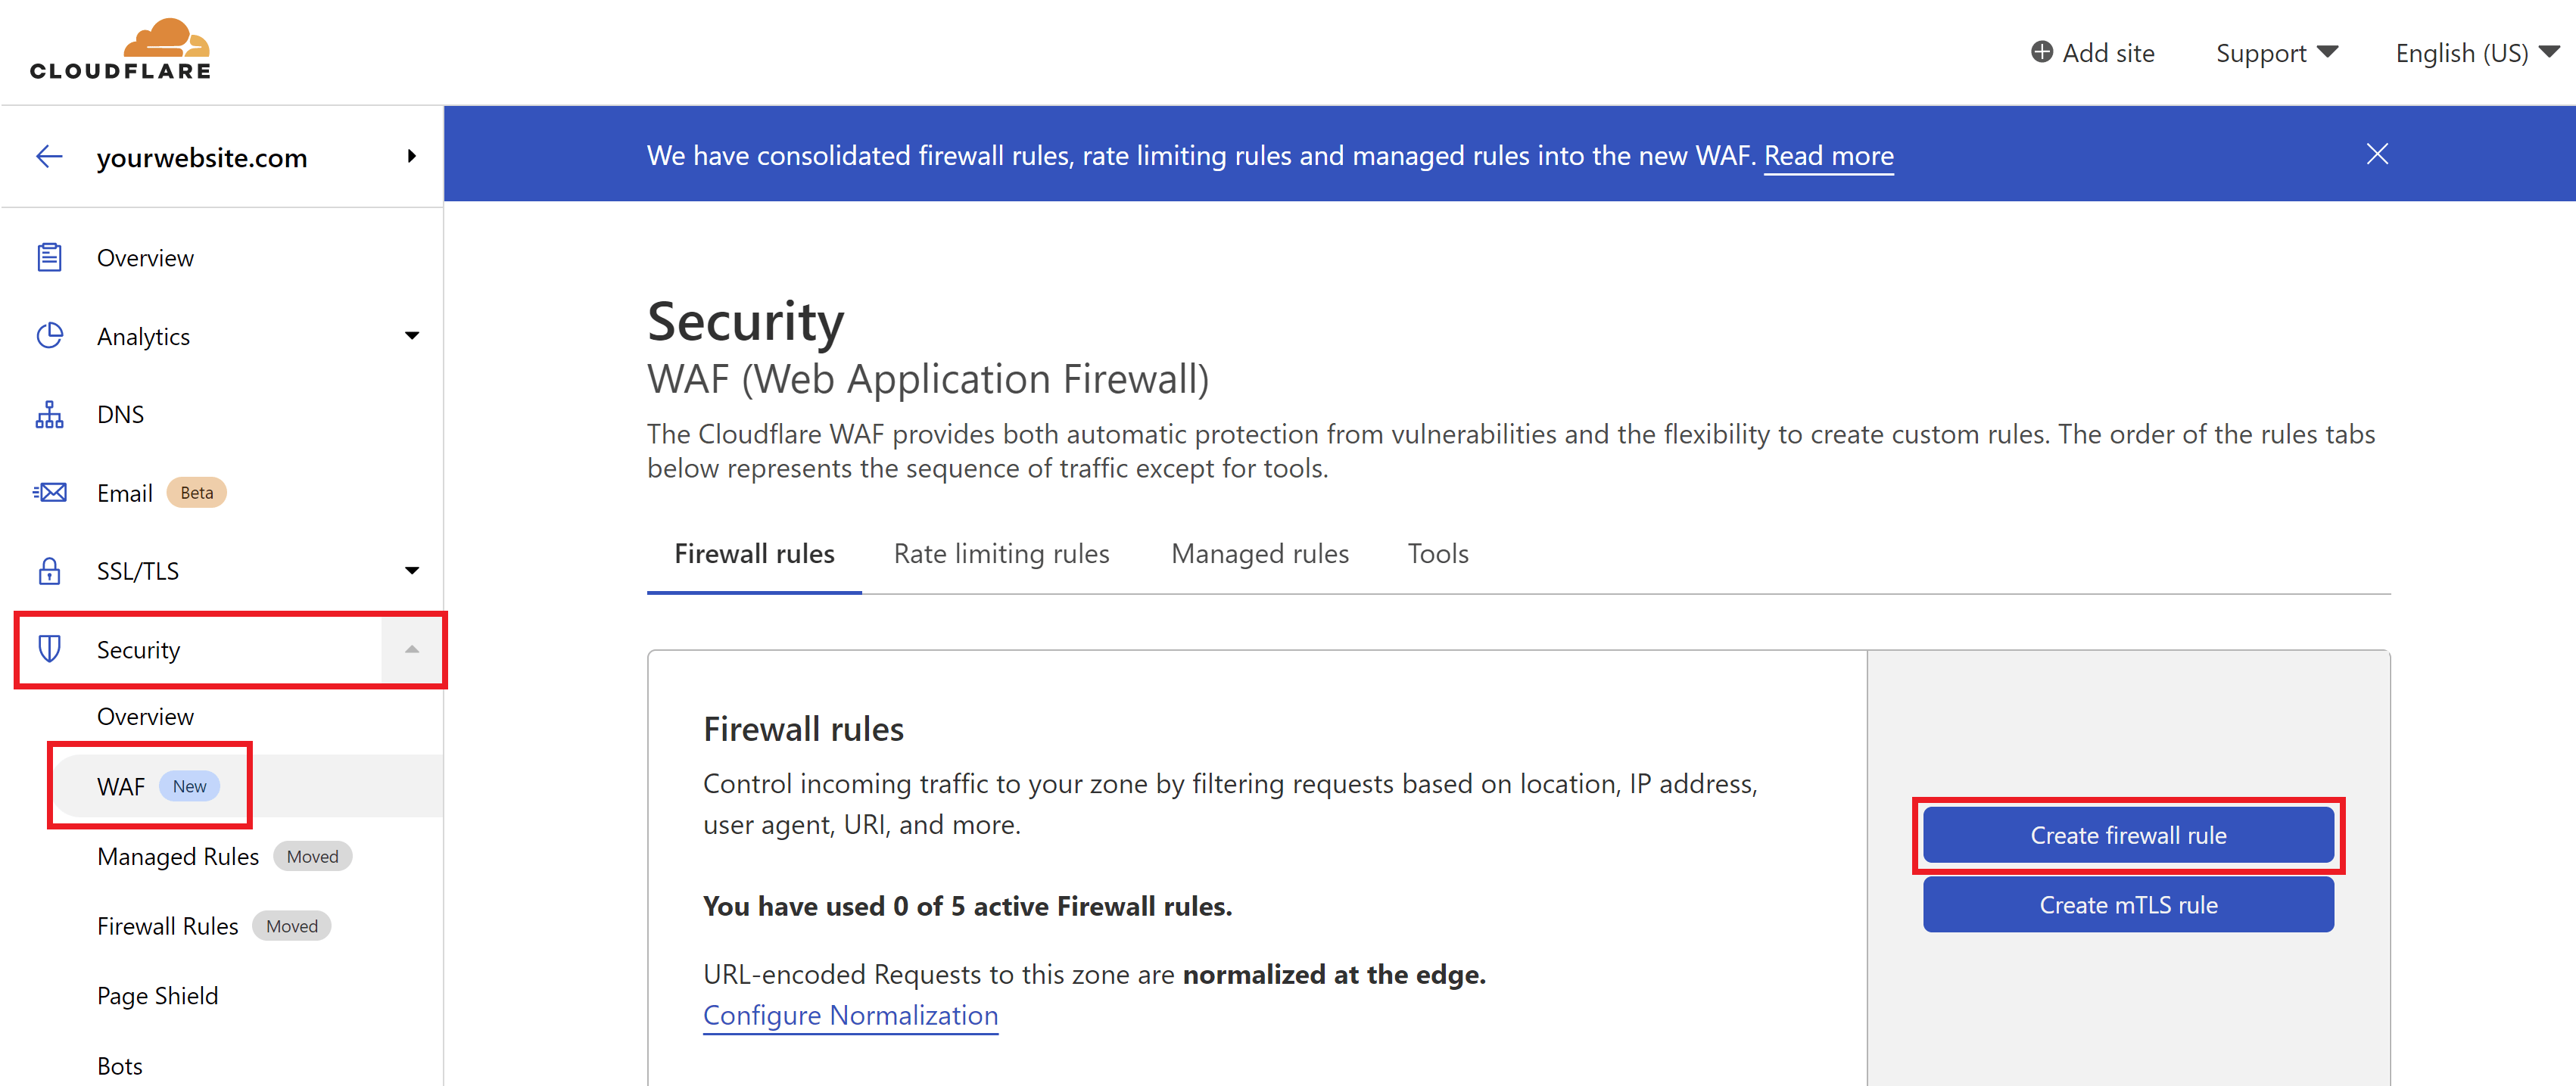
Inside your Cloudflare account choose your website and then click through to the Security > WAF page. Here click the Create a Firewall Rule button.
2. Configure Your Firewall Rule Expressions
First, give your rule a name that’s easy to identify.
Here is what my rule looks like:

This states that if:
- the URI contains /wp-comments-post.php
- then perform ACTION (see below)
3. Set the Action
Cloudflare offers two methods that could be utilized here. One is their “Managed Challenge” and the other is their JS challenge. As the JS challenge only takes place after a visitor has browsed the page and submitted their comment, the very brief Cloudflare challenge page that pops up doesn’t interfere with the users actions beforehand.
4. Deploy Your Rule
When ready, click the Deploy button to set your new firewall rule live.
Also, ensure that you have orange clouds active on your A and CNAME records so that traffic to your site is passing through Cloudflare’s system.
Cloudflare will now block a ton of comment spam for you, and you can also include this in the block contact form rule in this article if you’ve already created it.
Method 3: Restrict wp-comments-post.php if referrer doesn’t equal your website’s URL using Cloudflare
The following can be used as an alternative to the above two rules. It blocks submissions that aren’t made directly from your website.
Bonus!
You can also use this to prevent contact form spam. Details included below.
Step 1. Create a Cloudflare Firewall Rule
Navigate to the Security > WAF page, and click the Create Firewall Rule button.
Step 2. Configure Your Firewall Rule Expression
First, give your rule an easy to identify name.
Here’s what the rule looks like:
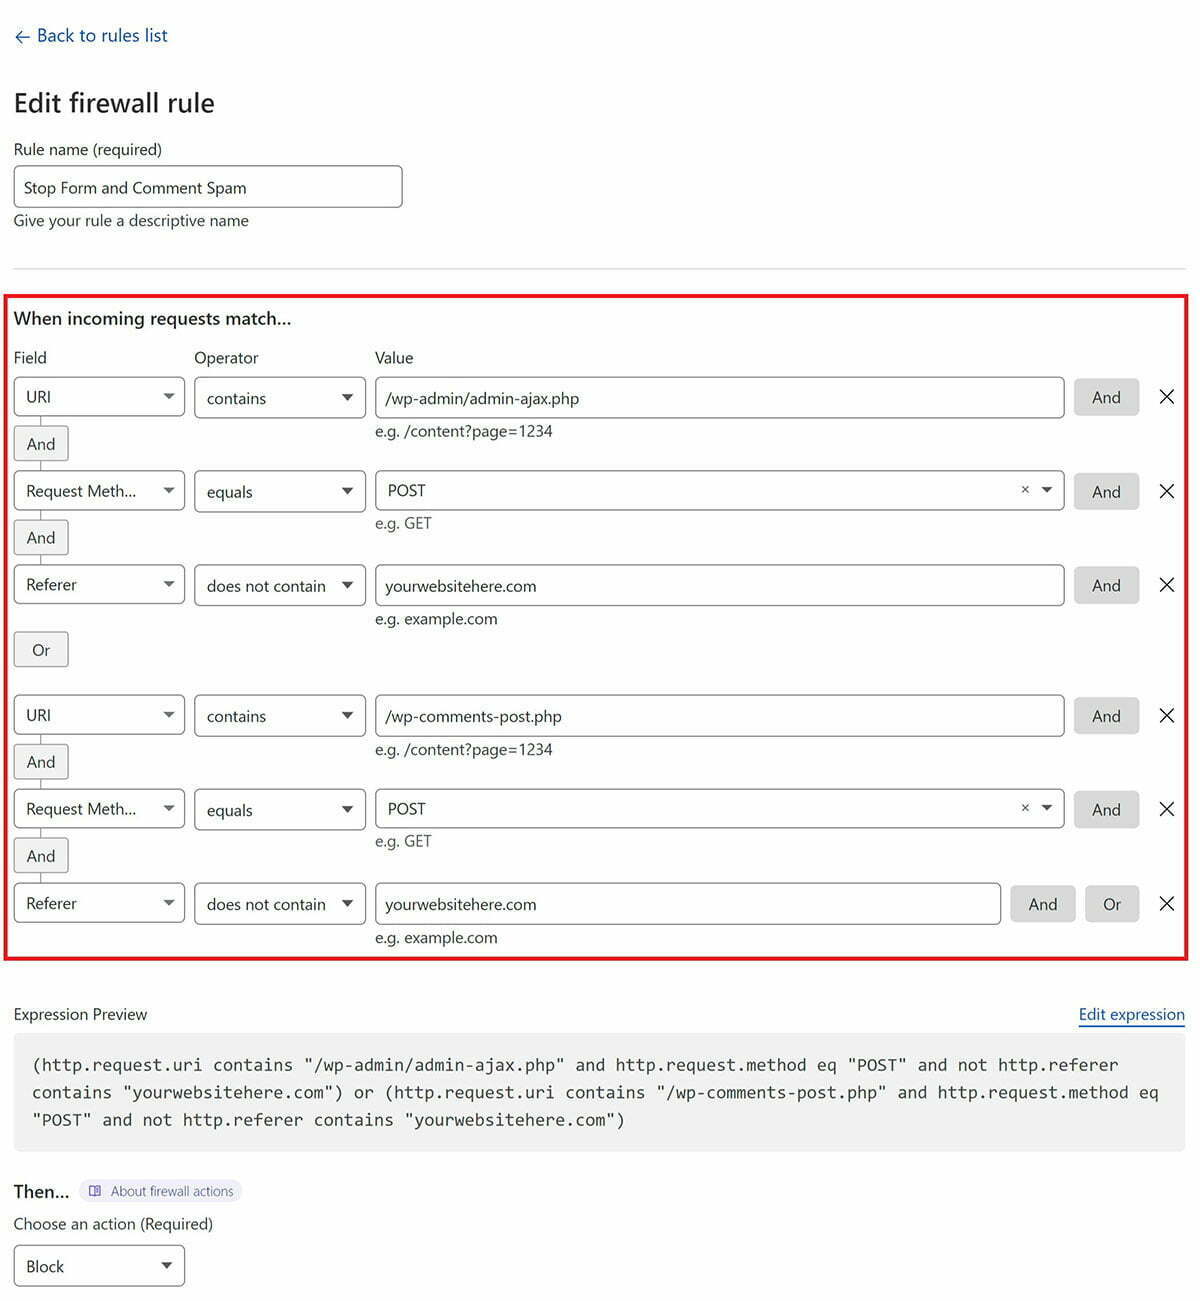
This states that if:
- The URI contains either /wp-admin/admin-ajax.php or /wp-comments-post.php
- and the request method is POST
- and the referrer does not contain your website URL
- then perform ACTION (block in this case)
(http.request.uri contains "/wp-admin/admin-ajax.php" and http.request.method eq "POST" and not http.referer contains "yourwebsitehere.com") or (http.request.uri contains "/wp-comments-post.php" and http.request.method eq "POST" and not http.referer contains "yourwebsitehere.com")
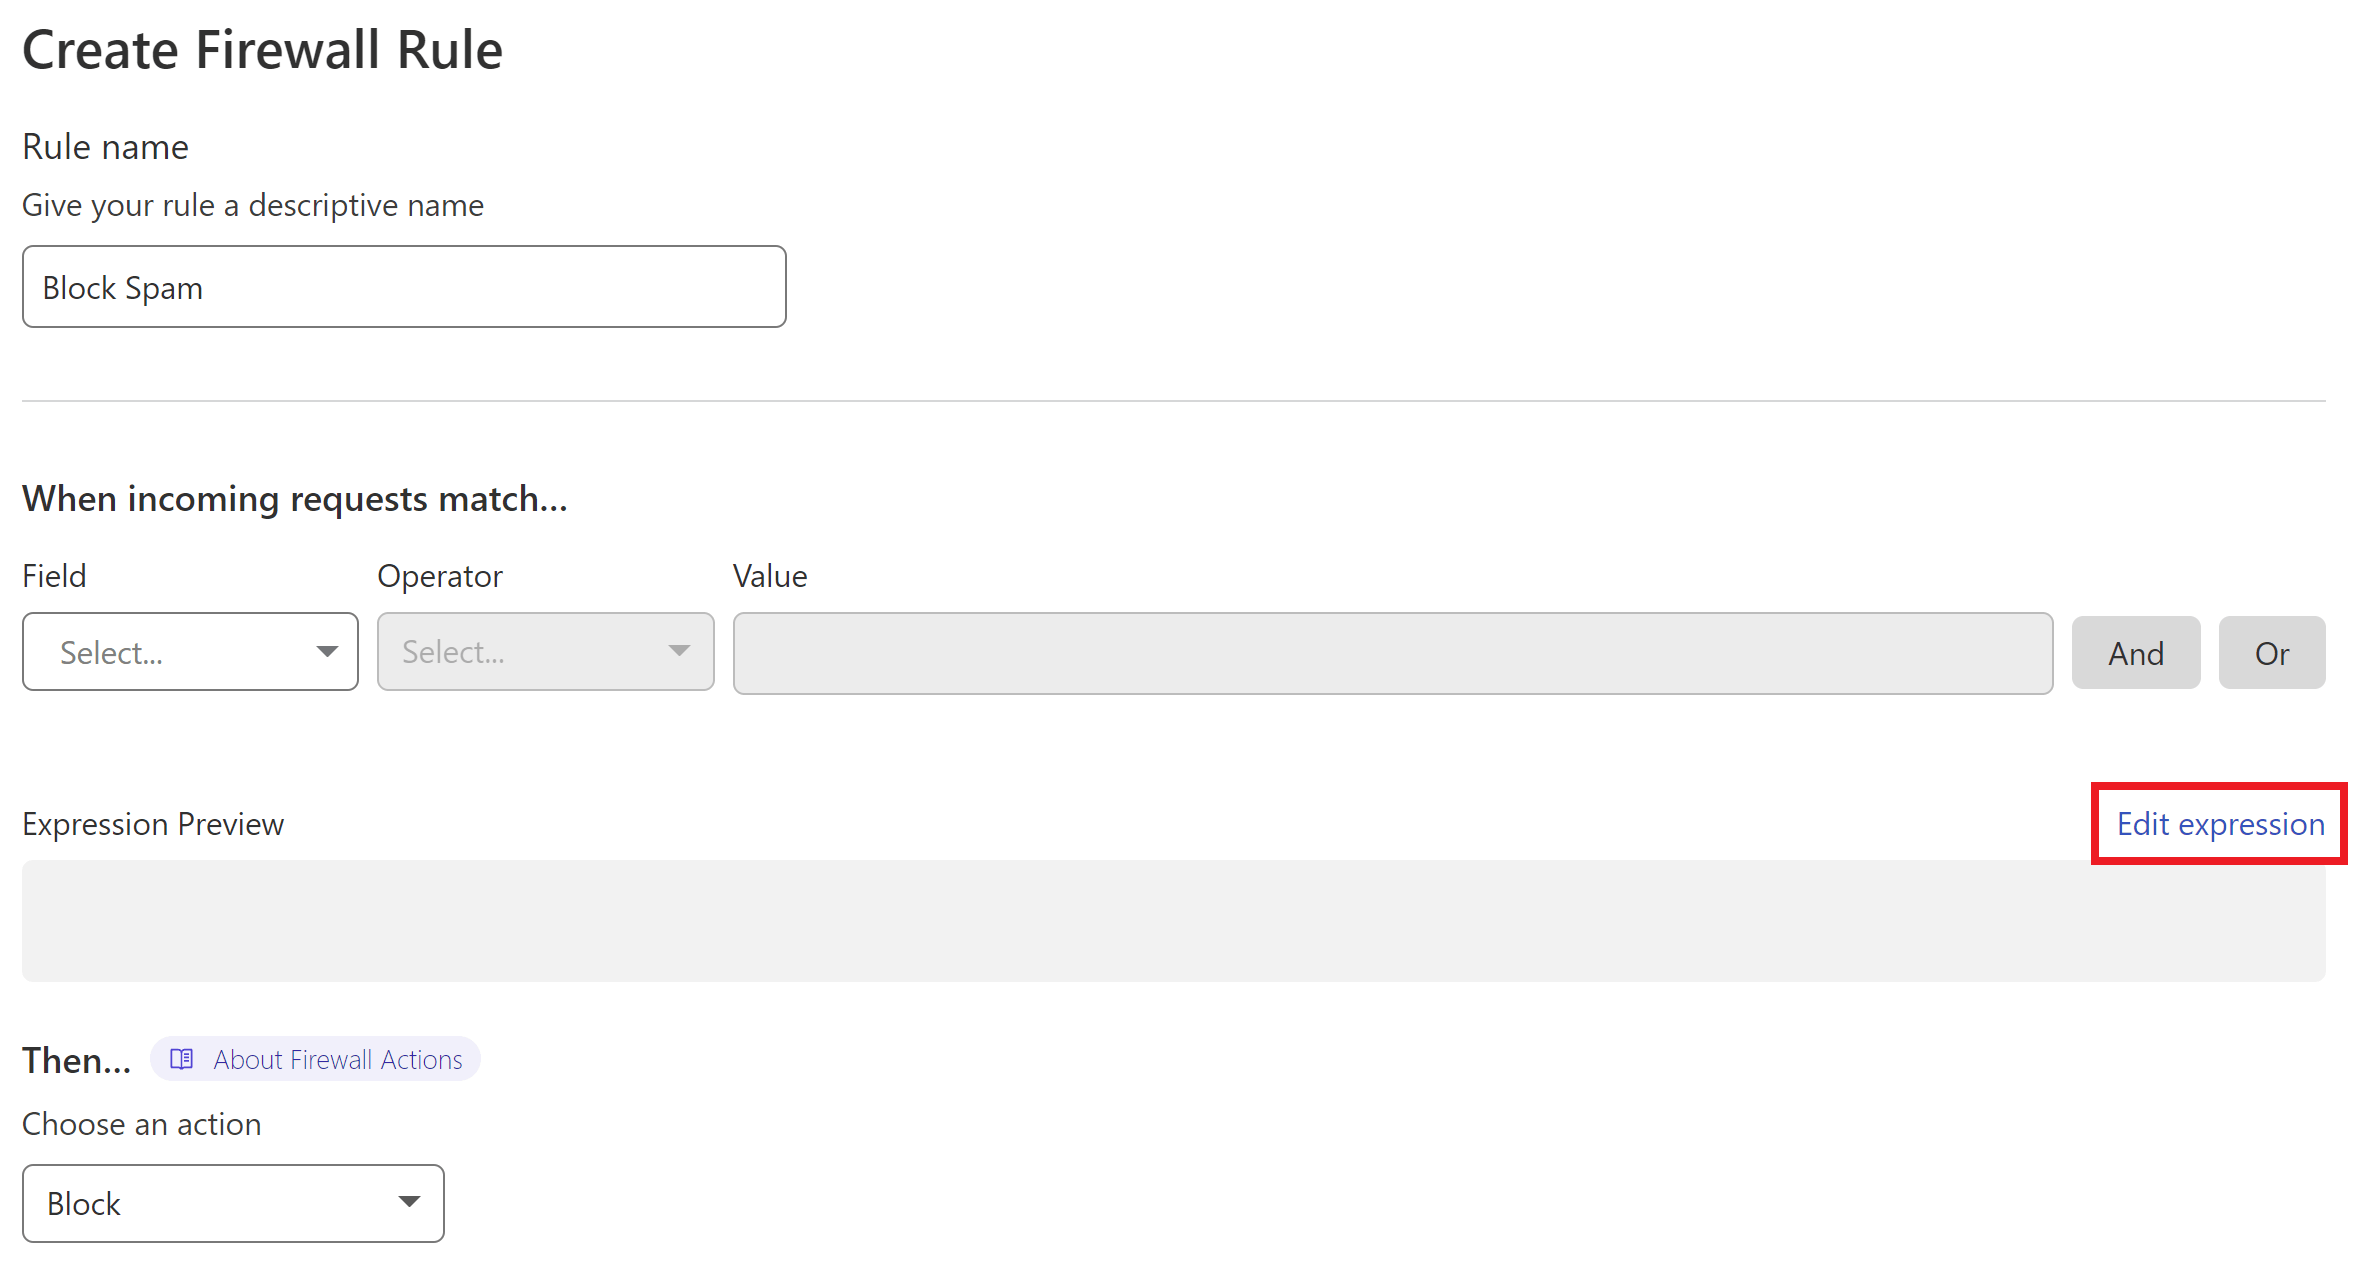
Next, inside your Firewall rule, click “Edit Expression” and paste the above.
Step 3. Set the Action and Deploy Your Rule
Cloudflare can block all requests that break the rule outright.
When ready, click the Deploy button.
Method 4: reCAPTCHA or hCaptcha
CAPTCHA solutions can also be a great way to block comment spam, but this is also my least favorite method.
Google ReCAPTCHA
reCAPTCHA V3 is an excellent, non-intrusive way to add spam protection to your comment section.
reCAPTCHA is an acronym for ‘Completely Automated Public Turing Test to tell Computers and Humans Apart’, and V3 does an excellent job of living up to its name.
Combining this with the two methods above almost guarantees virtually no spam (at no cost), but do take into account there may be privacy concerns with Google’s reCAPTCHA software for EU users.
A couple of the more well-rated plugins that will make adding this to your site a quick and easy task are:
Most anti-spam plugins tend to have a fairly high number of negative reviews, but if V3 is working as expected it should do a great job of preventing spam.
hCaptcha
hCaptcha is an alternative to Googles reCAPTCHA, and offers a more privacy-focused solution.
At this point in time it may not be as effective as reCAPTCHA V3, but it should still offer additional protection, and comes with it’s own WordPress plugin:
2 Additional, Alternative Methods for Blocking Comment Spam
I believe the first two methods above are reliable, easy to implement, and essentially evergreen. They cut bot traffic off before they can even begin, denying them access to the wp-comments-post.php.
However, if neither is to your liking, here are 2 additional resources you can dig into.
1. Block Spam by Denying Access to No-Referer Requests
Jeff Starr published this solution years ago and it’s still solid today. Essentially, you deny the ability to post comments if requests don’t originate from your domain.
UPDATE: This is now also included above as a Cloudflare rule here.
The code for .htaccess along with more information on this solution is included in Jeff’s post here:
Block Spam by Denying Access to No-Referrer Requests by Jeff Starr
For Nginx, you can use the following snippet (replacing “example.com” with your domain):
location ~* ^/wp-comments-post\.php {
if ($http_referer !~* ^https://example.com/) {
return 403;
}
include fastcgi_params;
set_if_empty $sockfile php;
fastcgi_pass $sockfile;
}
Use the instructions detailed above (click here), but add this code into the blockspam-main-context.conf include instead.
2. Remove the URL Field and Deny Any POST Requests That Use It
Another plugin-free solution I came across is a more advanced honey pot trap that targets bots specifically on their end goal.
It’s entirely WordPress-based and hides it involves hiding the URL field from the comments form from regular website visitors so they can’t fill it in. Bots, however, can still post to it, and it’s used as a honey pot that blocks them if they fill this field in.
Which they will because that’s why they’re there.
You can learn more on the author of the solutions blog here:
How to automatically block WordPress bot spam without a plugin by Christopher Heald
Additional Protection with WPFail2Ban and/or the Comment Blacklist
If some douchebag is determined to visit your website and manually post spam, you can add some additional protection by using the WPFail2Ban integration and making use of the build Comment Blacklist functionality inside of WordPress itself.
Using WPFail2Ban
Our integration will the WPFail2Ban plugin can help you further block bots from posting spam by identifying patterns of bad behavior (such as trying to post comments to non-existent posts), and logging any comments that you mark as spam, preventing those IPs from posting further spam in the future.
You can learn more about our integration with WPFail2Ban and using Fail2Ban on your servers here:
Configuring Fail2Banhttps://www.verdanttcs.com/ to Prevent Brute Force Attacks
Make use of the Comment Blacklist
WordPress natively includes functionality that will allow you to add your own blacklist to prevent all types of spam. An excellent resource to get started with this is the Splorp WordPress Comment Blacklist:
https://github.com/splorp/wordpress-comment-blacklist
The GitHub page linked above contains further info on how it was created and considerations to take into account. It is well worth the read, and the list can be used as an excellent foundation for your own list if you want to tweak it.
Adding the Blacklist to Your Website
To add the blacklist to your website, head to your Dashboard > Settings > Discussion. Here you’ll find a section called “Disallowed Comment Keys“.

Paste your blacklist here, scroll down to the bottom of the page, and click the Save Changes button.
Combine this method 1 above and you will immediately reduce spam comments by a significant amount.


