Introduction
There are multiple, quick and easy ways to backup your websites database. In this article, we’ll look at 2 different options: phpMyAdmin and WP-CLI
TABLE OF CONTENTS
There are also popular plugins you could use such as All in One WP Migration, UpdraftPlus, WP Database Backup WP Migrate DB, and BackWPup.
Exporting via phpMyAdmin
If your database is small, phpMyAdmin should work perfectly well for exporting and importing your database. It’s quick and you can do it right inside your vCanopy account.
In your account, open up phpMyAdmin by clicking the database icon next to your website.

Inside phpMyAdmin, click “Databases” at the top of the page.

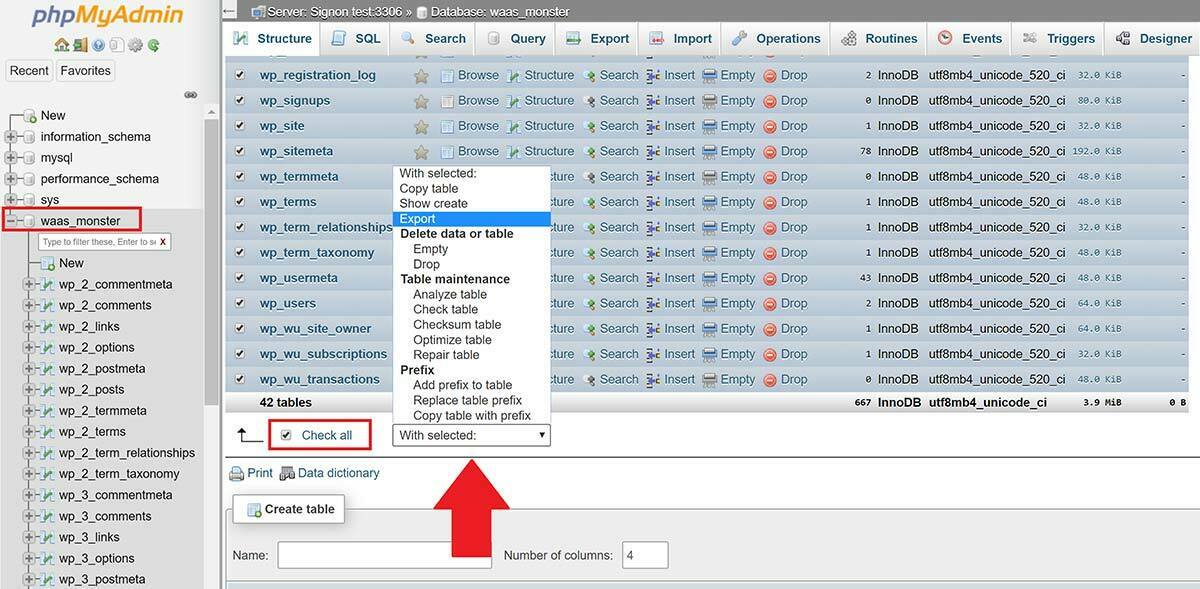
In the left-hand sidebar you can see the databases available. Select your website’s database (in this example the website is “waas.monster”.
Once inside your database, scroll down to the bottom and check the “Check all” box, and then select the export option from the dropdown to the right of the check box.

phpMyAdmin will take you to a new page as shown below. Click “Go” and it will automatically start the download of your database.

Importing via phpMyAdmin
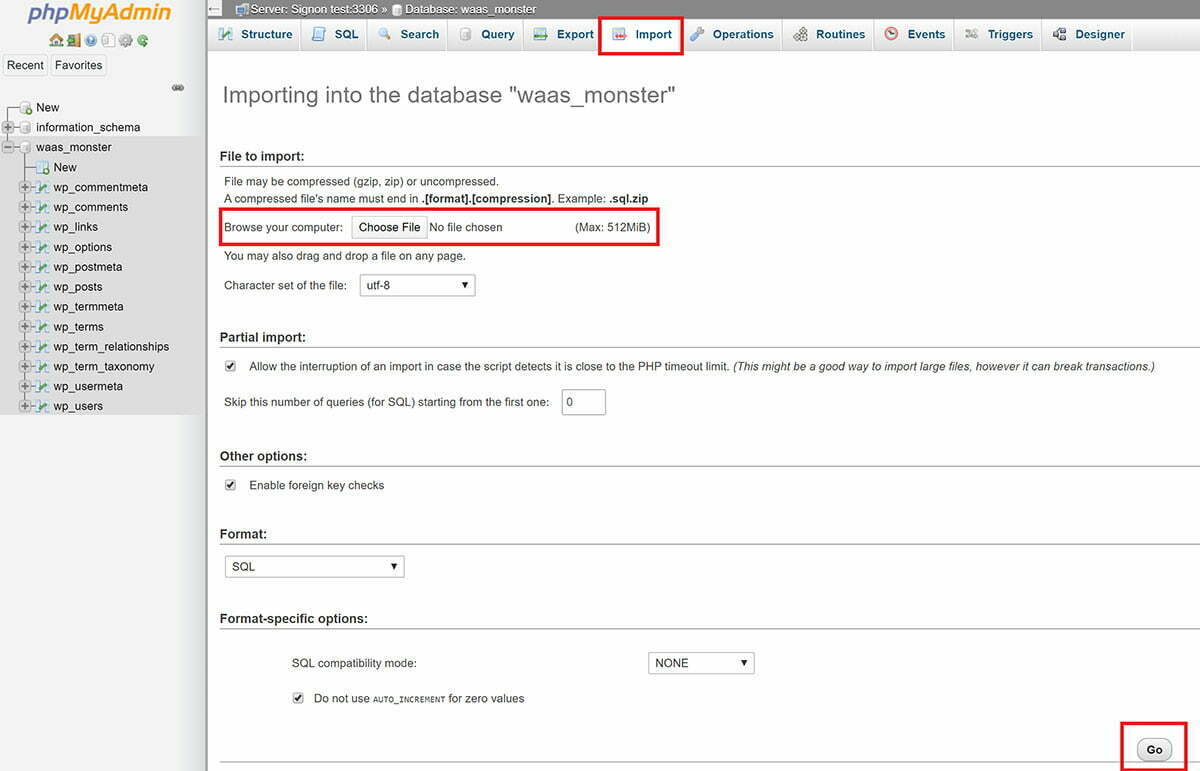
Now we need to import the database. Open up phpMyAdmin like in the step above. In the menu at the top, click on “Import“.
Click the “Choose file” button and add your database, then scroll to the bottom of the page and click “Go“.

This may take awhile depending on the size of your database, but you’ll see a success screen once complete.
Exporting via WP CLI
STEP 1. CONNECT TO YOUR SERVER
For this you’ll need to connect to your server. Please see the following articles to get started:
Step 1. Generate your SSH Key
Step 2. Add your SSH Key to vCanopy (also see Add default SSH Keys)
Step 3. Connect to your server by SSH as Root user (we like and use Termius)
STEP 2. BACKUP YOUR DATABASE
Creating a backup of your database with GP-WP-CLI is quick and easy.
Run the following command to backup your database (switching out “site.url” for your domain name:
gp wp site.url db export /var/www/site.url/htdocs/name_of_backup.sql --all-tablespaces --add-drop-table
For example:
gp wp vCanopy.com db export /var/www/vCanopy.com/htdocs/dbaug2020.sql --all-tablespaces --add-drop-table
NOTE 1: Full path to the .sql file should be entered even if the command is being run from the directory (say htdocs) in which the sql file is present.
NOTE 2: If the above gives you a permissions error your website may require you to add additional privileges. This will look something like:
mysqldump: Error: Access denied; you need (at least one of) the SUPER or SET_USER_ID privilege(s) for this operation
Please see this guide for reference on how to grant extra privileges:
Importing via WP CLI
If your database backup isn’t already on your server you can upload via SFTP into your htdocs folder.
Next, navigate there with:
cd /var/www/site.url/htdocs
Now in the folder where our database is located we can run the following GP-WP-CLI command to import it:
gp wp site.url db import /path/to/database.sql
For example:
gp wp example.com db import /var/www/example.com/htdocs/database.sql
NOTE
The full path to the .sql file should be entered even if the command is being run from the directory (say htdocs) in which the sql file is present.
IF YOU GET AN ERROR WHEN TRYING TO IMPORT..
While still inside your websites /htdocs folder, try running WP CLI directly instead of GP-CLI.
First, try the following, switching “systemuser” with your websites system user:
sudo -u systemuser wp db import database.sql
Alternatively, try adding the --allow-root flag and running the following:
wp db import database.sql --allow-root


