Introduction
For most websites, our timeout settings are what we would consider to be ideal. The only time you may need to change them is when:
- You are uploading a big file or running a plugin-based migration import of some kind.
- Your website has some long-running scripts/queries and is experiencing some timeouts during busy periods.
The first is usually a quick fix. You can increase the timeouts, do what you need to do, and then set them back to our defaults.
The second is usually due to an inefficient codebase and/or too small a server for periods of peak traffic (the server can’t handle the load when you reach a certain level of concurrent visitors).
Configuring Nginx
We have this article on all of the settings and corresponding GP-CLI to help you tweak them to your needs:
The section we’re interested in here though is the FastCGI Configurations:
Configure Nginx FastCGI Settings
PHP FASTCGI PROCESS MANAGER (PHP-FPM)
The settings in this section of the article can cause some confusion. FastCGI is commonly associated with FastCGI caching, and this section does contain some cache-specific settings, however, it also contains settings for PHP-FPM, which stands for PHP FastCGI Process Manager.
PHP-FPM is the server that Nginx passes dynamic PHP requests to for processing. So, if a request is missing/bypassing the cache, Nginx sends these requests to PHP to generate the page. The PHP-FPM server processes these requests and sends the generated HTML back to Nginx to serve to the end-user.
In a nutshell, it deals with the back and forth between Nginx and PHP when a page can’t be served from the website’s cache – whether FastCGI or Redis.
PHP-FPM TIMEOUTS
There are 3 specific settings that deal with FastCGI timeouts. These are as follows, including their default timeout length in seconds:
- fastcgi_send_timeout 60s;
- fastcgi_read_timeout 60s;
- fastcgi_connect_timeout 60s;
These settings configure the timeout periods for the connection between Nginx <-> PHP-FPM, and they aren’t actually related to FastCGI caching.
We have a restriction on the fastcgi_connect_timeout setting – the maximum time allowed is 75 seconds. This is because if Nginx cannot detect the PHP-FPM server for that long then it essentially means that it’s down, and keeping those requests open longer would be of no benefit to yourself or your end-users. The default of 60 really isn’t worth changing as it won’t be at the root of your issue.
The send and read timeouts however can be increased, and these two will help with timeout errors, which we’ll look at below.
We’d also recommend reading through this entire section of the Configuring Nginx article for a more technical breakdown of all the available settings and what they allow you to do.
PHP Max Execution Time
The default time for this setting is 300 seconds, which is 5 minutes. If you’re uploading a file or running an import of some kind, you may need to change this. In this case, the fastcgi_read_timeout can be set to be as long as the max_execution time, which will ensure that Nginx doesn’t close the connection before a long-running script/process has the chance to finish.
How to Increase Timeout Lengths
STEP 1. INCREASE PHP MAX EXECUTION TIME (IF NECESSARY)
This sets the maximum time in seconds a site’s PHP script is allowed to run before it is terminated by the parser.
Directive: max_execution_time
Unit: Seconds
Default value: 300
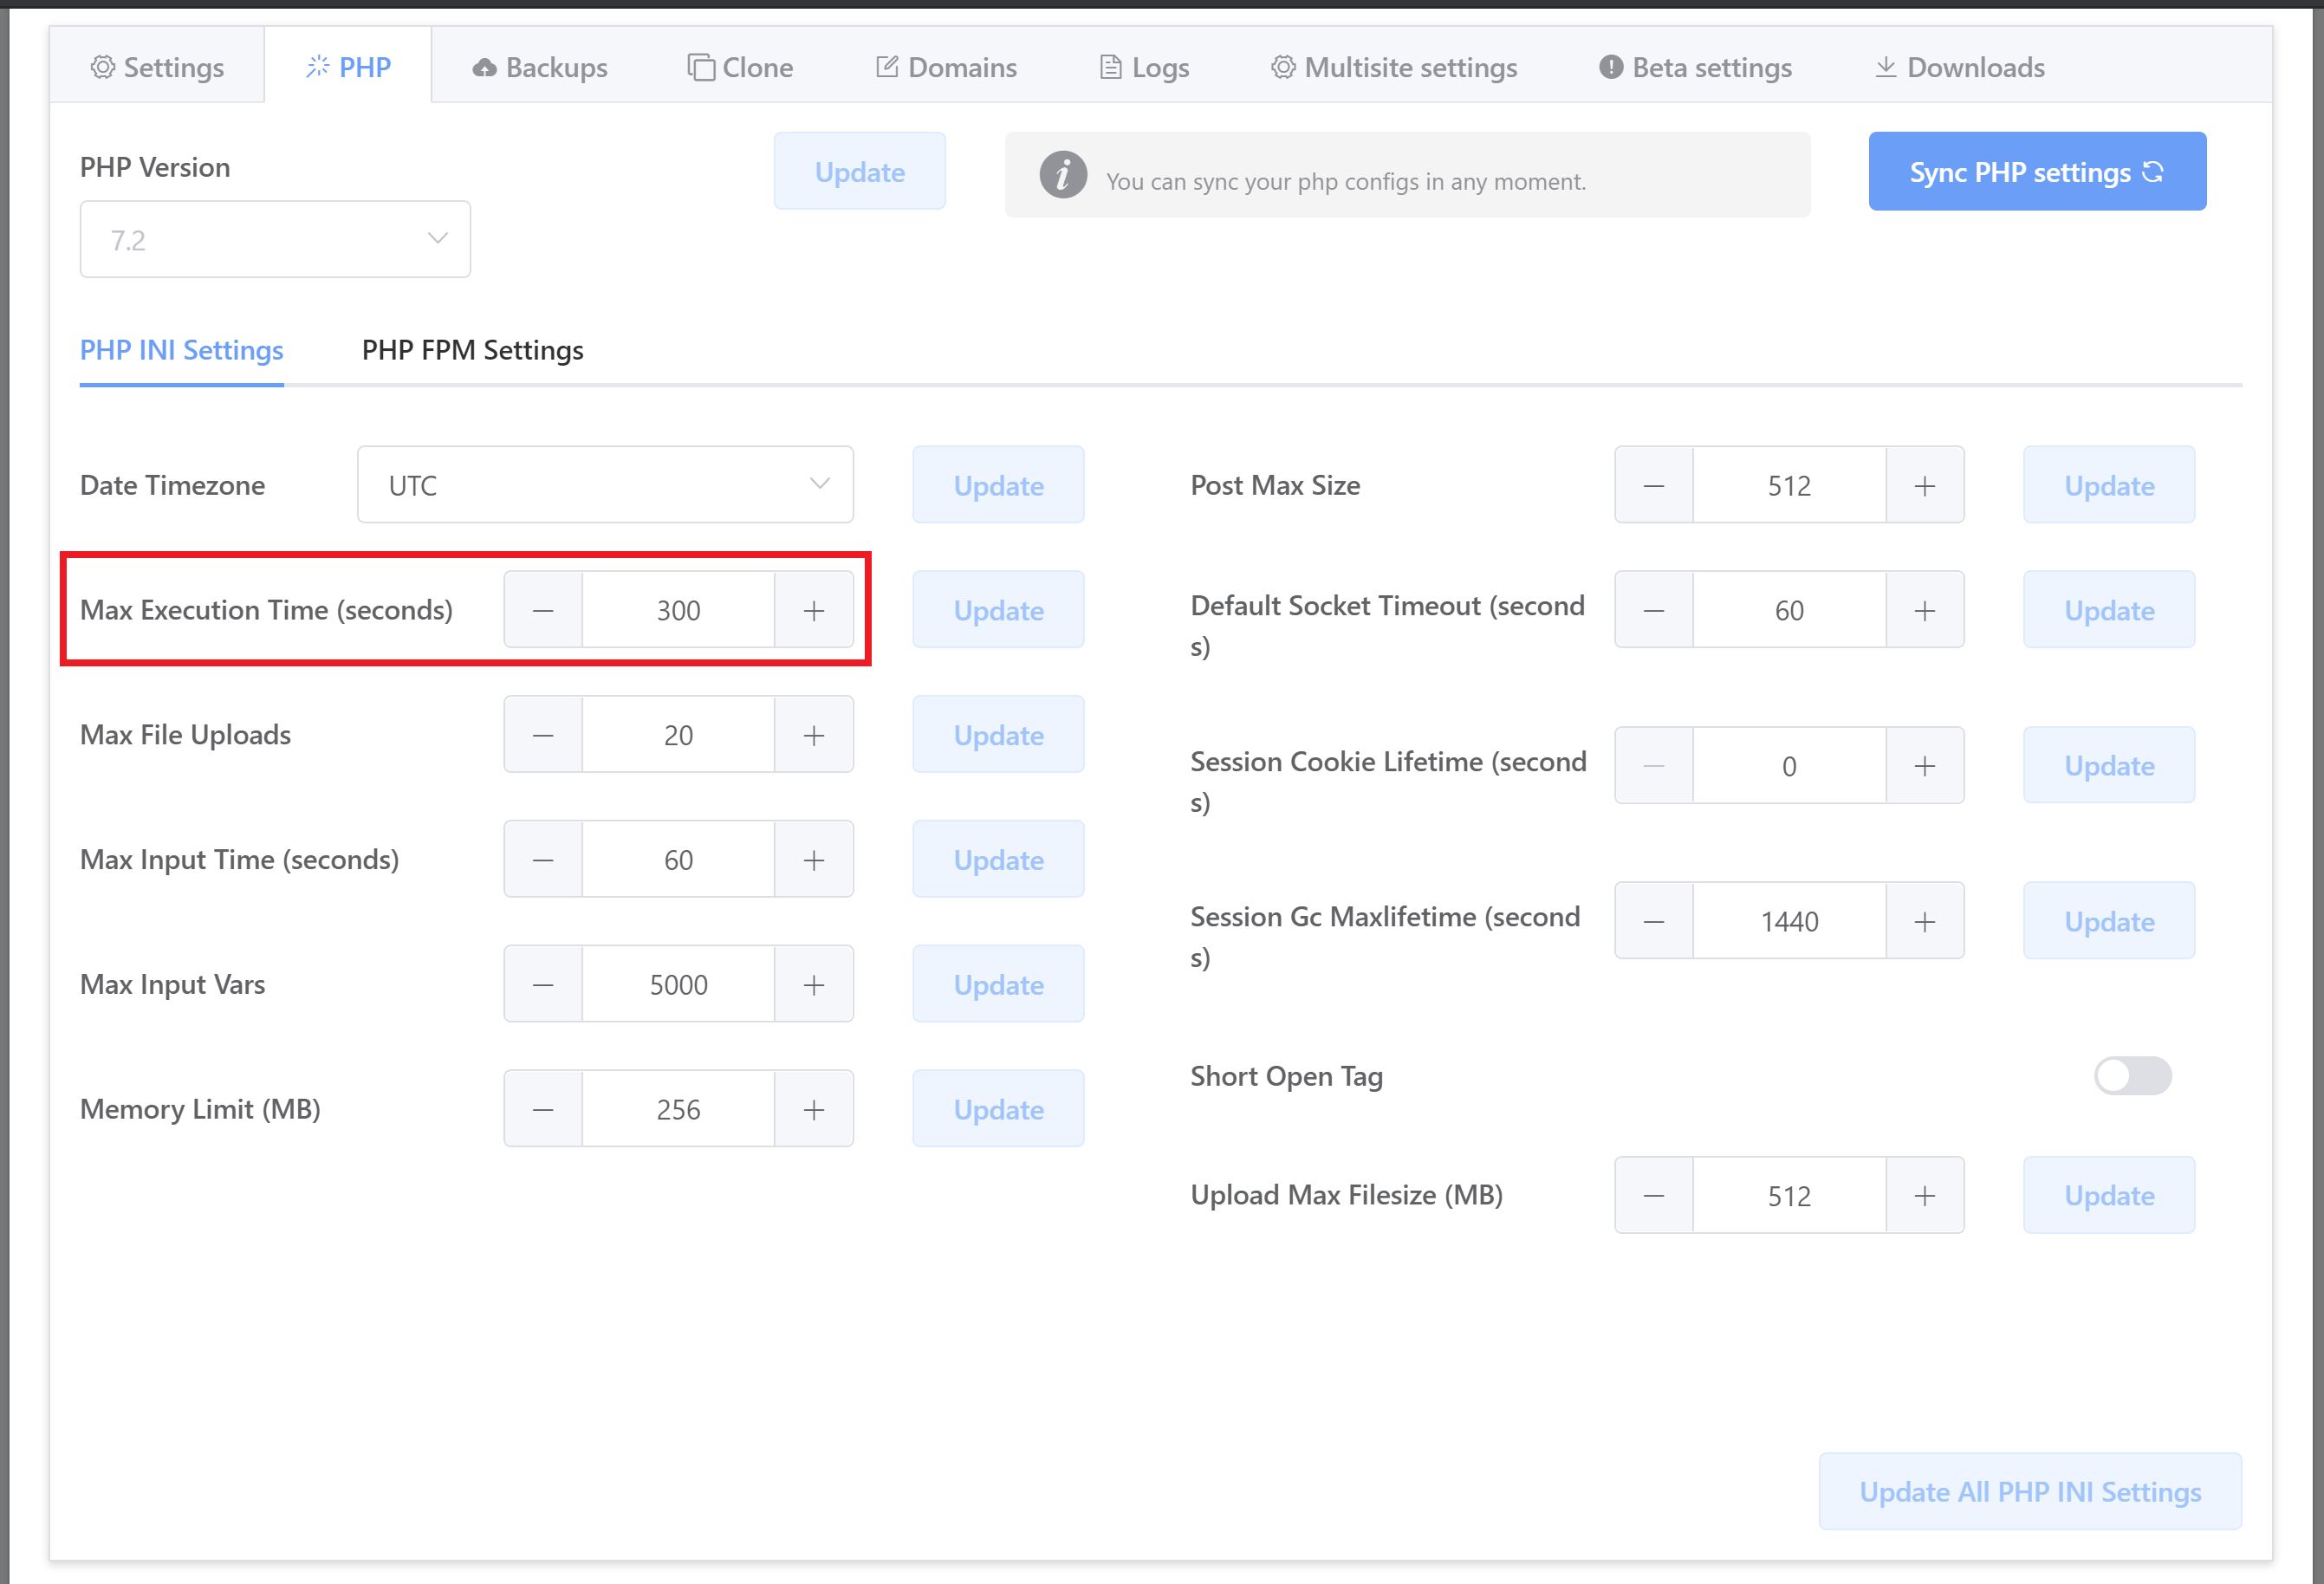
You can configure PHP Max Execution time for your individual websites from within your vCanopy account. Simply click on the domain inside the Sites page of your account to open up the configuration modal, and click through to the PHP tab.
Here you’ll see your PHP INI settings, and you can adjust your Max Execution Time here:

Once you’ve adjusted the setting, click the Update All PHP INI Settings button in the bottom right.
STEP 2. CONNECT TO YOUR SERVER
To increase Nginx FastCGI timeouts you will need to connect to your server. Please see the following articles to get started:
Step 1. Generate your SSH Key
Step 2. Add your SSH Key to vCanopy (also see Add default SSH Keys)
Step 3. Connect to your server by SSH as Root user (we like and use Termius)
STEP 3. INCREASE FASTCGI READ TIMEOUTS
This step and the following are taken directly from our Configure Nginx article.
This setting defines a timeout for reading a response from the FastCGI server. The timeout is set only between two successive read operations, not for the transmission of the whole response. If the FastCGI server does not transmit anything within this time, the connection is closed.
Directive: fastcgi_read_timeout
Config location: /etc/nginx/conf.d/fastcgi.conf
Context: http
Unit: Seconds
Default value: 60
Accepted value: Integer
gp stack nginx fastcgi -read-timeout {accepted.value}Example:
gp stack nginx fastcgi -read-timeout 30
This directive may also be adjusted in the server and location contexts, to be applied on a site by site or location by location basis. You will need to do this manually using an include.
STEP 4. INCREASE FASTCGI SEND TIMEOUTS
This sets a timeout for transmitting a request to the FastCGI server. The timeout is set only between two successive write operations, not for the transmission of the whole request. If the FastCGI server does not receive anything within this time, the connection is closed.
Directive: fastcgi_send_timeout
Config location: /etc/nginx/conf.d/fastcgi.conf
Context: http
Unit: Seconds
Default value: 60
Accepted value: Integer
gp stack nginx fastcgi -send-timeout {accepted.value}Example:
gp stack nginx fastcgi -send-timeout 30
This directive may also be adjusted in the server and location contexts, to be applied on a site by site or location by location basis. You will need to do this manually using an include.
Additional Recommendation: Slow Logging
If you’re not having an issue with an upload, then we would strongly recommend turning on both PHP and MySQL slow logging to uncover the source of your slow-running PHP requests and MySQL queries. These bottlenecks will affect your website’s overall performance, and once you know what they are, you can set about improving your codebase to decrease their burden or eliminate them.
You can see how to turn these on here:


